Not all customers who stop buying are lost: Create a re-engagement campaign and bring them back on board!

Scope

Brands regularly experience customers who, over time, become inactive and stop buying, often without a tangible reason.

This can mean a significant loss of business for a company, especially if it applies to a substantial number of customers. People who came into contact with the brand, and might have bought regularly in the past, but have recently and gradually moved away. Customers in whom the company has perhaps invested to establish a trusting relationship.

But whatever their reasons are, not all customers who are currently inactive can be regarded as permanently lost. Targeted re-engagement campaigns can readily be tailored to reawaken their interest.

The Contactlab Marketing Cloud platform is a highly effective way of identifying the right targets and undertaking activities to bring them back on board again.


How can the Contactlab Marketing Cloud help you?

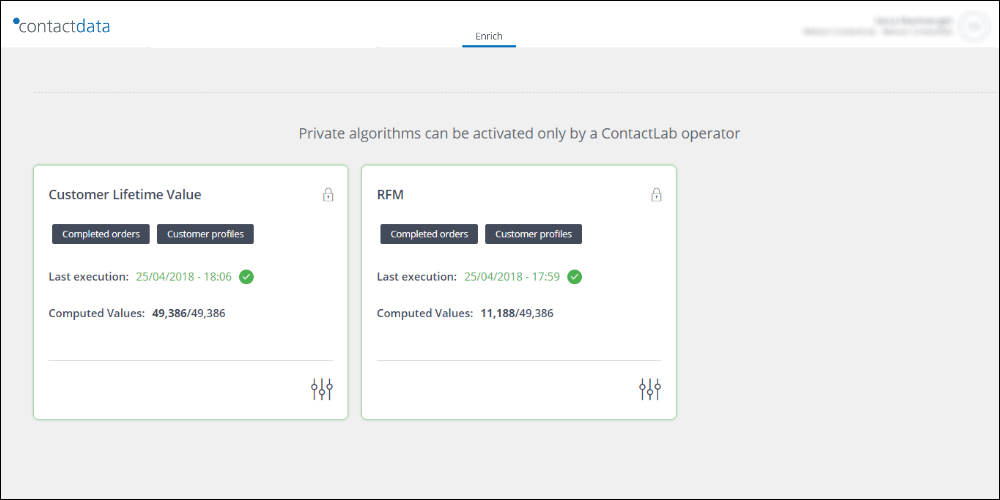
  1. Activate the Customer Lifetime Value (CLV) algorithm.
  2. Define the Customer Journey.
  3. Identify the inactive customers and start a campaign.
  4. Measure the results.
  1. Activate the Customer Lifetime Value (CLV) algorithm

With the help of the Customer Lifetime Value (CLV) algorithm, which our data analyst can activate for you in the Contactlab Marketing Cloud Data module, you can identify the cluster of inactive customers, or those at risk of being so in the near future. You can then determine the steps that are required to regain them. For example, by including the targets in a tailormade customer journey, or a personalized communications campaign, making each individual the focus of your re-engagement activities.

But remember, once the marketing activity is over, you need to measure the results to understand how many previously inactive customers started to buy once again, because of the campaign.

To start to re-engage customers, do the following:

  1. Access the platform and click Data.
    Here you can see the algorithm catalog available to you.
  2. Select the Customer Lifetime Value (CLV) panel, and do the following:
    1. Check the Scheduling frequency and adapt it to your needs, as required.
    2. Ask your usual contact at Contactlab to activate the algorithm.
  1. Define the customer journey

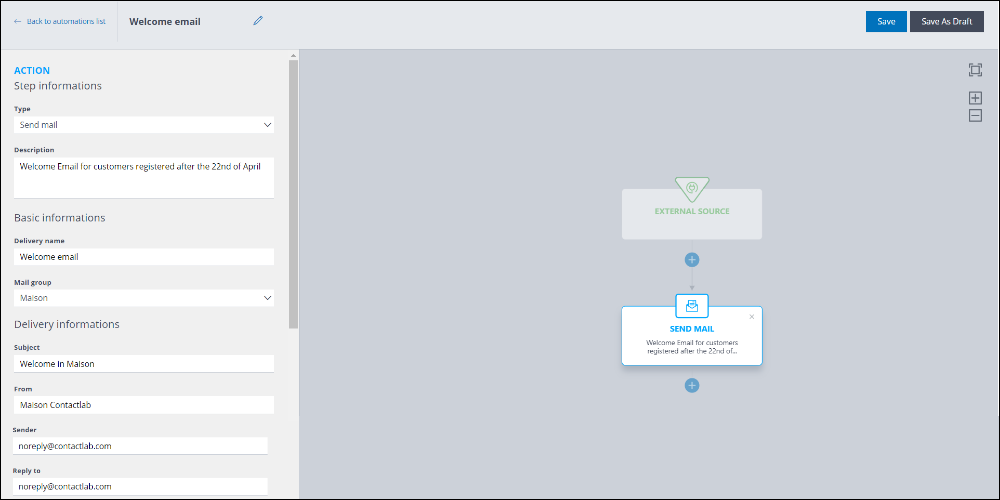
Now you need to create the communications automation the inactive customers will follow

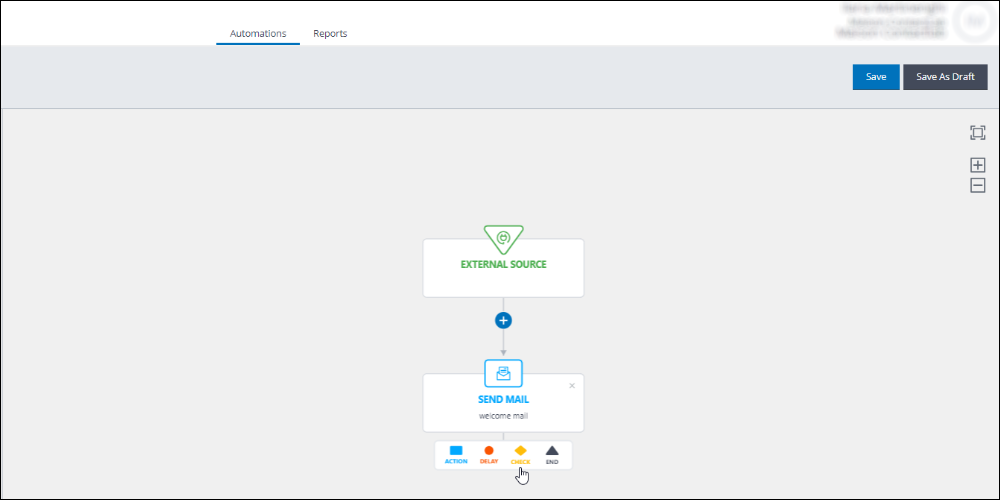
  1. Access the platform and click Flow.
  2. On the Automations tab, click Create new automation and ensure you select External as the source.
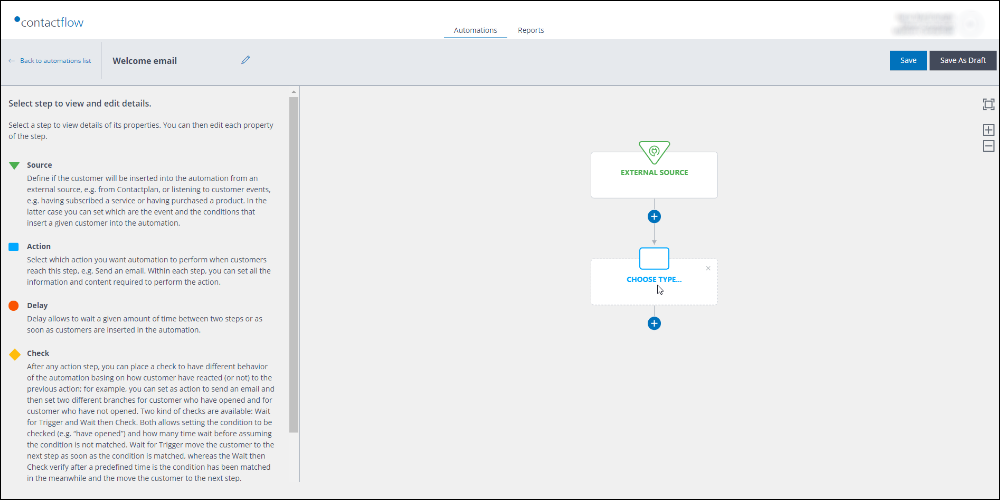
  3. Add, name and configure an initial email Action step.
    This may, for example, invite the contacts to come and visit you in-store, and offer them a discount coupon, if they click the appropriate link.
    Note:
    Flow enables you to use an email template created with PageBuilder, or insert HTML that you have generated with and external editor.
  4. Add a Check step to determine the communications path a contact will follow, according to how they react to the first email.
    In the Clicked path:

    1. Add an email Action to immediately send a thank you message and the discount coupon.
    2. Add a Delay step set to one week, then another email Action to remind the relevant contacts about the store visit.

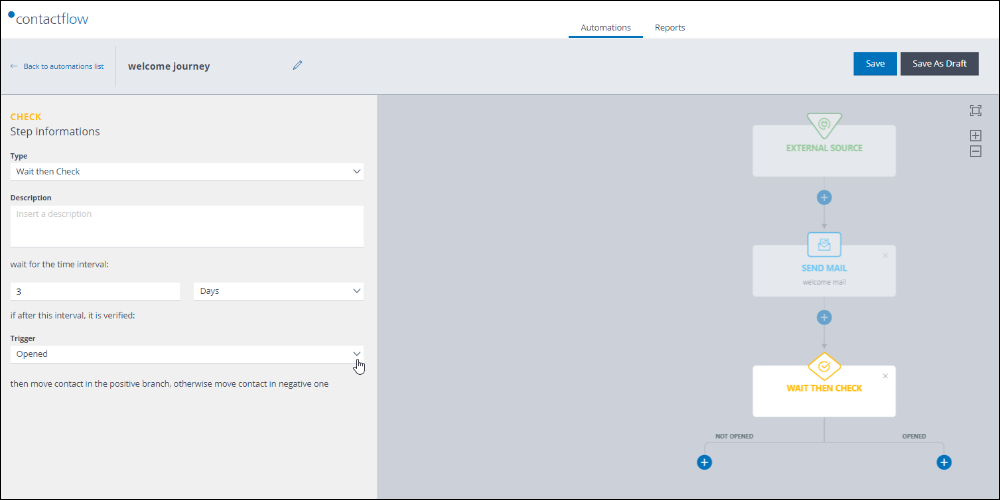
In the Not Clicked path:

  1. Add a Delay step set to a few days, and then an email Action to remind the customers about the store visit invitation and the discount.
  2. Add a Wait for Trigger Check step, set it to Clicked and add a time interval of 7 Days.
  3. In the Not Clicked path, add an End
    This ends the journey for those who have not clicked the discount link one week after the second email.

  1. Identify the inactive customers and start a campaign

Next, you need to create a segment, made up of the inactive customers who are to be inserted into the automation you have just defined, and which dynamically changes according to how the CLV-based cluster varies over time. Then you need to create a plan, to feed the appropriate contacts to the automation.

Note that all algorithms are optimized by our data analysts to suit your industry. The results will automatically be available in Plan, ready to use for segmentation.

  1. Access the platform  and click Plan.
  2. Click the Segments tab and create a new segment consisting of a new custom Insights rule.
    1. Under Algorithm, select Customer Lifetime Value.
    2. Under Actual Spending Cluster, select Equal to and inactive.
    3. When you are finished, click Add to save the rule, then Start new plan to immediately start defining the appropriate plan.

Note:
The algorithm time frame cannot be set manually while creating a segment, because it defined by the Contactlab data analyst when the algorithm is activated in Data. The time frame is usually set to one year, except for large-scale distributions.

  1. On the New plan page, ensure you do the following:
    1. Under When, select Repeated and define how long your re-engagement campaign should be active, with start and finish dates.
    2. Under Action > Consumer, select Send Contacts to an Automation.
    3. Under Action > Automation, select the name of the automation you have just created.
      This ensures that the segment you have defined is used as the source for your automation.

As a result, the segment that corresponds to the cluster of currently inactive customers who previously made a purchase, will be added to the automatic journey.

While the planned activity here is quite simple, it does serve to illustrate the considerable potential that the Contactlab Marketing Cloud platform makes available to you, by combining the processing power of an algorithm such as CLV with advanced behavior-based segmentation, a tailored and automatic journey, and a highly reliable delivery environment.

  1. Measure the results

Once you have completed your marketing activities, it is time to measure the results. The platform can also help you here. You can easily use Plan and the CLV algorithm to determine how many of the audience have either purchased something or remained in the inactive cluster.

To check how many contacts have become active again, do the following:

  1. Create a new segment in Plan, with a new custom Insights rule.
  2. Under Algorithm, select Customer Lifetime Value.
  3. Under Actual Spending Cluster, select Not equal to and inactive.
  4. Click +, positioned to the right of the Actual Spending Cluster field, and select Previous.
  5. Select Equal to and inactive, then click Add and Save.

The result is the Delta representing all the contacts who were previously inactive but have now purchased something. In this way, you can assess the effectiveness of your marketing initiative.

Now, it is up to you to maintain and enhance the re-established relationships with your contacts.

For more about the CLV, see the Data guide. For any questions or queries, contact our Customer Service.

Read more

Facebook: Select the data origin for your custom audiences in Send

Facebook’s recent policy changes have had an impact on customers who use the synchronization feature between custom audiences and our platform’s Send module.

When a custom audience is loaded or synchronized, Facebook now requires you to indicate the origin of the data. Specifically, whether the contact data that is being uploaded:

  • Was collected directly from the customers.
  • Came from third parties.
  • Originates from a combination of both of these sources.

Customers who synchronize their audiences using the Send integration feature can now specify the source of the data, either when creating a new audience, or while editing the settings of an existing one.

What you have to do if you use Send

Synchronizations created before August 15th, 2018

It is important to check every synchronization and, if not already defined, indicate the origin of the data. Please note that from October 1st,  2018, all custom audiences that do not have their origin specified, can no longer be used.

To specify the origin of an existing custom audience’s data, do the following:

  1. In the Send UI, click Configure > Integrations > Facebook, then select the Custom audience tab.
  2. Click the Details button, positioned to the right of each audience.
    The Custom audience detail page displays.

  1. Under Synchronization, use the Data origin drop-down menu to select the appropriate option.
  2. When you are finished, click Save to confirm your choice.


New synchronizations

The same Data origin drop-down menu is also available when you create a new custom audience synchronization.


For further information, see the Send Guide or contact our Customer Care.

Read more

Hub + PieSync = Many more opportunities for Hub!

Hub is now integrated with PieSync and as a result, has real-time access to all the contact data that is available in many other external cloud apps.

Thanks to PieSync, contacts from a large number of external systems can now be immediately available in Hub, eliminating the need to import and export the relevant data. The process is an automatic, two-way synchronization, every time you add or update a contact on your network.

integration

As a result, it is much easier for you to collect, store, update and consolidate customer data across all connected systems.

Set up is easy and does not require any downloads or installation, as everything is in the cloud. And you can easily avoid duplications, because the process matches contact email addresses during synchronization. Besides no longer needing to import or export contacts, there are many other tangible benefits from using this powerful integration. For example, you can share information throughout your team, save time and money, and reduce data errors that may otherwise result out of a manual sync.

Watch the video to see how easy is to start the integration and how useful it will be for your business.


What are you waiting for? Start enriching and empowering your Hub customer profiles by connecting them with the many cloud apps that are available through PieSync.

Review the long list of systems that can be integrated with Hub through PieSync, and start to enhance your business now.

Read more

Spam filters, spam words and how to test before delivery – Part 3

The problem of spam is very common and one of the biggest nightmares for communicators. However, there are many anti-spam techniques. This article focuses on content-based spam filters, as they can be useful when creating emails and help prevent potential filtering problems.

Spam filters: The environment

Many spam filters use message content analysis to determine whether the email design, content or certain visuals could be the source of undesirable messages.

Two of the most popular content-based spam filters are SpamAssassin and Cloudmark. They are automatically used by many email providers and employ complementary approaches. As a result, it is useful to know both.

deliverability

  • SpamAssassin

Uses a wide variety of techniques to eradicate spam messages from an inbox. One of these is a rule combination that looks for suspicious content and other spam indicators.
The process is based on the analysis of all received messages and the assignment of a total score, according to individual characteristics.
All messages with a score equal to or higher than 5 are generally regarded as spam. But as it is free and open software, every installation can be highly customized by, for example, making the filtering process more relaxed (by increasing the limit beyond 5) or more aggressive (by setting the score lower than 5).

Note:
You can verify the SpamAssassin score directly in Send, through the email creation tool.

  • Cloudmark

Cloudmark Inc. is a private company whose software protects against spam, viruses, phishing and other email and mobile messaging threats. The service is active for more than a billion customers of the biggest ISPs in the world, protecting 12% of global email accounts.
Cloudmark uses the inbox network of the ISP where it is installed, to create fingerprints of spam emails and define, as a result, the characteristics of similar messages, through a constant update process.To explain how Cloudmark works in simple terms, it could be said that it divides emails into distinct sections (header, body, footer, text, images, and so on) and then ‘learns and memorizes’ all the recurring elements of spam mails as characteristics of inappropriate messages, based on user reports.As a result, a message that wasn’t initially regarded as spam by Cloudmark, may later be filtered out if, for example, the particular campaign has been delivered using inappropriate contact lists.

 Note:

The Contactlab Deliverability Team (link con ancora giusto https://contactlab.com/it/offerta/digital-advisory/) has tools that can verify Cloudmark filters.

 How to reduce the risk of spam filters reacting to an email’s content 

  •  Clean HTML code

As with every language, HTML code has its own grammar rules, vocabulary and syntax. An HTML-based communication that breaks certain rules or includes typos can, as a result, be sent straight to the spam folder. For this reason, there are ‘validation’ processes that check whether a communication follows the rules. Validator.w3.org is one example of where you can check the quality of your HTML.

But unfortunately, validation can be a substantial challenge! In fact, it often results in a false-positive and, because if this, it would be almost impossible to completely validate a ‘modern’ email. However, we still recommend checking the test results, to have an indication of potential coding errors.

deliverability

  • A strong balance between images and text

Your goal should be to have a strong balance between text and images, according to what is appropriate for your business.
Use some text in the email body, to ensure your communication is clear, even if the images are not shown.

In addition, pay attention to the overall message size, and try not to exceed 20kb. The use of large images without text can alert spam filters. Historically, spammers used big images instead of text, so programs could not read the content.

  • Do not use URL shorteners

We recommend that you use shortening tools such as Bitly, tinyurl.com and so on, as little as possible, because spammers have deployed them a lot to hide their often already blacklisted and dangerous links. As a result, some anti-Spam filters have blacklisted the URL shortener domains, and their use can result in your emails being sent straight to the spam folder!

  • Avoid using plaintext URL links in text

HTML allows links to be inserted from any text to any URL. As a result, wrongdoers can hide dangerous links under apparently legitimate ones.

For this reason, you should only insert links as either ‘pure’ text or images, and NEVER as addresses in the www.URL.com format. Because link tracking (a very important marketing tool) rewrites your URLs, spam filters can pick up the inconsistency between the displayed link and the one used, then wrongly filter out your genuine emails!

  •  Use a visible unsubscribe opportunity

The ability to unsubscribe should always be present and visible, because if readers cannot easily do so, they will highlight your message as spam and damage your reputation. It preferable to lose a contact rather than being filtered!

  • Alternative text version

Emails can be sent as text, HTML or HTML with alternative text versions. It is good practice to always use an alternative text version to help avoid problems with anti-spam filtering. In fact, an alternative text version is important, as certain apps and email clients do not manage HTML, while some people simply prefer it, and block any HTML emails. However, the text version should be as consistent as possible with the HTML one.
In Send, you can auto-generate a text version by clicking the appropriate button.

deliverability

  • Spam Words

In the past, some words, known as ‘Spam Words’ were forbidden. They should still not be used if you want to avoid the risk of your emails being regarded as spam. There were also words that spammers bypassed with simple tricks, by writing, for example, the word ‘Viagra’ as ‘V1agra’.Ironically, an otherwise correct email with certain words in the content, could automatically be regarded as spam, while junk mail can be delivered to the inbox, just by disguising the hot words.Fortunately, anti-spam filters have evolved, and it is difficult for just a single word to result in a message being sent to the spam folder.

And, while it is still important nowadays to avoid text that could be considered as spam, this is not enough! Modern anti-spam systems use Bayesian filters to assess an email’s value, directly from a reader’s behavior.

Bayesian filters apply the Bayes theorem to email analysis, by which every event that has a probability can be valued according to events that have already taken place. In the case of anti-spam analysis, if an ‘N’ number of previously analyzed emails have been marked as spam by a reader, and they all contain a particular word, the filter deducts that the presence of the same term in the next email increases the probability it will also be spam.

In particular, you should:

  • Think of emails that increase interaction.
  • Test emails before the delivery.
  • Monitor your performance according to email domains.
  • Follow content best practice.

But, above all, you should use common sense when making any decisions about email copy and design. Put yourself in the recipient’s shoes and decide whether the message would be well received or regarded as undesirable.

And if you need professional help, feel free to get in touch with the Contactlab Delivery Team.

Read more

Flow in action: design automated journeys in just a few clicks

Establishing and keeping long-lasting relationships with customers is a daily challenge that every brand has to face. The Contactlab platform makes the Flow module available, which enables you to easily create automated and tailored customer journeys, thanks to an intuitive UI and the click and select design.

Read more

Be ready for the GDPR: Track your contacts’ consents

The GDPR countdown is almost over! But don’t worry, the Contactlab platform has all the tools you need to carry out the applicable measures and be up to date with the new European regulation.

The platform not only provides a highly secure information storage environment, it also enables you to dynamically manage your customers’ data, while ensuring it is under control and readily updatable.

All the collected data can easily be found in Hub, thanks to the individual customer profiles. Here, you can map and manage the consents of every single contact who is present in the platform, thanks to predefined propriety fields.

GDPR

If you click the Customers tab in the Hub UI menu, you have simple access to all the registered contacts. You can then select and modify each of them, with ready access to the Consents page, which is conveniently subdivided into easily-understandable sections. For more information about how to modify a contact read the appropriate guide page.

The first one relates to the disclaimer that has been read and accepted. It includes the date when the contact gave their consent, together with information about the relevant disclaimer version. All the remaining sections deal with individual required consents, such as:

  • Marketing
    • Traditional
      • Telephone
      • Paper
      • ……
    • Automatic
      • SMS
      • Email
      • ……
    • Profiling
      • Classic
      • Online
    • Soft Spam
      • Email
      • Paper
    • Third Party Transfer
      • Profiling
        • …..
      • Marketing
        • ……

There are also controls that enable you to select whether the following settings are active or not, for each individual consent:

  • Consent given (Status).
  • Consent Limitation requested.
  • Consent Objection.

GDPR

Once the consents have been defined, Hub records every change in a register, so you always have up-to-date and historical records available, in case, for example, of any dispute. Only users with a DPO role have access to this register. The aim is to track every change, while assuring complete customer data security, with regard to company data management.

Note:
Consents in the database can be modified automatically through the API. The UI can only be used to modify consents on an individual basis.

Thanks to this data management functionality, the Contactlab platform enables you to be ready for the GDPR.

For more about this new European legislation, read our article.

Read more

Are your communications effective? Ask your contacts!

Scope

Is your communication strategy the right one to achieve the desired goal? Will the subject you use awaken audience interest? In this tutorial, you will see how to answer these questions and send effective deliveries to your contacts, using A/B testing.

Later, you will learn about the elements and contents that enable you to write stimulating emails, which catch your audience’s attention.

But just what is an A/B test and how does it help you grow your business?

Procedure

The objective of an A/B test is to identify which of two versions of a communication attracts a more positive response. A small number of randomly selected contacts from your target audience are used as the test group. Version A of your communication is sent to half of the test group, while version B is sent to the rest.

After waiting an appropriate time, predefined criteria, such as openings or clicks, are analyzed for each version, to identify the most effective message. That message is then sent to the remaining contacts in your target audience.

In an environment where contacts receive multiple emails from different sources on a daily basis, it is important to understand which elements are most effective in encouraging someone to open a message, or to click a link inside. As a result, you will be able to hit your marketing and communications goals more readily.

Through A/B testing, you can be sure the message that is shown to deliver the best results is sent to the majority of your contacts. Randomly selecting the test group makes the process more objective and provides firm, measurable evidence about the effectiveness of your communications strategy. As a result, you can fine tune your marketing activities according to responses that come directly from your audience.

Configuring A/B test deliveries is simple, and you can choose from a wide range of message elements to evaluate, such as the communications objective, the sender, the call to action, the content, the visual design aspects and similar.

Contactsend enables you to create A/B test deliveries with just a few clicks:

  1. Sign in to the platform and select Contactsend.
  2. Click Create > Email campaign.
    A list of available email groups displays.
  3. Select the appropriate email group and click Create delivery.
    The Procedure selection page displays.
  4. Click create new a/b test.
    The Delivery parameters page displays.

create A/B Test

  1. Define the appropriate parameters such as the delivery title, the filter, the message format, whether to use dynamic text and/or attachments, and the opens and clicks tracking options.
    See the Contactsend Guide for more about creating a delivery.
    Note: a delivery title is mandatory for an A/B test and there should be at least 100 recipients.
  1. Click next.
    The A/B test parameters page displays. Do the following:

    1. Define different titles for the two deliveries, if required.
      An appealing title can actively encourage a recipient to open a message and is a very important part of a successful delivery.
    2. Decide upon the percentage of recipients that should be sent each test version and, as a result, the number who will receive the message that wins the test.
      Note: while reducing the number of test recipients increases the amount of contacts who will be available to receive the final message, the statistical significance of the test sample will be less.
    3. Select the Content variable that should be used to differentiate the two test messages. The options are:
      • Sender’s address.
      • Email subject.
      • Email content.
    4. Select the Winning criterion that is to be used to determine the test message for the final delivery.
      The automatic winning criterion can be:

      • The percentage opened.
      • The percentage of clicks.
      • The percentage of clicks over opens.You can also choose to manually select the winning message.

create A/B Test

  1. Enter the sender details, the email subject, the HTML content and the alternative plain text version, as appropriate.
    Note: the Content variable that you selected in the A/B test parameters page, determines where you can enter the relevant A and B versions. For example, if you selected Sender’s address, the A and B versions can be entered under Sender details, but if you selected Email subject, the A and B options will be available under that heading.
    The Preview panel enables you to review each of the configured messages.
  2. Once you have checked the messages, click next.
    The Test delivery page displays.

create A/B Test

  1. Configure and send a test delivery to up to 30 recipients, for one or both of the A/B test message versions, as required.
  2. When you are ready, click finish.
    Note: for A/B test deliveries, the contact list is immediately extracted from the database, once you click finish. This means the database will temporarily be locked (read-only mode) until both tests and the winning version are sent.
  3. In the Contactsend UI, click Communicate > Email deliveries > Ready.
    The relevant A/B test delivery appears in the list.
  4. Click the email subject to open the delivery details.
    You can choose to send the message immediately, or schedule the delivery as required.
  5. Decide how to send the winning message to the remaining audience members. You can send it:
    1. Automatically.
      Select how long the system should wait before sending the winning message.
      Note: allow enough time (more than just a few hours) to ensure that the test results are significant. If the time is too short, the feedback (clicks, openings and so on) that is used to choose the winning message, will be limited
    2. Manually.
      The system can inform you about the winning message, enabling you to deliver it as required.


You have now successfully configured an A/B test delivery. As a result, you can be sure you are sending your target audience the communication that is considered to be the most effective, helping you maximize business opportunities. This simple tool allows you to define two different communications with just a few clicks, resulting in valuable information about audience behavior and your communications strategy.

The next tutorial will discuss the elements and content that you should consider when creating clear, effective and original messages to attract your audience’s attention. You will also see how Contactsend can help you realize your objectives.


See the Contactsend Guide for more about A/B testing or contact our Customer Care.

Read more

Customize your contacts’ journeys according to their actions

Scope

In this tutorial, you will see how to insert a Check step into a Contactflow automation. As a result, you can determine which of two communication paths a customer’s journey automatically follows, according to whether they carry out the chosen activity or not, within a defined time frame.

Procedure

Contacts who, for example, receive the same email, can react in completely different ways. One person might leave the email unopened, another perhaps just reads it, while a third could click a link in the message, to view more details about a particular product. Contactflow enables you to simply and automatically manage these different behaviors and what happens next in each case, using Check steps.

As its name implies, a Check step checks to see if a preselected trigger event takes place. It then determines which of two separate and potentially completely different paths a contact should follow, according to whether they have performed the trigger or not, within a defined time frame.

For clarity, the paths are called YES and NO paths in this tutorial, although their actual names in the Flow UI are slightly different.

journey

There are two types of Check step:

  • Wait for Trigger.
    Pauses the automation only until the selected trigger event takes place. For example, the contact opens an email. If the event does not happen within a predefined time frame, the NO path is automatically followed.
  • Wait and Check.
    Pauses the automation for a predefined period, then checks to see whether the selected trigger event has taken place. If the event has not happened after the predefined time frame, the NO path is automatically followed.

A Check step should only be inserted in an automation immediately after the appropriate Action step to which the relevant trigger refers, such as Send mail.

You can configure the separate YES and NO paths as required and, for example, add further check steps to each, according to the actions it includes.

Note:
An individual Check step can only verify a single Opened or Clicked trigger event. If, for example, you want to manage contacts who do not open an email in a different way to those who read the message, and the people who click a link differently again, you will need to use at least two Check steps, each positioned in the appropriate path.

A step can be added to a new automation, or one that you want to edit. This example describes how to add a Wait and Check step, with an Opened trigger event, to an existing ‘Welcome email’ automation, available in the Draft tab of the My automations page.

To add a Check step, do the following:

  1. Sign in to the platform and select
    The My automations page displays.
  2. Click the Draft tab, followed by the ‘Welcome email’
    The relevant Automation configuration page displays.
  3. Under the ‘Welcome’ Send Mail action step, click the + icon , then click Check in the Steps selection
    A new Check step is added to the automation.

check journey

  1. Click the new step to display its configuration options in the Sidebar.
    1. Under Type, select Wait and Check.
    2. Enter a Description, if required.
    3. Under wait for the time interval, define how long the automation should wait before checking if the trigger event has taken place.
      For example, 3 Days.
    4. Under Trigger, select Opened.
      The Check step is configured to wait three days before checking whether the ‘Welcome’ email has been opened.

check journey flow

You can now continue to define the actions and other steps that should be carried out in each of the two resulting paths.

If, in the above example, the Wait for Trigger step is selected instead, the automation chooses the YES path as soon as the contact opens the email. If, after three days they have not performed the trigger event, the contact follows the NO path.

For more details, see the appropriate pages of the Contactflow Guide, or contact our Customer Care.

Read more

Send an email to your contacts by inserting them in an automated journey

Scope

In this tutorial, you will see how to create a Send email action step within a Contactflow automation.

As a result, you can define the communications that should automatically be sent to your contacts.

Procedure

Creating a Send email automation step is very simple to do. But being able to add different types of customizable communications to an automated journey, then send them to the appropriate contacts according to their behavior and needs, can be extremely useful to a brand.

To create a Send email step, do the following:

  1. Access the platform and complete all the initial automation creation steps and the Automation configuration page displays, which is subdivided into two panels:
    • The left Sidebar.
      When a step is added to an automation, all its configuration options are displayed here.
    • The Automation configuration
      The area where you create an automation by adding steps. It initially displays the External Source panel, which acts as the start point for a new automation.
  1. Under the External Source step, click the + icon.
    The Step selection panel displays, where you can choose the type of step you want to add.
  2. Click Action.
    A new action step is added to the automation.
  3. Click the new step to display its configuration options in the Sidebar.
    All the configuration fields must be completed to define the relevant action.
  4. Under Type, select, for example, Send mail.
    The name of the relevant action step in the Automation configuration panel is updated accordingly.

create email

  1. Enter a Description, if required.
    For example, ‘Welcome email’.
    Displays in the relevant action panel to make it easier to identify later.
  2. Under Basic Information:
    1. Enter a Delivery name.
    2. Select the Mail group that should be used for the delivery.
  3. Under Delivery Information, enter:
    1. The email Subject
    2. The appropriate From
      The name that will be displayed as the email sender.
    3. The Sender
    4. The appropriate Reply to
      Note:
      Depending upon the email group, certain fields may already be completed.

fill the fields

  1. Under Email template, click Edit template… to define the appropriate template.
    The Email template page displays.
    You have two options:
  • Use an HTML template previously created with the Contactlab PageBuilder editor.
  • Insert an externally created HTML.

Here, you can also see a Preview of the email.

  1. The Email template page also enables you to configure any delivery Labels.
    The dynamic field link tracking and management is automatically and directly carried out from Contactflow.

You have now completed the Send email action step and can go on to configure the remaining automation steps, as required.

For more details, see the appropriate pages of the Contactflow Guide, or contact our Customer Care.


Read more

Who are your top customers and who is going to drop off?

Scope

In this tutorial, you will learn how to calculate Recency, Frequency and Monetary (RFM) scores from the data and events stored in your customer profiles. RFM is one of the easiest and most effective algorithms that you can use for segmentation, enabling you to answer questions such as “Who are my best customers?” and “Who are the customers I can consider as lost?

About the RFM algorithm

The RFM algorithm enriches the customer profile with data and scores about their purchases:

  • Recency.
    How recent the last transaction was.
  • Frequency.
    How many times they have bought something.
  • Monetary
    The amount they have spent.

Calculating customer RFM scores can be important and very advantageous to a brand, because they enable promotional and engagement deliveries to be created, and retention strategies to be designed, according to customer activities and needs.

When calculating the RFM scores, the transactional data for every available contact in the database is taken into account, working back from the day the algorithm is run to N months before. Once the data has been processed, the algorithm assigns an RFM score to each customer.

This is a very important part of the process, as the Contactdata algorithm automatically uses calculated Recency, Frequency and Monetary thresholds to determine the customer scores, rather than fixed ones.

Often, this step is carried out by applying arbitrary threshold values to the data. For example, a rule could be defined that states the customer must have bought a product not longer than 10 days ago, to be assigned a high Recency value. But why choose 10 days and not 20? What determines the threshold choice?

However, the Contactdata implementation does not work with fixed thresholds. Instead, they are calculated automatically, according to the Recency, Frequency and Monetary value data distributions that are available in the database. This way, the thresholds that are used to create segments are automatically adjusted to ensure that the scores are valid for each type of business environment.

The parameters that are configured for each company include:

  • The Score Scale.
    The maximum available score.
  • The Time span.
    The length of time, expressed in months, during which data is to be taken into account.

Activating the algorithm enables the relevant data to be used in the calculations, with the results being available to:

  • Differentiate communications according to customer behavior and the relevant RFM scores.
  • Create retention strategies for customers who haven’t bought for a long time.
  • Create re-engagement strategies for high spending customers who haven’t bought recently.
  • Create up-sell deliveries for customers with moderate spending levels.

Example

The following example shows how the RFM algorithm works and demonstrates its usefulness to your business.

Consider a customer who last bought one year ago and spent €100. The algorithm compares the Recency = 1, Frequency = 1 and Monetary = €100 values with the entire database population, resulting in an RFM score of 111. This means the customer last bought a long time ago, only did so a few times and had a low spending level.

Conversely, a customer with an RFM score of 555 is someone who bought recently, does so often and generally spends quite a lot.

Procedure

To activate the RFM algorithm, do the following:

  1. Sign in to the platform and select Contactdata.
    The Enrich page displays.
  2. Select the appropriate Portfolio, Workspace and Node settings, as follows:
    1. Click the User information panel, positioned to the right in the Control bar, then click Settings.
      The Settings page displays.
    2. Under Portfolio, Workspace and/or Node, select the appropriate options from the drop-down lists.
    3. When you are finished, click Confirm.
      The Settings page closes and you are returned to the Enrich

The Enrich page includes a series of panels, which display the algorithms that are available for you to use.

  1. Scroll to the RFM algorithm panel, locate the Activation switch , and click it if required, to activate the algorithm.
    The switch is green when the algorithm is active. Otherwise, it is gray.

See the Contactdata Guide for more about using algorithm panels or contact our Customer Care.

Read more