
To add an Action step to an automation, do the following:
- Click ACTION in the Steps selection panel.
An action panel is added to the Automation configuration flow diagram, with the name Choose Type.
See Creating an automation for more about the Steps selection panel.
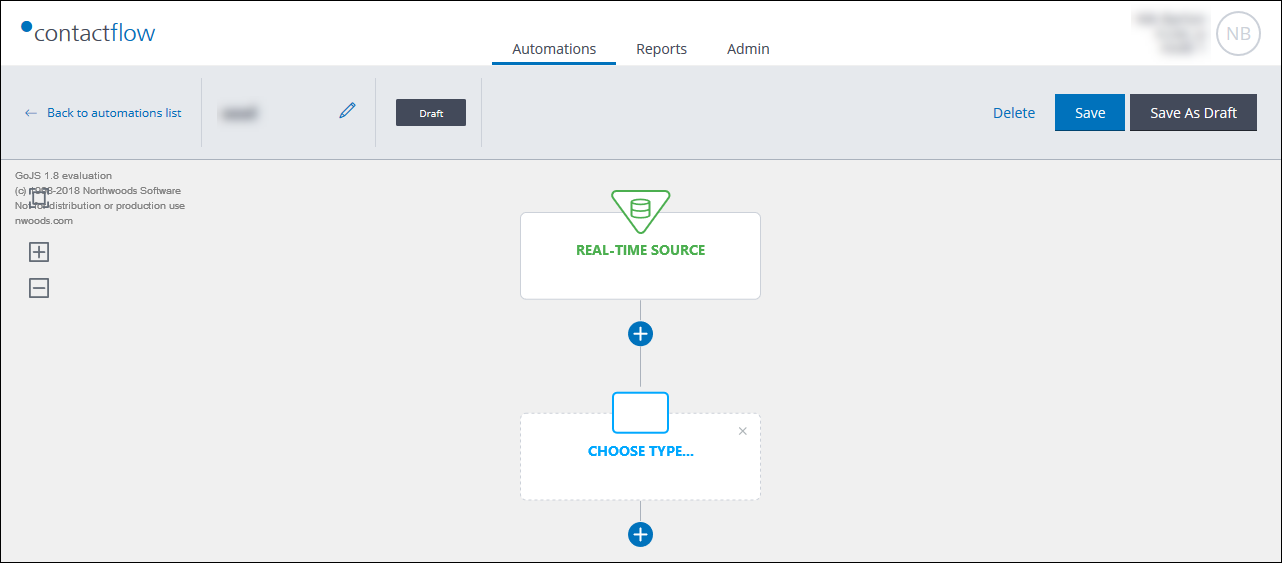
The action Choose Type panel
-
- Click the Choose Type panel.
The Action configuration options display in the Sidebar. - Under Type, select the required action:
- Send mail.
Enables you to configure an email delivery to the appropriate contacts. - SMS.
Enables you to configure an SMS delivery to the appropriate contacts. - Tag.
Enables you to add information to a customer event property or constant, or replace the current value with one that you define. You can tag the same customer property in more than one automation. - Webhook.
Enables you to notify a third-party system that a specific contact-related event has taken place, through an HTTP callback.
- Send mail.
- Click the Choose Type panel.
As soon as you select the action type, further configuration options display, and the name of the action panel in the automation diagram is updated accordingly.
Send mail configuration options
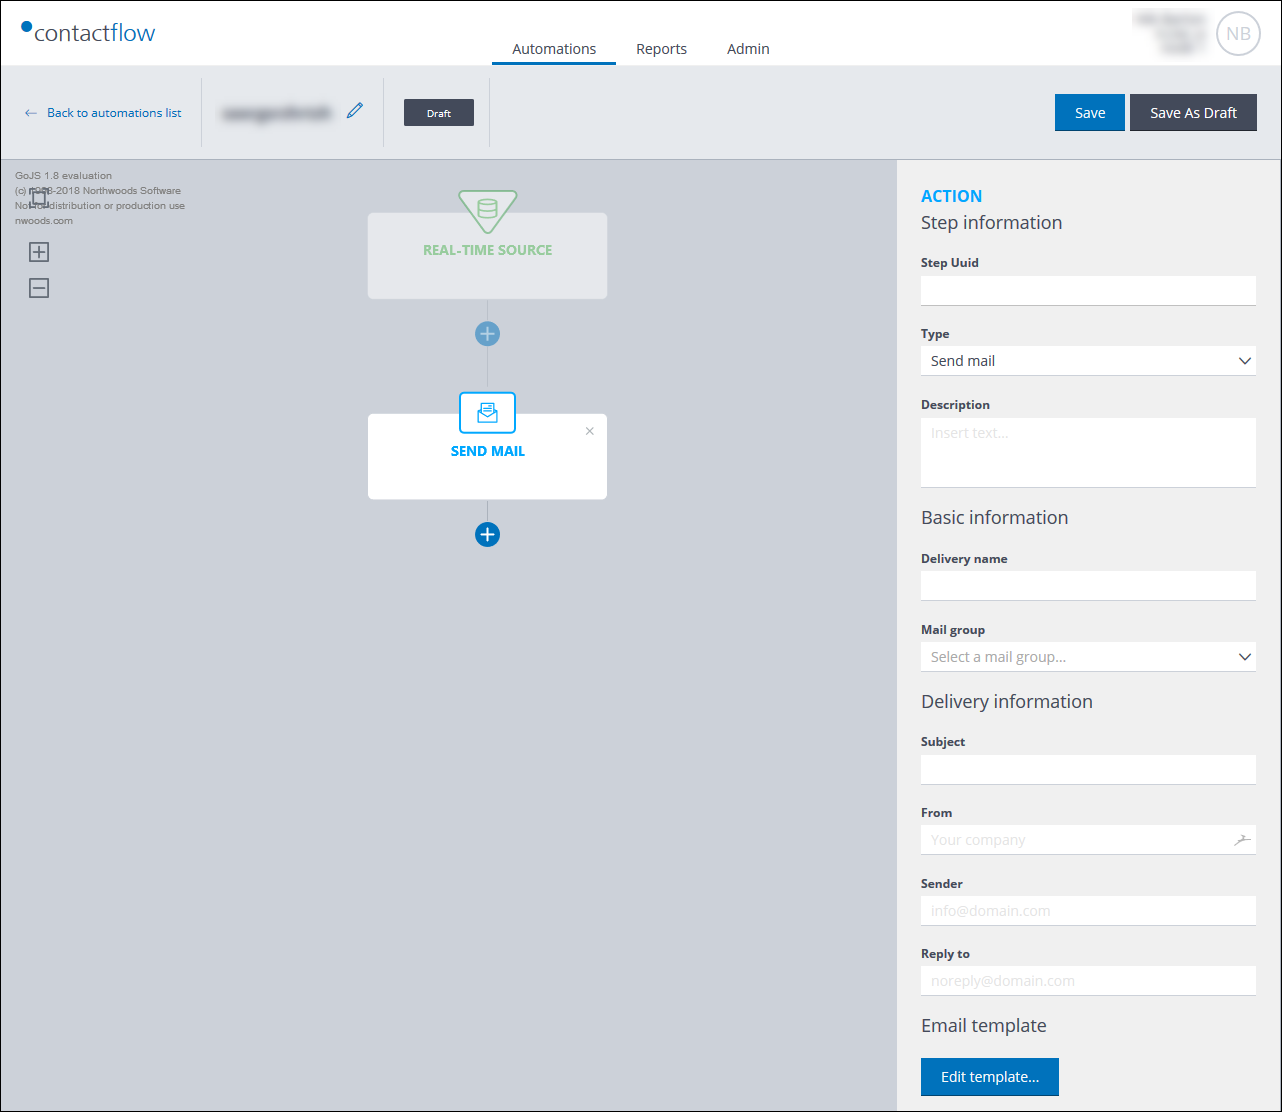
Example of the Send mail configuration options
If you select Send mail, do the following:
- Enter a Description, if required.
- Under Basic information, do the following:
- Enter a Delivery name.
- Under Mail group, select the appropriate Contactsend mail group from the drop-down list.
- Under Delivery information, do the following:
- Enter a Subject for the delivery, if it is not already predefined in the selected mail group.
- Enter the From, Sender and Reply to details in the appropriate fields, if they are not already predefined in the selected mail group.
- Under Email template, click Edit template….
The Email template page displays. - Do one of the following to add your message to the delivery:
- If you want to use a message created in PageBuilder:
- Click From PageBuilder, if it is not already selected.
The available PageBuilder folders display. - Select the appropriate message from the relevant folder.
or:
- Click From PageBuilder, if it is not already selected.
- If you want to use Email Designer to create your message:
- Click From Email Designer, followed by Use Email Designer.
The Email Designer Templates page displays. - Click Start from scratch, if you want to create a new template.
or: - Select the template you want to use as the basis for your email, from the appropriate repository.
- Continue to create your email.
See the Send guide for full details about how to use Email Designer. - When you are finished, save your work as a template.
Any template you create is saved in the My Templates repository. - Reopen the saved template in Email Designer, and click Export HTML.
The relevant HTML displays in the HTML tab.
Note:
You can click Export HTML without first saving your work, but this is not recommended, as it will no longer be available for any further editing later.
- Click From Email Designer, followed by Use Email Designer.
- If you want to use an HTML message created using a different method:
- Click HTML.
- Copy and paste your message into the box provided.
Note:
This box is only a receptacle for your HTML. It is not a full HTML editor. Use an HTML editor of your choice to create your message body. - On the HTML tab, under Alternative text, enter the alternative text for the delivery in the box provided, if required.
- If you want to use a message created in PageBuilder:
- Click Preview to view your message as it will be sent, if required.
- Click Labels and enter the appropriate label Key and Value pair, if required.
Further label pairs can be added by clicking the + icon, positioned to the right of the last Key and Value pair in the list. - To close the Email template page, click the X icon, positioned in the top right corner.
The Send mail configuration is complete.
SMS configuration options
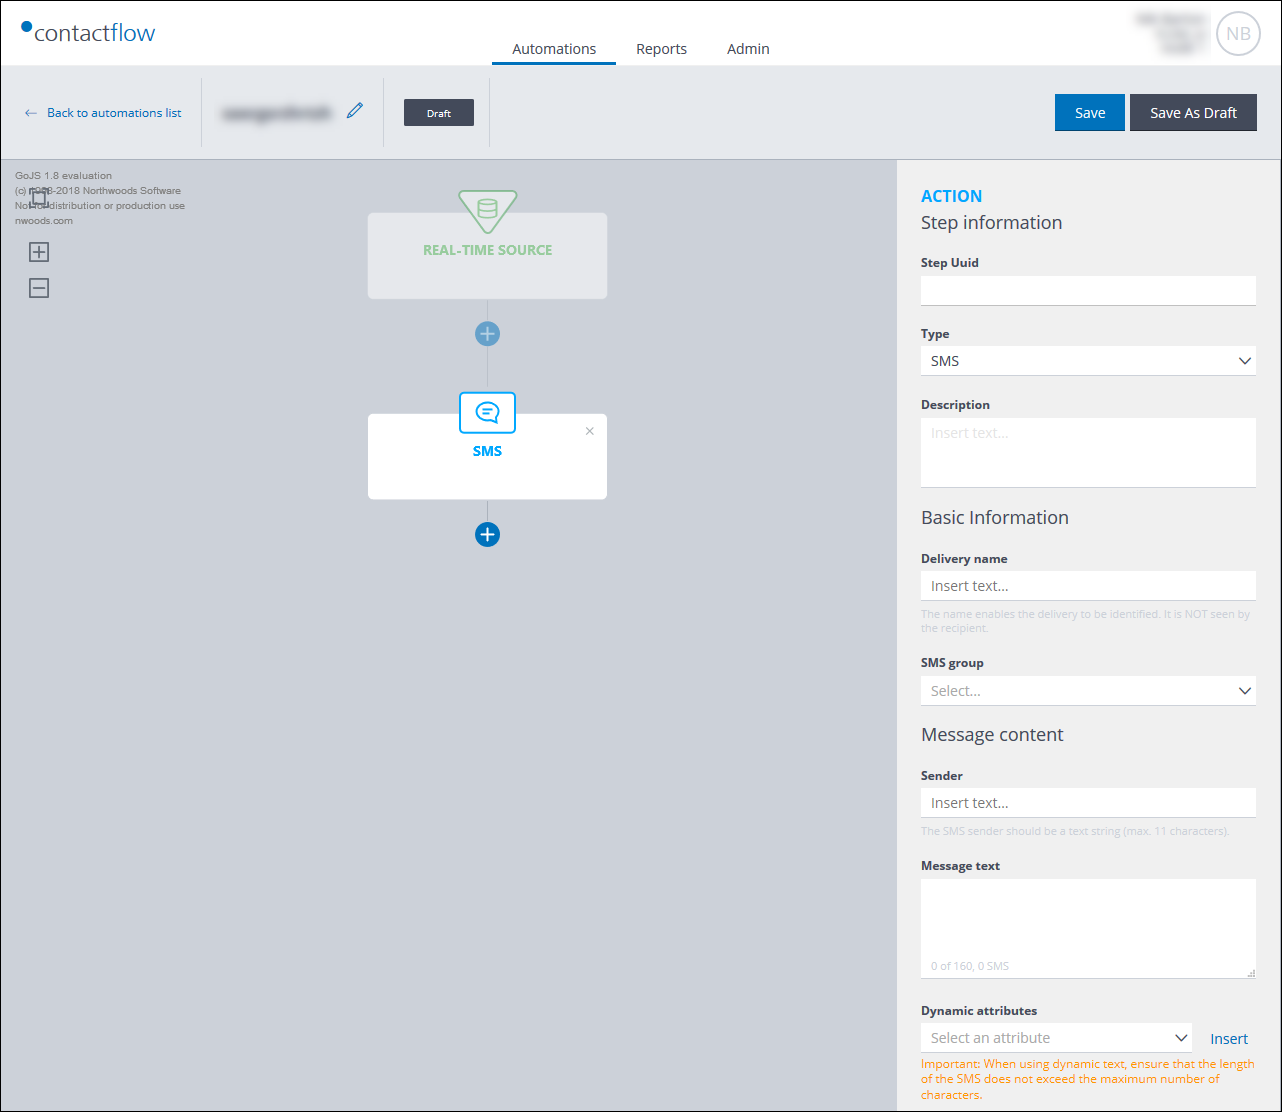
Example of the SMS configuration options
If you select SMS, do the following:
- Enter a Description, if required.
- Under Basic information, do the following:
- Enter a Delivery name.
This enables the delivery to be identified. It is not seen by the recipient. - Under SMS group, select the appropriate Contactsend SMS group from the drop-down list.
- Enter a Delivery name.
- Under Message content, do the following:
- Enter the Sender details.
A text string up to 11 characters. - Enter the Text of the message.
The number of characters entered, the maximum number of characters and the number of SMS messages created, displays at the bottom of the Message text box.
- Enter the Sender details.
- Under Dynamic attributes, do the following, if required:
- Select a message attribute to add to the SMS, from the drop-down list.
An attribute represents the content of a specific field in the relevant database. For example, the contact’s first name. - Click the appropriate point in the SMS message, then click Insert.
The attribute is added to the text.
Note:
You must ensure that when dynamic text is used, the SMS does not exceed the maximum number of characters, which is shown at the bottom of the Message text box.
- Select a message attribute to add to the SMS, from the drop-down list.
- Add further attributes, if required.
The SMS configuration is complete.
Tag configuration options
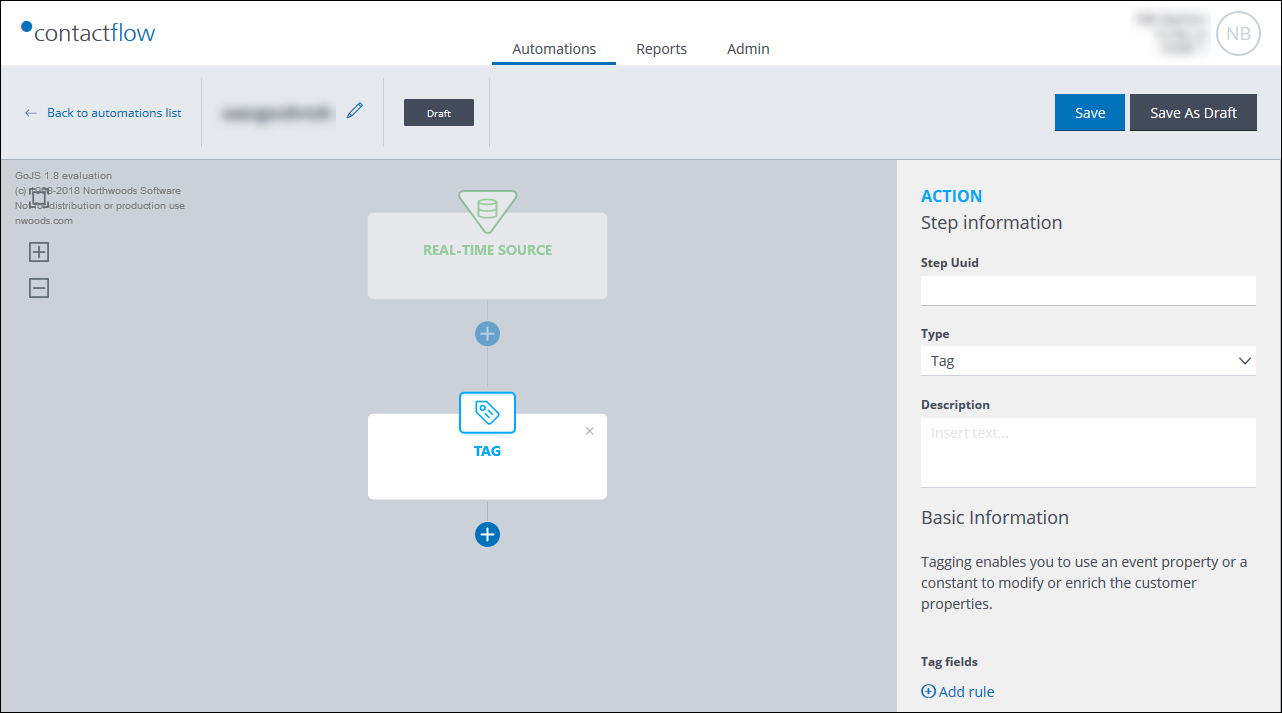
Example of the Tag configuration options
If you select Tag, do the following:
- Enter a Description, if required.
- Under Basic information > Tag fields, click + Add rule.
The Select customer property… field displays. - Select the appropriate property from the drop-down list.
The Select action to perform… field displays.
Note:
The options that are available in the next step vary according to the property you select. - Select the required action, such as:
- Concatenate with the value.
Combines the value you define with the existing information.
or: - Replace with the value.
Replaces the existing information with the value you define.
or: - Append the value.
Adds the value you define to the end of the existing information.
- Concatenate with the value.
- Under Insert text…, enter the appropriate value.
- Add further rules, if required.
The Tag configuration is complete.
Webhook configuration options
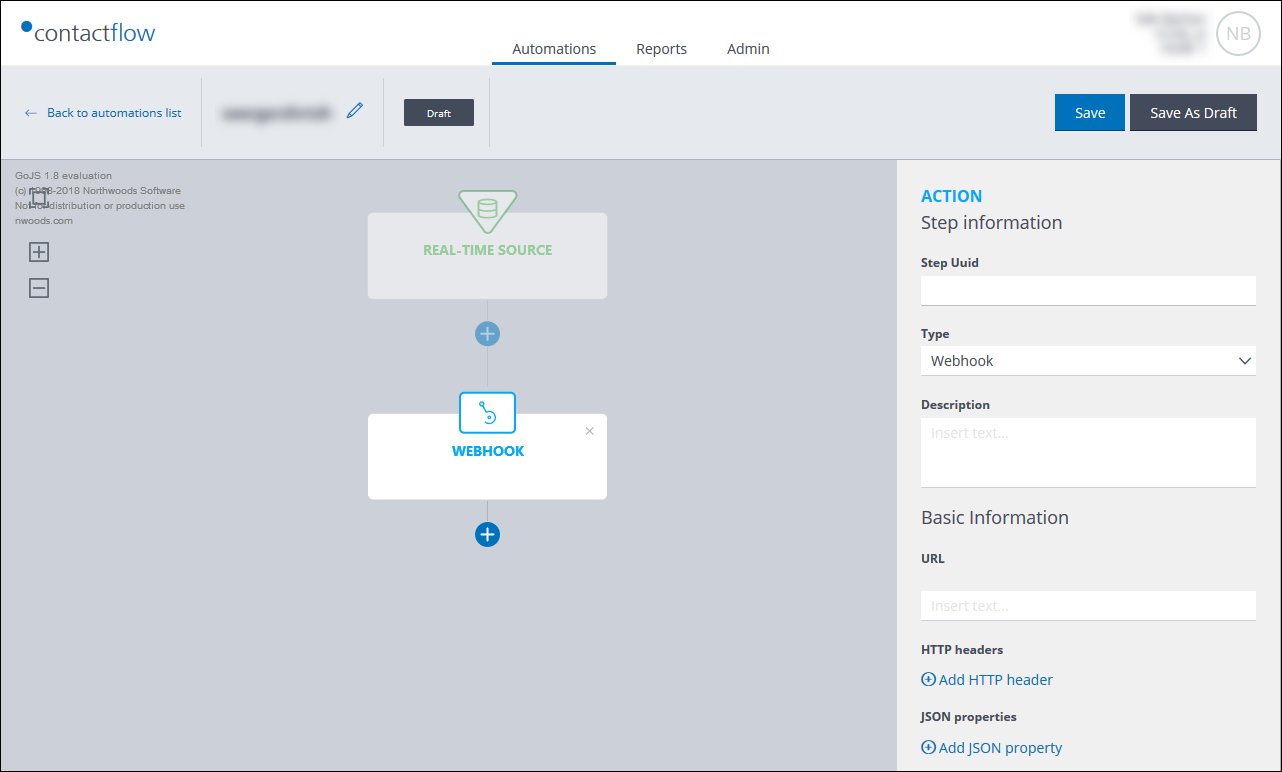
Example of the Webhook configuration options
If you select Webhook, do the following:
- Enter a Description, if required.
- Under Basic information, do the following:
- Enter the URL to which the HTTP request should be sent.
- Under HTTP headers and JSON properties, click + Add HTTP header and/or + Add JSON property if required, and enter the appropriate key/s and value/s.
- Click + Add HTTP header and/or + Add JSON property, to add further key and value pairs as required.
The Webhook configuration is complete.
When you have finished defining the Action step, continue to add further steps to the automation, as required:
If you have finished defining the automation, follow the steps given under Completing the automation.
Also see:
Previous page: Configuring a Real-time Source | Next page: Adding a Check step