The month of August has brought us interesting news for our email editor. New features that enhance Email Designer and make it more and more the ideal tool for the creation of your email marketing campaigns.
What can you do with these releases?
Side bar
You can now hide the side bar that offers all the tools you need to design and edit your template. Especially when you are working on smaller screens or on html with larger widths, it is now possible to increase the visible area for a better editing experience.
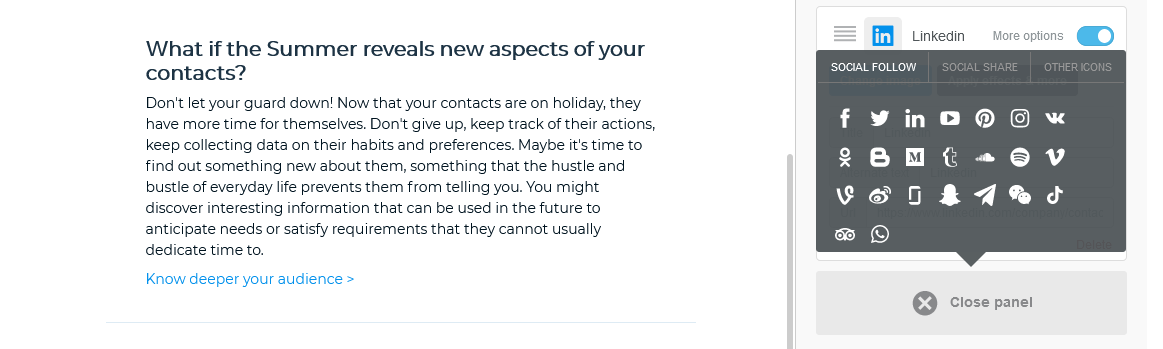
Social Icons
Now including TikTok, Whatsapp and Tripadvisor. More possibilities to connect with your contacts in a few quick steps on all the communication channels they use.
What does it mean?
Enhance your experience as a Marketing Cloud user.
Find all available features without missing any.
Save time and focus on activities of greater value to your business.
Stay in touch with your customers on all channels, including social, that they use on a daily basis.
Leverage all possible modes of interaction to maximise your sales.
Call us and find out why our competitors are talking about us The human touch is our treasure, our experts who, thanks to their long-standing presence in the market, the skills they have brought home over time and their continuous training, enable the availability of cutting-edge technology and enhance the qualities and…
New features for the email template editor! New features for Email Designers that will make your emails even more appealing and attractive with new value elements that will provide your customers with additional opportunities to interact with your brand.
Welcome Email Designer: Building emails in the platform has never been so easy A new email content editor is being added to the Contactlab Marketing Cloud, enriching its already impressive capabilities even further. Email Designer is built to make the already straightforward editing experience of our customers even easier and to further enhance…
As of March 16th, 2021, a new version of Email Designer, the platform’s drag & drop email editor, is available.
One of the aspects that set Email Designer apart is its ease of use. Anyone can easily create emails that are perfectly viewable on any device. This release further strengthens this feature of the editor.
What can you do with this release?
You can preview your emails while remaining in the current work session. In fact, two new icons have been added in the upper left corner of the screen that allow you to move from the mobile version to the desktop version without leaving the workspace or switching to preview mode. In addition, you continue to work on the selected version even if you change the mode.
In this way you can check in real-time the result of each of your changes and this brings great benefits:
Template creation operations become easier.
The process is streamlined.
Time is reduced.
The possibility of errors decreases.
Although you can change the view, you are still working on a single template and it is not two separate versions of the template. Unless you decide to hide one or more pieces of content in either desktop or mobile mode, all changes made in one view will be reflected in the other.
What it means
You can switch from desktop to mobile view in one click, continue to design your content and really understand how your email looks on different devices without having to leave the screen to access the preview.
The real value of this action is fully understood when you activate the mobile email optimization features on the template:
Hide the content of a block (also available for desktop) to diversify the content proposed on a specific device.
Don’t stack columns of a particular row on mobile, which then looks the same as the version designed for desktop.
Reverse the stacking of the columns of a row on mobile devices which then appear in reverse order, i.e. from the rightmost to the leftmost.
About Hide the content of a block. If the setting is active, next to the icons of the mobile and desktop versions, a new one appears indicating the use of the feature for the block you are working on. For example, let’s think about the case you have chosen to hide some images for mobile to prevent the scroll of your email from becoming too long. You can still see the image blocks in the mobile view and you can identify them on the fly because the block is blurred and the icon appears when you highlight them.
All without writing a line of code. Choose Email Designer, optimize task management and maximize results.
Email Designer in action Email Designer is the new editor that, thanks to its intuitive drag & drop interface and many other features, makes it fast and easy to create beautiful, personalized and responsive design compliant emails. Watch the video and discover how to…
New features for the email template editor! New features for Email Designers that will make your emails even more appealing and attractive with new value elements that will provide your customers with additional opportunities to interact with your brand.
From March, 4th 2021, it’s available a new version of Email Designer, the platform drag & drop email editor.
What can you do with this release?
With this release you can streamline and simplify your email creation operations and increase the level of content customization when using Email Designer.
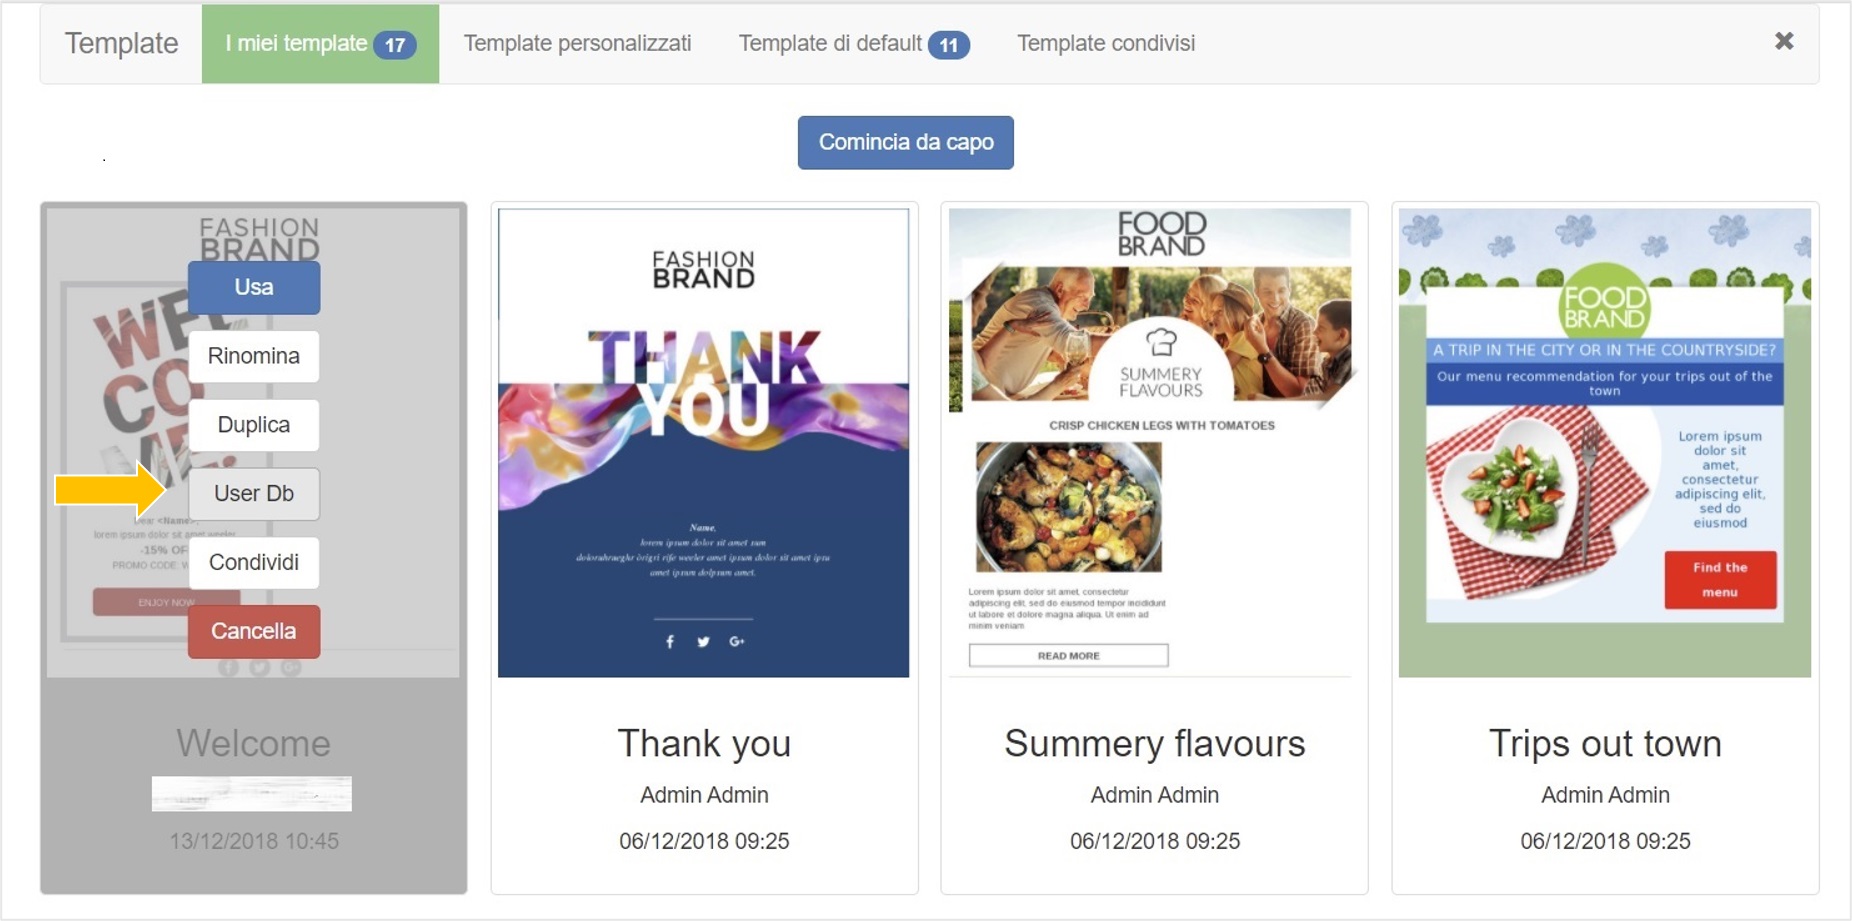
You can now make the display of each row of the template dependent on the values of the fields in the User Db for each recipient.
You can decide which fields to make visible and to which contacts, based on the specific conditions you set when building your emails. In this way, you can differentiate what your target audience will see in their communications.
By associating specific filters to the rows that express the conditions on the values assumed by selected fields of the User Db associated with the template, the row is displayed or not in the email sent. You can also get a preview!
Associating a User Db to a template can be done explicitly within the Email Designer template management panel,
or implicitly and contextually to the creation of a delivery, through the usual association of the delivery to a specific email group.
Keep in mind that if you duplicate a template that is already associated to a User Db, the link remains also in the duplicate. If you decide instead to share it with your eventual sub-companies, the template at their disposal loses the association.
How do the conditions shape up?
We said… a specific row of the template and its elements are visible depending on the presence of a filter on the row and the contextual occurrence of the conditions associated with it.
Let’s see an example. Let’s imagine we are a clothing brand and we want to reserve a special discount only to our Italian customers, using the image of a female dress for all women and a male one for men, keeping all other components of our email unchanged.
With the introduction of this feature, we can create a row by inserting the image for the woman and the filter for that row to be visible only to women. We can then, for example, duplicate the row, modify the associated filter to make it visible only to men, and change the image. Watch the video.
It’s an example and it’s very simple but it immediately shows how fast and intuitive the new feature is and how it allows to streamline operations and customize the result. With just one template we can get differentiated emails in content according to the targets we want to reach.
What it means
Having important information available in the User Db, thanks to its association with the template, you can use filters and customize messages obtaining multiple benefits. On the one hand, you can improve your customers’ experience with content that is tailored to their needs and that makes them feel like they are the center of your attention. On the other hand, you can optimize your operations by automating processes that you would otherwise have had to manage manually and create more than one campaign.
Choose Email Designer, optimize task management and maximize results.
Email Designer in action Email Designer is the new editor that, thanks to its intuitive drag & drop interface and many other features, makes it fast and easy to create beautiful, personalized and responsive design compliant emails. Watch the video and discover how to…
Creating an email delivery with Send and Email Designer is as simple as 1, 2, 3… Our new content editor Email Designer is perfectly integrated in the Send module interface and workflows. In this tutorial we show you how to use the editor together with Send to easily create effective and personalized email campaigns to reach…
Send an email to your contacts by inserting them in an automated journey Creating a Send email automation step is very simple to do. But being able to add different types of customizable communications to an automated journey, then send them to the appropriate contacts according to their behavior and needs, can be…
On desktop and mobile devices and for different mail and web clients?
In the next few days the latest web clients will be added to the long list of existing systems on which you have the possibility to preview in real time the email you are drawing. Exactly as your customers will see it!
You can do it directly in Send with a simple click, using the Instant Preview feature, without exiting the application to open and use an external tool. You can find the feature inside the wizard to create your delivery, accessible through a grey button.
If the display doesn’t work correctly and there are changes to make, you can do them immediately in Send by requesting the generation of a new preview to check the result. The thumbnails of the email, open on different clients, are ready in a few seconds. You can also refine the request by filtering by client or by choosing a specific device or operating system in the drop-down menu.
By clicking on the desired thumbnail, the preview of the message is enlarged to its actual size. You can also get the horizontal view reproduced when the mobile device is rotated!
The new features introduced allow you to get previews for Outlook, Office 365, Gmail, AOL, Google Gapps and Comcast web clients on Edge, Firefox and Chrome.
And that’s not all: for the Outlook web client, the preview in Dark Mode has also been introduced, that is increasingly used by your customers.
If you still don’t use this feature, you can already try it directly in Send without requiring activation. In fact, every company has ten free previews available. Once they are sold out, you can decide whether to subscribe to the service and continue using it. For more information, contact your Contactlab representative or Customer Service.
Rendering in real time available for iPhoneX and iOS11 The new real-time rendering feature that Contactlab made recently available gets richer: in Contactsend it now possible to visualize the preview also for iPhone X and Outlook for iOS 11, promptly according to market opportunities. This is another example about how…
Creating an email delivery with Send and Email Designer is as simple as 1, 2, 3… Our new content editor Email Designer is perfectly integrated in the Send module interface and workflows. In this tutorial we show you how to use the editor together with Send to easily create effective and personalized email campaigns to reach…
An email’s HTML. Specifications and advice. Part 2 The Contactlab Marketing Cloud provides all the tools you need to manage automatic email communication plans, then engage with just the right contacts, in the most appropriate way, through personalized messages that are tailored to the individual needs and wishes…
Here it is… A quick preview of what the platform will be able to offer, thanks to the new interface:
A tailor-made workspace.
A fresh and modern design characterized by ease of use and intuitiveness.
Increased integration between the various features.
Better navigation between the platform modules.
Watch the video and discover a few of the many benefits that will be available to platform users, while they navigate around the Contactlab Marketing Cloud!
What’s next: A re-energized interface, purpose-designed to enhance… To ensure that we stay one step ahead of your future needs, the Contactlab Marketing Cloud will soon be available through a new user interface. A tailor-made workplace that both complements the integration of a wealth of features and enables…
At Contactlab, the new star shines on and on… Platform innovations… 2019 has continued where 2018 left off, with Contactlab's new and innovative Marketing Cloud. Now, we can say that without doubt, the highlight of the first half of this year has been the release of several new, powerful and feature-rich…
Contactlab Marketing Cloud provides a powerful and very capable platform that helps you tangibly enhance your customer interactions, increase their value significantly, and successfully influence purchases again and again. It supports you through every stage of the customer life cycle, helping you convert contacts into valuable customers, boost loyalty, and develop long term relationships while reducing churn.
Spend the next couple of minutes watching the demo video and start to get a taste for how much we can do together…
Then contact our Customer Care for the complete picture.
Enhance customer interactions with the help of Artificial Intelligence On stage at the Contactlab Conference 2018 we started from two personal experiences as customers to talk about the world of data, and the importance of being able to collect and elaborate upon it and how the Contactlab Marketing Cloud platform can help…
Presenting the Contactlab Marketing Cloud: The platform that transforms… At the Contactlab Conference 2018, the new Contactlab Marketing Cloud, the digital marketing platform that firmly focuses on engagement intelligence, was presented. All this is possible thanks to combining artificial intelligence with the tangible added value of a human touch
Marketing Automation and new Intelligence increase the value of the… Enrich your contact profiles with new information and create automated journeys: request a demo of Contactflow and Contactdata immediately. Ensuring that customers have enjoyable and unforgettable experiences, is the goal of every brand. But to do so, it is vital that…
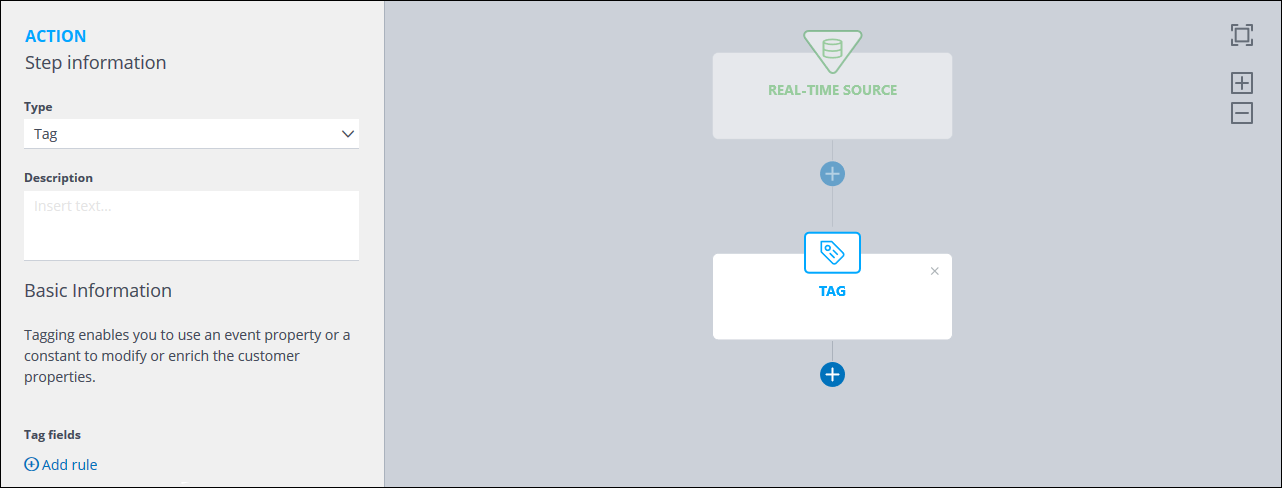
A new Flow version that brings additional features to the module is available from April 29th, 2019.
What does this release help you do?
The new Tagaction step lets you add information to a customer property, or replace the current value with one that you define.
How?
In a similar way to other Action steps, click ACTION in the Steps selection panel, then select Tag as the Type from the drop-down list.
Enter a Description, if required, then under Tag fields:
Click Add rule and select the appropriate property from the drop-down list. Note:
The options that are available in the next step vary according to the property you select.
Select the required action, such as:
Concatenate with the value.
Combines the value you define with the existing information.
or:
Replace with the value.
Replaces the existing information with the value you define.
or:
Append the value.
Adds the value you define to the end of the existing information.
Under Insert text…, enter the appropriate value.
Add further rules, if required.
Take a look at this short video for more details.
What does this mean?
This new functionality is particularly useful when you want to add easily recoverable information to a customer’s records, increase a counter, or replace existing data.
Do you want to automatically add women who have just viewed a bag on your… In this tutorial, we will learn how simple it is to immediately and automatically add contacts to a Flow automation, as soon as they conform with the event condition/s you have defined. For example, add each woman to an automation,…
A new Flow version is available from April 12th, 2019, and it includes some new features that enhance the module.
What does this release enable you to do?
You can quickly select the required event or rule condition as you create automation steps.
When you configure a real-time source, or select an event or rule condition elsewhere in Flow, you can choose the event from a drop-down list. But now, you can locate the required entry far more quickly and easily, using the auto-select functionality.
How?
Navigate to the appropriate Flow page.
For example, Real-time source.
Under Event, Event rules or Demographic rules, start to type part of the name of the required selection.
It doesn’t have to be the beginning of the name, you can type any letters that it includes, as long as they are in sequence.
When you type, the content of the drop-down list changes to match what you have entered, as you can see in this short video. Note:
The event, rule conditions and similar fields are not case sensitive.
Select the required entry from the list.
What does this mean?
This new functionality is particularly useful when there is a long list of events or rule conditions.
Do you want to automatically add women who have just viewed a bag on your… In this tutorial, we will learn how simple it is to immediately and automatically add contacts to a Flow automation, as soon as they conform with the event condition/s you have defined. For example, add each woman to an automation,…
Thank customers for their purchases, automatically promote your range, and… Your customers have responded well to your latest promotion, buying products from your new range as a result, but where to now? Learn how to easily build multi-option journeys, to reach each customer with messages tailored to their interests, through…
Are your contacts more attracted by an adventure weekend, or by realizing their dream of traveling round the world? Which of two newsletters has influenced your sales the most?
You decide to dedicate two of your monthly newsletters to different types of travel. The first promotes all-inclusive adventure weekend packages, while the second focuses on a journey that dreams are made of… the trip most people wait a lifetime for. But which captured your contacts attention the most, and had the greatest impact on travel sales?
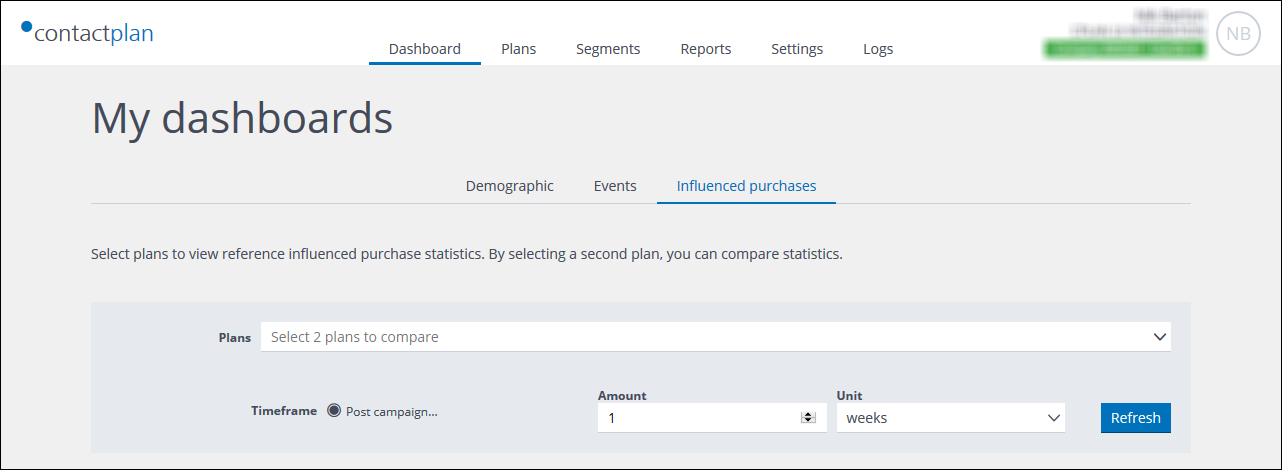
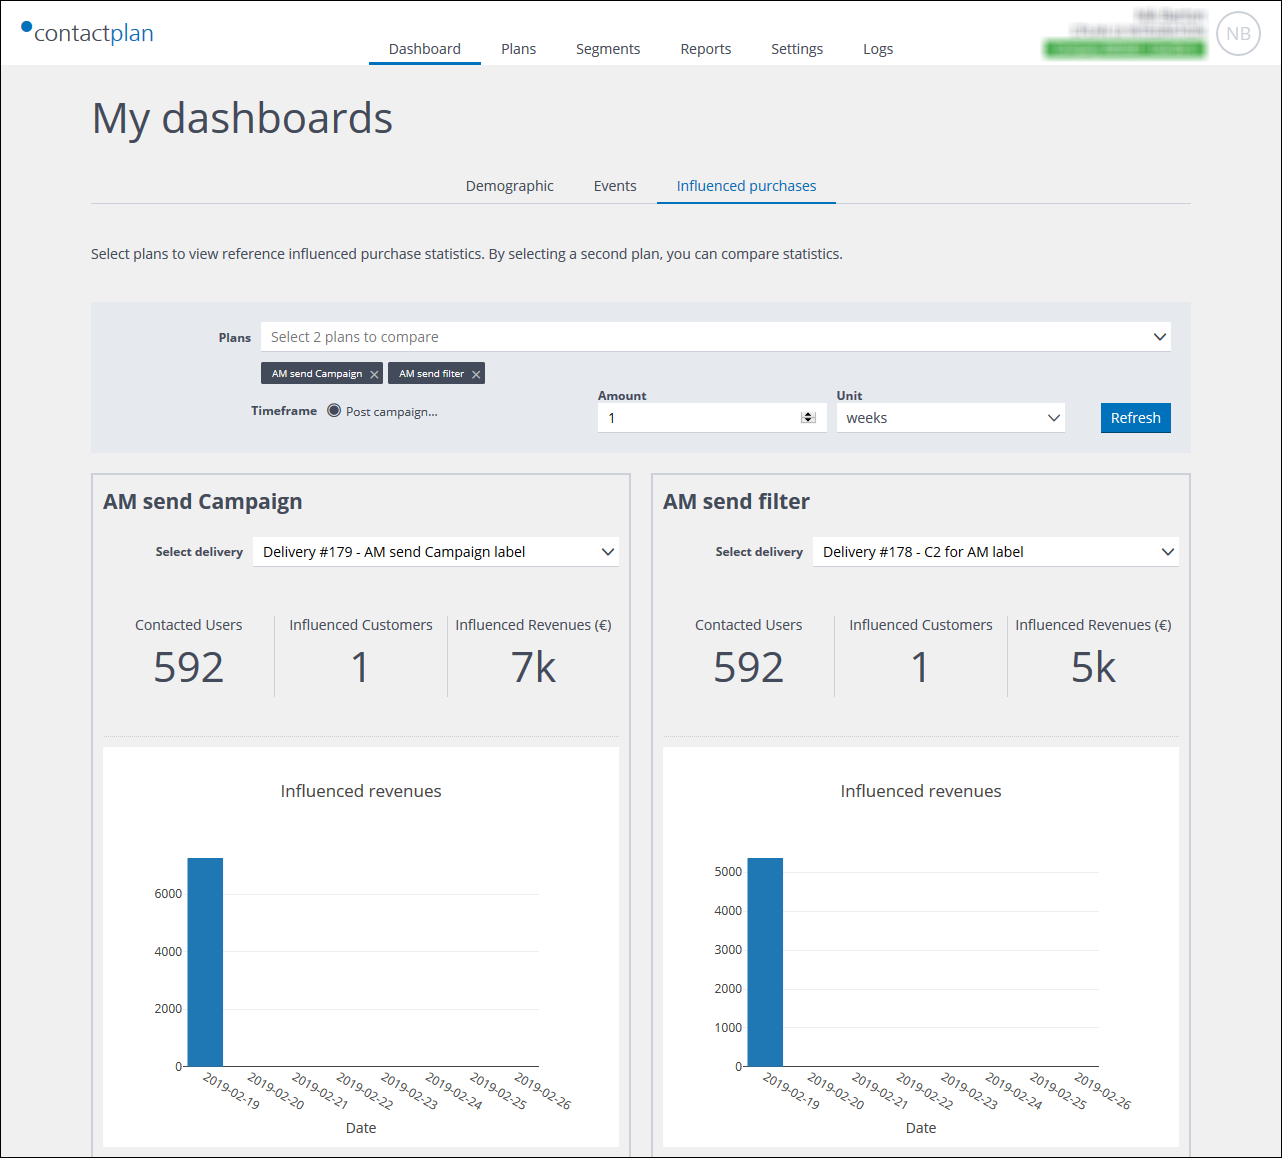
With Plan’s new dashboard, you can readily find out which activity has been more successful. You can also discover, for example, whether the most popular product following the plan’s delivery, is one suggested by the newsletter, or whether the five best selling items include any surprises.
Plan lets you compare the results of your deliveries in just a few clicks, and determine the influence your scheduling has on product sales, by displaying the facts side-by-side.
Click Dashboard in the Control bar, then the Influenced purchases tab on the My dashboards page.
In the top panel, select an appropriate Plan and set the Time frame.
After a short pause, the total number of people contacted, the number of influenced customers, and the total influenced revenue are displayed. The subsequent charts show, for example, the revenue distribution over the chosen time frame and the top five products that have been bought. Note:
If more than one delivery is associated with the relevant plan, you can select the appropriate one to display, using the field beneath the plan name. If no data is available for the relevant time frame, a warning displays.
Example of the top panel of the Influenced purchases tab
Now select the second plan and set the appropriate time frame.
The results of both campaigns display next to each other, allowing you to readily compare results.
Example of the Influenced purchases tab with two plans compared
Once you’ve, for example, identified the most effective of two plans, you can then compare it with another, simply by closing the one you no longer require (click the ‘X’ icon next to its name in the top panel) and selecting a new one, with the appropriate time frame. Note:
To retain optimum system responsiveness, you can only have two plans open at the same time.
Comparing two or more plans is that easy. Take a look at the step-by-step video for more details.
Do your communications affect your customers’ purchases? Plan… Plan includes a new dashboard that allows you to understand the effect of your plans. You can discover how much they have influenced purchases over time, together with the most popular products. You can also compare two plans and see…
Does your delivery result in customers who buy? Scope In this tutorial you will learn how to identify those contacts who not only click a link in a particular delivery, but also buy something shortly afterwards. The steps are quite easy. You need to create a segment that…
Angela likes red shoes, but she doesn’t complete the order It’s important for a brand to know the products that have been looked at and caught a customer’s eye. After all, a specially tailored message could reawake interest and lead to a successful sale. First, you need to create a…
Imagine you want to enhance the data in your customer profiles, and ensure you have each contact’s date of birth and city of residence available, ready for tailored campaigns based on the use of that information.
Watch the following video and discover how new features in the latest release of Flow can help you differentiate paths and steer contacts towards the goal… to improve the data in their profiles.
This short video shows how to configure such an automation in easy to follow steps.
Use demographic data to differentiate your contacts’ journeys… Differentiate your contacts' journeys, based on their demographic properties. All the demographic data in the individual profiles can be used to manage relationships, enhance customer experiences and progressively increase their participation in your marketing campaigns.
Discover contact behavior over time in Plan The platform is enriched with a new feature that allows you to discover the behavior of your customers in the time horizon that most interests you by querying the data in Plan. You can get information on the whole database…
Marketing Automation and new Intelligence increase the value of the… Enrich your contact profiles with new information and create automated journeys: request a demo of Contactflow and Contactdata immediately. Ensuring that customers have enjoyable and unforgettable experiences, is the goal of every brand. But to do so, it is vital that…