
Fantastic!! Your customers have responded well to your latest promotion, buying products from your new range as a result, but where to now?
How about automatically following up an initial thank you mail and special loyalty offer, with individualized communications that are tailored to each customer’s interests and preferred channels? With Flow, creating automatic, interactive and multi-option communication campaigns becomes second nature.
In fact, it’s as easy as this:
- Sign in to the platform and select Contactflow.
The My automations page displays by default. - Click Create new automation, complete the appropriate fields on the New automation page, ensuring you select the Real-Time source option, then click Create automation.
The Automation configuration page displays. - Click the Real-time Source panel, then under Incoming event in the Sidebar, select Completed order as the event that will trigger a contact being added to the automation.
- Under Event rules, add conditions to refine the incoming event, for example:
- Click Add condition, then select Products – category from the drop-down list, followed by Contains and Winter.
This identifies purchases from the winter product range. - Click Add condition again and select And as the interaction condition.
- Select CompletedOn from the drop-down list, and Equal to or greater than, then enter the date when the range became available.
This differentiates the current range from previous years.
- Click Add condition, then select Products – category from the drop-down list, followed by Contains and Winter.
You can continue to add event and demographic rule conditions, if required, and/or a Removing event that determines when a contact is removed from an automation, according to your needs. For example, you could add a minimum total purchase value, to filter out those who just bought a very small item. These customers could then be added to a different, more appropriate automation.
See the Flow Guide for more about configuring a Real-Time source.
- When you are finished, return to the Automation configuration panel, and continue creating the automation, as follows:
- Under the Real-time Source panel, click + and select ACTION.
An action panel is added to the Automation configuration flow diagram, with the name Choose Type. - Click the panel to display the Action Step information in the Sidebar, select Send mail as the Type, then configure the initial ‘Thank you’ email.
Don’t forget to include a link to a web page where customers can record their interests and contact preferences, to receive, for example, a special loyalty discount.
See Adding an Action step > Send mail configuration options in the Flow Guide for more details. - When you are finished, click + under the SEND MAIL panel in the Automation configuration flow diagram and select CHECK.
A check panel is added, with the name Choose Type. - Click the panel to display the Check Step information in the Sidebar, select Wait for Trigger as the Type, Service subscribed as the Event and 1 week as the time interval before moving contacts to the negative path.
- In the Automation configuration flow diagram, click the Path button beneath the check panel once to generate the negative (No) path, then another three times to create the positive (Yes) paths. Ensure that you select ACTION as the first step for each path.
The different positive paths are used to send follow-up communications, employing the preferred contact method that each customer has identified, through the ‘Thank you’ email web page. Hub records the choice in each customer’s individual profile, while Plan is used to create the appropriate filters for the email, SMS and Push deliveries. See the Hub and Plan guides for more details.
- Click Edit condition above each positive path and do the following:
- Give the condition an appropriate Name, such as ‘Select service event’.
- Under Event rules, select serviceName and Equal to, then enter the name of the relevant database column that is used to record your contacts’ channel preferences and responses to the first mail, such as LoyaltyProgramme.
- Click the first, second and third positive action panels in turn, and in the Sidebar, select Send mail, SMS or Webhook (for a Push message) as the Type, so the result is one of each.
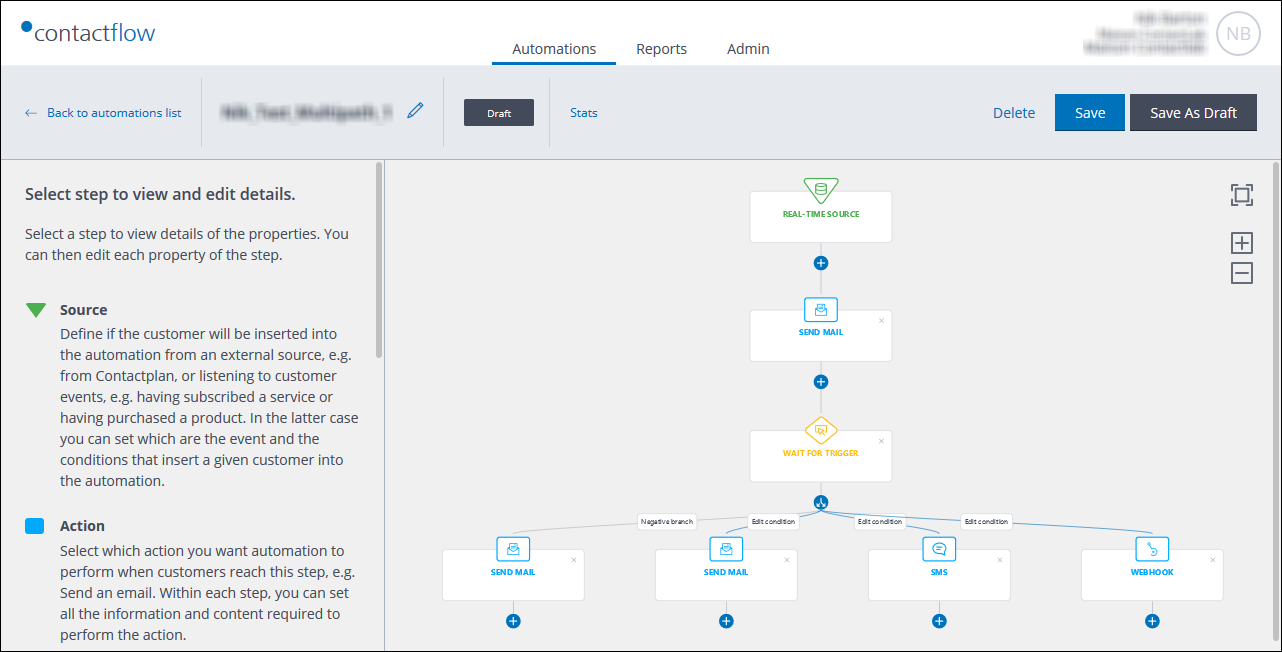
Example of the initial automation flow diagram
- Configure the email, SMS and Webhook options in the Sidebar. For example, do the following for a Webhook:
- Add a Description, as required.
- Under Basic Information, enter the URL to which the HTTP request should be sent.
This should be the URL of the external Push notification service that you use. - Under HTTP headers, enter the appropriate key/s and value/s to add a header to the Push message, as required.
- Under JSON Properties, enter the appropriate key and value pairs to define the Push message. For example, the customer ID, the message template and the authorization token.
Note:
An appropriate authorization token is always needed.
See Adding an Action step in the Flow Guide for more details about adding an email, SMS or Webhook step.
- When you have configured the initial action step for each channel, continue to add action, check and delay steps until you have a complete campaign.
A campaign that is both proactive in encouraging people during their journey, and one which responds to your customers’ behavior and purchase activity, through their preferred communication method. See Creating an automation in the Flow Guide for more details about each type of step. - Once you have completed the three positive (Yes) paths, select the action step in the negative (No) path and choose Send mail as the Type in the Sidebar.
- You can then go on to configure a reminder email, to be sent to all those customers who didn’t respond to the initial ‘Thank you’ message, in the Sidebar.
Perhaps one that invites them again to register their interests and contact preferences, to receive the special loyalty discount. - Complete the negative path as required.
You could for example, repeat steps 8 to 14 above, to replicate the three positive communication paths for when further customers respond to the second mail, while adding an End step to the new negative path, for those who do not react.
Flow is so flexible that the choice is always yours.
The above example describes just a few of the available options. But you have many, many choices available to you. So why not start to explore the flexibility, power and strengths of Flow today?
Note:
The events and categories that are actually available to you, depend upon how Hub has been configured for the relevant workspace.
For more information, see the Contactflow Guide or contact our Customer Care.