
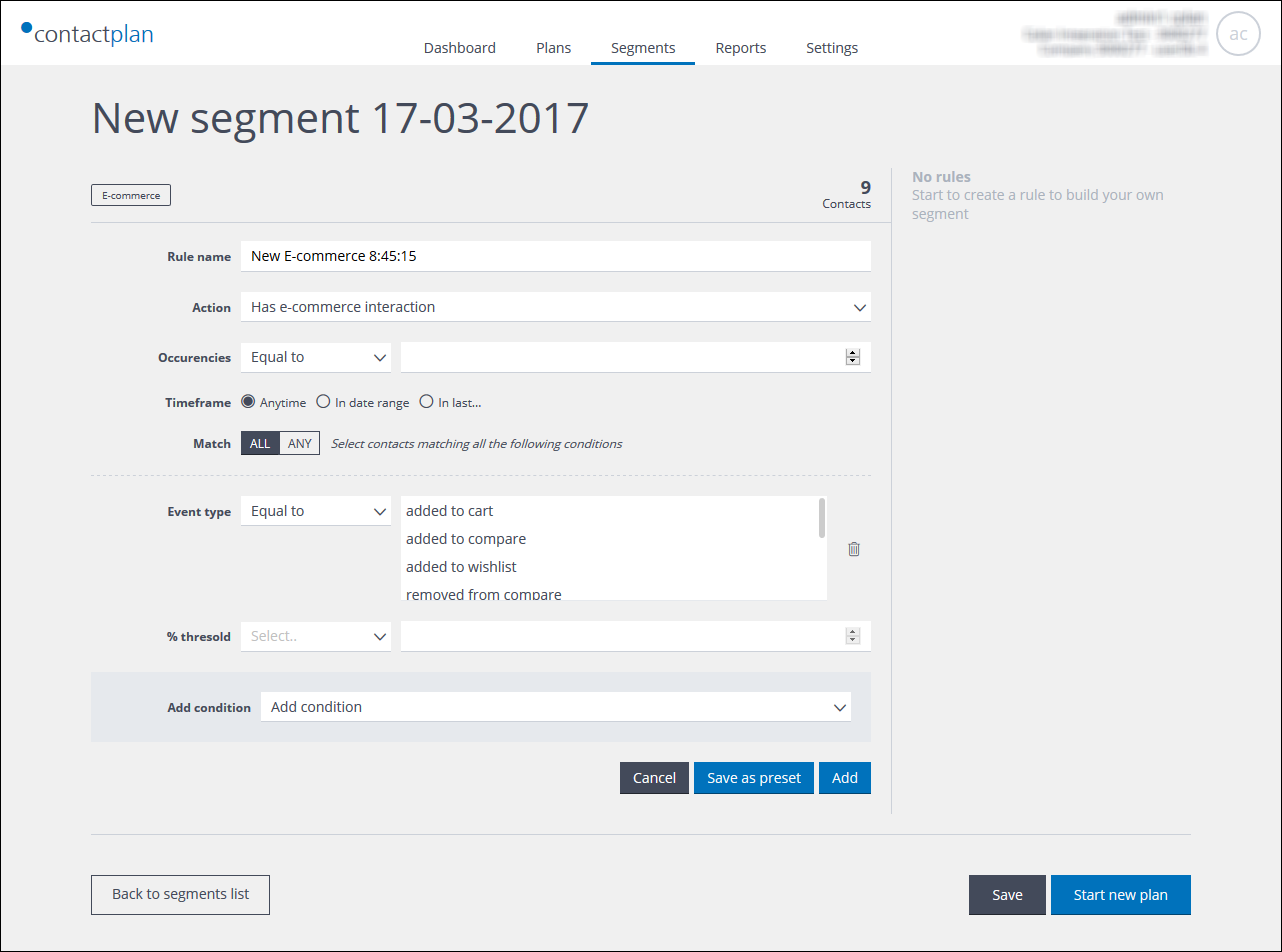
The Create custom e-commerce rule page
Note:
See Using data types, input fields and operators for more about the fields and operators that are available in the UI.
When you click Create custom rule, the new e-commerce custom rule page displays, with the name of the segment shown as its title and E-commerce highlighted in a small box. The system automatically generates a Rule name, consisting of the words New E-commerce and the time. Do the following:
- Select the system generated name and enter one of your choice.
Ensure that the name you use is unique, descriptive of the rule, and can easily be recognized by yourself and others in the future. - Under Action, click the downwards pointing arrow to the right of the box, and select the appropriate e-commerce action for the rule, for example, Has no abandoned cart.
Note:
The following e-commerce actions are available:- Has abandoned cart.
Contacts who have an abandoned cart. - Has no abandoned cart.
Contacts who do not have an abandoned cart. - Has e-commerce interaction.
Contacts who have interacted with your e-commerce site. - Has no e-commerce interaction.
Contacts who have not interacted with your e-commerce site.
- Has abandoned cart.
If you select Has e-commerce interaction or Has no e-commerce interaction, you can define the Event type that is used for the interaction in the appropriate condition fields.
The following event types are available:
-
- Added to cart.
- Added to compare.
- Added to wishlist.
- Removed from compare.
- Removed from wishlist.
- Reviewed product.
- Viewed category.
- Viewed product.
For example, if you choose Has no e-commerce interaction as the action, with Equal to and added to cart as the event type, all contacts who have never added something to their cart are selected. In a similar way, if you choose Has e-commerce interaction together with Equal to and added to whishlist, all contacts who have ever added something to their wishlist are selected.
Note:
If the Event type condition is not displayed automatically for the database that you are using, use the Add condition panel, as described below, to add the field and its controls.
- Under Occurrences, use the appropriate operator and value to define how often the Action should have taken place.
- Under Time frame, select when the e-commerce action should have taken place.
Three options are available:- Anytime.
The action can have taken place at any time. No further options are displayed. - In date range.
Click the Calendar icon in each box and define the date range.
The action must have taken place:- After the first date.
Only the first date field should be completed. - Before the second date.
Only the second date field should be completed. - Between two dates.
Both date fields should be completed.
- After the first date.
- In last…
The action must have taken place in the defined time period.- Enter a numeric value in the first box, for example, 3.
- Click the downwards pointing arrow to the right of the second box, and select days, weeks, months, or years.
See Time frame conditions for more about time frames.
- Anytime.
- Under Match, select whether the contacts that are to be identified by the rule, should match ALL of the conditions you define in the next steps, or ANY of them.
Note:
If you select ALL, the number of relevant contacts in the database, which is displayed to the right of the page at the top and bottom, reduces as each condition is applied. If you select ANY, the number of contacts increases. See Combining conditions within a rule for more details.
- Add further conditions, as follows:
- In the Add condition panel, click the downwards pointing arrow to the right of the box, and select the appropriate condition, for example, Event type, from the drop-down list.
The new condition is added to the page. - Click the downwards pointing arrow to the right of the first box, and select the appropriate operator, for example, Equal to, from the drop-down list.
Note:
The first box may display a different list of operators, according to the type of condition being defined. See Operator types for more details. - Enter or select the appropriate value in the second box.
Note:
Depending upon the condition that you are defining, the second box may be:Date-based input fields allow either:
-
- An absolute date to be chosen, using the calendar widget.
or: - A relative date to be selected, such as one week ago, or two months in the future.
- An absolute date to be chosen, using the calendar widget.
Click the opposing horizontal arrows icon, to the right of the calendar or relative date field, to change to the other field type. See UI icons for a description of each icon displayed in the UI.
- In the Add condition panel, click the downwards pointing arrow to the right of the box, and select the appropriate condition, for example, Event type, from the drop-down list.
- When you are finished, do the following:
- If you want to create a preset from the rule you have defined, click Save as preset, before you apply the rule to the segment.
- Click Add to apply the rule to the segment, or Cancel to abort the process.
You are returned to the New segment page and the rule is added to the Rule list area of the Segment Summary panel.
% threshold condition
The % threshold condition is used to identify contacts whose activities satisfy a percentage range that is applied to a specific event type, while also meeting the other conditions defined for the rule. For example, contacts who have added an item to their shopping cart on more than 10% of the occasions that they have interacted with your e-commerce site.
Note:
The % threshold condition can only be applied if at least one other condition is set in addition the Action and Time frame fields.
Previous page: Creating an e-commerce rule | Next page: Creating a purchases rule