Plan includes the following dashboards:
- Demographic.
- Events.
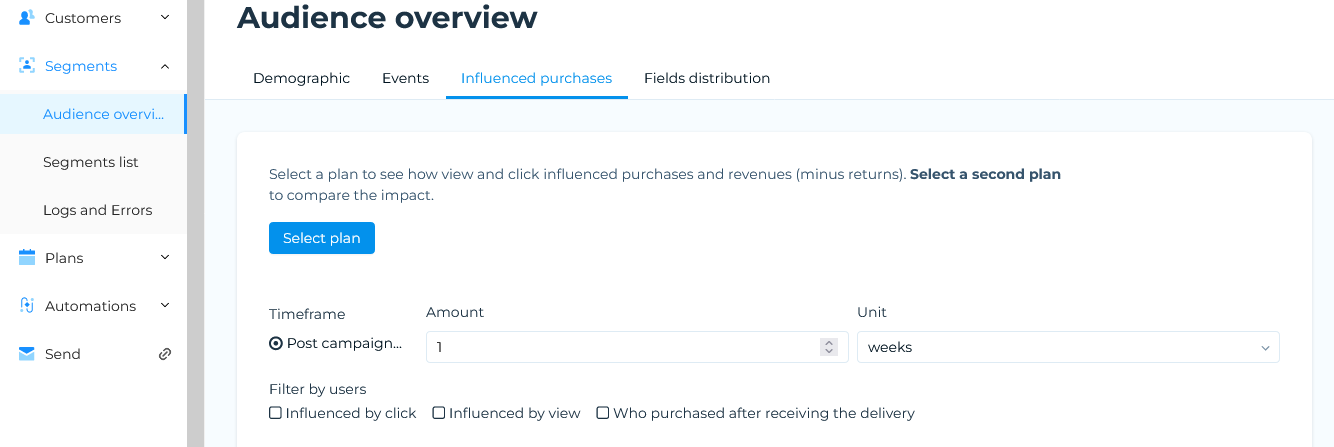
- Influenced purchases.
Displays statistics related to plans that have been carried out.
Note:
The Influenced purchases dashboard only displays if transaction data is available. - Fields distribution.
All dashboards are available for the whole database, while the Demographic and Events ones are also available for individual segments. See Dashboard analysis and reports for a summary of the type of information that dashboards include.
Using dashboards
Dashboards are divided into individual panels, which are made up of charts, graphs and other graphical representations of the available data. The contents of a dashboard are determined by us during system configuration. You can select the appropriate time frame for the Events and Influenced purchases dashboards to display.
Dashboard panel controls
Towards the top right of each dashboard panel are a series of controls that enable you manage the displayed information. While the available controls vary according to the type of chart, you can, for example:
- Save the relevant chart in PNG format.
- Save the relevant chart to a cloud location for later editing.
- Pan the displayed information.
- Zoom in or out.
- Autoscale the chart.
- Reset the axes.
- View additional information when you hover your mouse over a particular area of the chart.
A screen tip displays when you position your mouse over a particular control icon, which describes what it does.
Accessing the database dashboards
To display the dashboards for the whole database:
- Click the Dashboard tab in the Control bar.
The database Demographic, Events and Influenced purchases dashboards display on separate tabs.
Accessing the dashboards for a segment
To display the dashboards for a particular segment, do the following:
- Click the Segments tab.
The My segments page displays. - Locate the required segment using the Segments list or Segments cards view.
- Click the appropriate segment.
The Edit Segment page displays. - Click the Analytics icon, positioned towards the bottom right of the Segment Summary panel.
See UI icons for more about the Analytics icon.
The segment Demographic and Events dashboards display on separate tabs.
Selecting the time frame for an Events dashboard
Selecting the time frame is the same procedure for the whole database, or an individual segment. The only difference is the data to which the time frame applies. Do the following:
- Once you have accessed the appropriate Events dashboard, under Time frame, select one of the following:
- Anytime.
The dashboard takes all available data into account. This is the default. - In date range.
The dashboard includes the relevant data between the selected dates. - In last…
The dashboard includes all relevant data, for example, from the last year.
- Anytime.
- Select the appropriate date range or historical duration, as appropriate, then click Refresh.
The dashboard is updated accordingly.
Defining the settings for an Influenced purchases dashboard
To configure an Influenced purchases dashboard, do the following:
- On the Influenced purchases dashboard, select at least one plan from the drop-down list.
Choosing more than one plan enables you to compare the results. - Select the appropriate Time frame.
- If you add or remove plans, or change the time frame, click Refresh to display the updated data.
The Fields distribution section
In this area you can view up to 20 of the values assumed by the demographic fields selected and made visible by the platform user for the segment creation phase. The data highlighted are the name in the field as written and the numerosity. If, for example, we consider the Gender field, it will be possible to find Female, Male, M, F, m, f, -null- etc. according to how it has been filled in the compilation phase. For a field to appear, it must be in the Enabled status in the Settings > Segments > Fields Configuration section.
In this section, you get maximum visibility of the distribution of values in the database fields and it becomes possible:
- Immediately view the composition of the database.
- Perform an initial analysis of the quality of the fields.
- Identify any anomalies quickly and easily.
Previous page: Deleting a plan | Next page: Managing reports

