Do your deliveries reach the right inbox?

Scope

In this tutorial, you will learn what Contactsend seed lists are, as well as how they can be created and used.

What is a seed list?

According to a study of ReturnPath, that every year publishes global studies about deliverability, abot the 20% of commercial emails do not reach the inbox. The percentage is high and the perspective changes if your delivery are in that 20%.*

have you ever thought about how to monitor where your emails arrive once you send them? Contactlab did it, and developed different tools with the goal to monitor and improve as muh as possible the deliverability of your campaigns. Seed lista are just an example.

A seed list is a very useful way of controlling and monitoring deliveries. It is made up of a maximum of 30 email addresses, including ones that are not in the database, which receive copies of all real deliveries sent using Contactsend, or those sent to selected email groups.

Seed lists enable you to check whether, for example, a specific delivery is correctly received from different email servers, the message is regarded as spam, or there are any problems with the delivery.

You can use a different seed list for each email group, one for a combination of groups, or one that is active for all deliveries. Read Contactsend Guide to discover more about “Email groups”.  You can configure a maximum of 10 seed lists.

Procedure

To create a seed list, do the following:

  1. Sign in to Contactsend, and click Configure > Automation > seed list.

  1. Select Add a new seed list and give it a recognizable name.
  2. Click Insert.
    You have now created a basic seed list.

  1. Next, add the email addresses that should automatically receive a delivery copy, by clicking 
  2. To define the deliveries that the seed list should be applied to, do one of the following:
    1. To associate the seed list with one or more email groups, click 
      Associating the seed list with an email group means that you do not have to repeatedly enter certain settings, which are common to different deliveries.
      Remember that an email group is a container that can be used for an infinite number of deliveries. A group should not be confused with an individual delivery.
    2. To apply the seed list to all deliveries, regardless of the group, click 
    3. To active the seed list, click 
    4. To delete the seed list, click 

Note:
The seed list addressees receive a copy of the first email in a Contactsend delivery. If there is personalized content, it will be the same material that is used for the first recipient. Links work correctly, but do not generate events and, as a result, they have no impact on statistics. Links managed by Contactsend, such as web version, unsubscribe and similar, do not work.

To know more about Seed Lists consult the “Automation” section in Contactsend Guide.


*Source: beta.alessandrafarabegoli.it

Read more

Customize the interface to speed up the creation of your segments

Scope

Contactplan enables you to simply customize the pages that are used to create segmentation rules.
For example, you can choose:

  • The conditions that will be shown by default
  • Which ones will be available in the Add conditions drop-down list
  • The conditions that will be hidden

In some instances, you can also customize how values are inserted for each condition. As a result, new segmentation rule creation can be easier and faster, as the UI will only display the fields that are needed.

Procedure

You probably collect a lot of data about your contacts and their behavior in your database. While all this information is important in understanding your potential customers, it may be that certain records are more useful than others, when creating an audience for your marketing deliveries.

Scrolling through a large number of different conditions to find the right ones, may be impractical and inefficient, slowing the segmentation rule creation process. There are almost certainly some conditions, such as country, date of birth or email subject that are used more often than, for example, name and surname, while others, such as customer ID, will probably never be used to identify a marketing delivery audience.

To enable you to simplify and speed up rule creation and editing, Contactplan includes a Field setting page where, subject to the appropriate access permissions, you can define the conditions that will be:

  • Displayed by default on the rule creation pages.
  • Available to add to the rule, by selecting them from the Add conditions drop-down list.
  • Completely hidden, meaning they will not be available by default or in the drop-down list.

Conditions can be defined and made available to all of your company’s Contactplan users, for each segmentation rule category that has been enabled, such as Demographic, Digital messages, Purchases and so on.

Contactplan automatically selects the best input type for each condition field, for example, a radio button, a drop-down list and similar. The input type selected depends upon the kind of data, such as numeric, string or date, and the number of stored values. But if you want to use a different type, you can select the one you require on the same Field setting page.

You can now customize your interface and create segments in an easier and faster way. For more details, see the Field settings page in the Contactplan guide.

Read more

Create a segment to send a delivery in a chosen language, to customers associated with a particular store

Scope

This tutorial shows how to create a segment, which can then be used to send a delivery in a chosen language, such as English, to all the customers who asked to receive communications about a particular store, for instance, the one in Milan.

Procedure

  1. Sign in to Contactplan, and click the Segments tab in the Control bar, at the top of the page, to display the My segments
  2. Click Create new segment.
  3. In the New segment page, enter a unique and recognizable name for the segment.

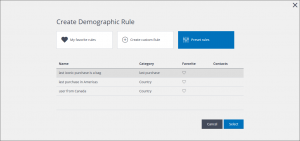
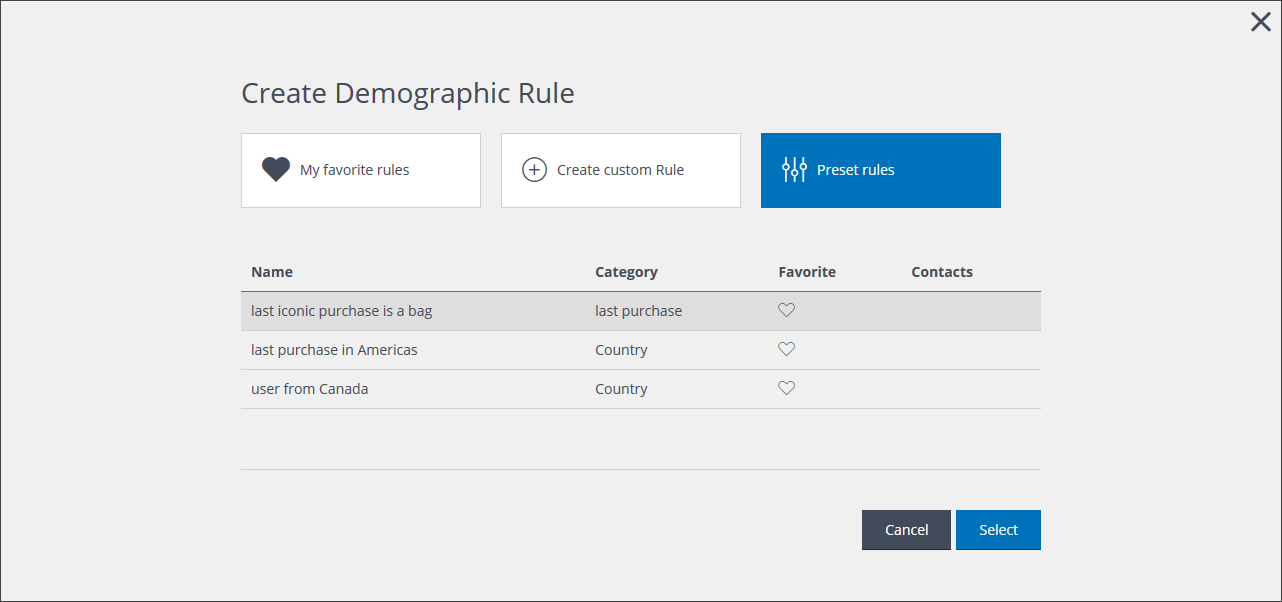
  1. Click Create Demographic Rule, followed by Create custom Rule.
  2. Enter a name for the rule, then select ALL to include only the contacts who match all the rule conditions you will define.
  3. Under Language, select Equal to and en_GB.
    The number of contacts decreases because only the customers who match all the conditions are included in the total.
  4. Under Preferred Store, select Equal to and then the appropriate store, for example, the one in Milan.
    Note: the Language and Preferred Store fields are not available by default in Contactplan. They are only accessible if they have previously been configured in applications such as Contacthub or Contactsend.

  1. When you have finished, click Add to save the rule and return to the New segment
  2. Click Save to be able to apply the segment to a future delivery, or Start new plan, to use it immediately.

you can now contact your customers in their favourite language with customized offers according to their associate store. In this way it will be aesier to engage them with customized offers.

For more info consult Contactplan guide in the “Creating new segments” section.

Read more

Wish Happy Birthday to all your customers setting a single delivery

Scope

In this tutorial, you will learn how to use Contactplan to create recurring deliveries to an audience who form at least part of a predefined segment. But what is a recurring delivery? A recurring delivery is one that is repeated over a defined period of time. Imagine, for example, you want to send a birthday greeting to your customers, together with a gift from your e-commerce site, such as an extra discount on their next purchase, or a special bonus. It’s very easy to do, thanks to recurring deliveries!

Procedure

To create a recurring delivery, do the following:

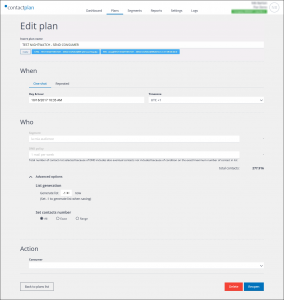
  1. Sign in to Contactplan, and click the Plans tab in the Control bar, at the top of the page, to display the My plans page.
  2. Click Create new plan to display the New plan page.

  1. Enter a unique and recognizable name for the plan.
    Using our example, it could be “Birthday Greetings”.
  2. Under When, select the Repeated tab to define a recurring delivery, and do the following.
    1. Under Date & hour, click the box to display the Calendar
      Enter the date and time that the recurring delivery should start, or use the calendar controls.
    2. Select the appropriate Time zone, if it needs to be changed.
      The default time zone is automatically set to the one defined under SettingsTime zones & week.
    3. Under Repetition, select whether the delivery should be repeated Daily, Weekly or Monthly.
      For the birthday greetings delivery in our example, we need to select Daily. That way, your customers will receive their birthday greeting on the appropriate day.
    4. Under End date, click the appropriate Never, After or On date radio button, and select or enter when the recurring delivery should finish, if required.
      If you select Never, you can stop the repetition manually, by using the appropriate Stop Plan button on the Recurrence tab of the My plans page.
      See the Contactplan Guide >  UI icons for more details.
    5. Click Load recurrences to display the dates of the first ten repeats, if required. The total number of repeats is also shown.

  1. Under Who:
    1. Select the appropriate Segment that was created previously, such as “Birthday segment“.
      After a short delay, the number of contacts in the segment displays.
    2. Select the appropriate DND policy, if one is required for the recurring delivery that you are creating. The number of relevant contacts displays, and the total contacts field is adjusted.
  2. Click the downwards pointing arrow to the left of Advanced options and do the following, if required:
      1. Under List generation, define when the contact list that is to be used for each delivery should be created.
        For example, if you want the list to be generated when the delivery is sent, select ‘0’. If you want the list to be created when the delivery plan is saved, to use it later, select ‘-1’. If you want the list to be generated a certain number of days before the delivery, use the scroll box to select when it should be created.
        For our birthday greetings example, the list should only be generated each time the delivery is sent, using the ‘0’ setting. This ensures that a new list, consisting of the contacts who have a birthday on that date, is created each day.
        Note: For recurring deliveries, the next one in the series is automatically planned as soon as the current delivery has completed. This means that:
        If you select ‘-1’ for the List generation parameter, the plan and the list are created immediately after the previous delivery has been sent, then the new delivery is generated in Contactsend, ready to be sent on the appropriate date.
        If you select ‘0’, the plan is created immediately after the previous delivery has been sent, but the list and the Contactsend delivery are generated when it is due to be sent.
      2. If you want to define the number of contacts that should be used for the delivery, under Set contacts number,do one of the following:
            1. Select All to use the contact list as defined by the relevant segment and DND policy (default).

        or:

            1. Select  Exact if you want a precise number of contacts to be used, then enter the number of contacts in the box provided.
            2. Under If the value is not reached, click the appropriate action:
              • Send anyway
                The available contacts are used, even if the desired number is not reached.
              • Add contacts
                The number of contacts in the list is increased by adding others from the database. Enter the maximum percentage of the total number of contacts that can be added in this way. Contactplan then adds contacts until either the maximum percentage or the defined number of contacts is reached.
              • Set error
                The plan is not run, and an error is returned, if the required number of contacts is not reached.
                Or:
            1. Select Range if you want to define a suitable range of contacts.
            2. Enter the range of contacts in the boxes provided.
            3. Under If the value is not reached, click the appropriate action.
              See above for more details about the available actions.

        Both the List generation and Contacts number advanced options can be used together.

  1. In the Actionpanel, click the arrow in the box under Consumer, and select the appropriate action for running the delivery plan:
    • Create Filter in Send
      Used to create filters in Contactsend. If you later delete the plan, the relevant filters still remain available in Contactsend.
    • Create Delivery in Send
      Used to configure a delivery in Contactsend.
      This option also enables you to add a message to the delivery, including HTML pages created in PageBuilder. See the Contactplan Guide > Example of creating a new plan for more details.
      Note: Contactsend click tracking for links with no dynamic parameters in the URL is automatically activated.
      When you save your plan as ready, it will be delivered using Contactsend.
    • Send to SFTP
      Sends the contact list associated with the delivery plan to the appropriate storage location. If selected, options display that enable you to choose:

      • The Field separator.
        Allows you to select the character that is used to separate two fields in the saved file.
      • The Field enclosure.
        Allows you to select the characters that are used to enclose a value in the saved file.
  2. When you have finished, click:
    • Save as draft if your plan is not yet complete, or you think that you may want to change your entries.
      Or:
    • Save if your plan is ready.
      Or:
    • Back to plans list to abort the process.

  1. You are returned to the My plans page and the draft or ready plan is added to the list.

Immediately after you click Save, the recurring delivery is stored and the first one in the series is planned. You can easily recognize the recurring deliveries in the list, as they have the suffix _(N), where N represents the number of the particular instance.

You can reopen any plan that has been saved as Ready at any time, but you can only edit it up until the time and date that it is due to run. Draft plans can be edited at any time.

See the Contactplan Guide “Plan details”  for more about Ready and Draft plans.

You can edit a single plan instance or all of them. For example, you can edit a delivery subject or HTML without changing those that follow, or you can update all the instances, so all the following deliveries are also modified.

If you later delete a segment or a DND policy, it continues to be used by any planned deliveries to which it has already been applied

In this way you are able to whish Happy Birthday to all your customers setting just one single delivery. For mere info consult the “Recurring campaign” section in Contactsend Guide.


Read more

How to configure and manage Automations; from the Abandoned Cart to the Welcome Email

Scope

In this tutorial, you will learn how to create Automations in Contacthub, and manage them as required.

What are Contacthub automations?

Automations allow selected actions to be carried out automatically, after defined events have taken place. Sending a welcome email when a registration event is received, is a simple example. Automations may interact with the whole Contactlab Engagement Marketing platform, triggering the appropriate processes according to the defined timeframe.

Creating an automation

To create an automation, do the following:

  1. Sign in to Contacthub and click the Automations tab in the Control bar at the top of the page, to display the Automations management.
  2. Click Create a new automation.
    The Automation configuration page displays, with a system-generated name and the appropriate configuration fields.

  1. Select the system-generated name and enter a unique and recognizable Automation name of your choice.
  2. Under Active nodes > Add nodes, select the node/s to which the automation should be applied.
    The name of each selected node displays within a black box, directly under the field.
    The automation will be triggered by the appropriate event, if it involves customers belonging to the selected nodes.

  1. If you want to remove one of the nodes from the automation, click the X icon, positioned to the right of the appropriate node name.
  2. In the Trigger panel, select:
    1. The event that will trigger the automation like for example abandoned cart, viewed product, etc.
      When you select an event, the Advanced options field displays. Click it to apply conditions to the event.
      The available conditions depend upon the type of event you have selected. For example, an Abandoned cart event may have price, product or date-related conditions.
      You can add multiple conditions as required which must be verified.
      If you want to remove a condition, click the Bin icon, positioned to the right of the appropriate field.
    2. Whether the event applies to an anonymous, known or any customer.
    3. The event context.
      You can select whether it is, for example, an E-commerce, retail, Web or similar event, to refine how it is applied.

  1. Define the Delay.
    This is the length of time Contacthub waits after an event has taken place, before triggering an automation. For example, wait 24 hours after an Abandoned cart event, before sending an email.
    Delays are measured in seconds, and can have a maximum duration of one week.

  1. Under Action, define what should happen when the event takes place. There are three categories:
    1. Tag
      Use an event property or a constant to modify or enrich the Contacthub customer properties. For example, you can select the Contact details > mobile number field for the contents to be updated.
    2. Webhook
      Send information to external applications, by calling a defined URL, to enable them to carry out the appropriate action.
    3. Send Email
      Send a transactional email to the customer that the event relates to, using Contactsend, or deliver a notification to a fixed address.
      Note:
      The following must be defined to integrate Contacthub with your Contactsend configuration:

      • Your Contactsend apiKey and userKey
      • The Campaign ID to be used by the automation.
      • The relevant recipient email address. This can be fixed or defined by information available in Contacthub.

  1. When you are finished, click Save.
    You are returned to the Automations management page and the automation is added to the list.

Note: An automation is saved as active by default. To deactivate an automation:

  • Move the Enable slider, positioned to the right of the appropriate automation in the Automations table, to the left.
    If the switch is gray, the automation is deactivated.

Modifying an automation

Do the following:

  1. Sign in to Contacthub and click the Automations tab in the Control bar at the top of the page.
  2. Click the desired automation.
    The Edit automation page displays.
  3. Edit the settings as required.

  1. If you want to remove the automation, click Delete.
    Note:
    This action cannot be reversed.
  2. Otherwise, when you are finished, click Update to save the changes, or Back to list to abort the process.
    You are returned to the Automations management

Do you want to see an example of how an automation works?
Click this link to discover how to remind your customer that they have an abandoned cart, by sending them automatic emails.

Read more

Do you want to create a new segment by combining two or more existing ones?

Scope

In this tutorial, you will learn how to create a new and unique segment, which is based two or more existing ones and the rules they include.

Procedure

To combine segments and create a new one, do the following:

  1. Sign in to Contactplan and click the Segments tab in the Control bar, at the top of the page, to display the My segments page.
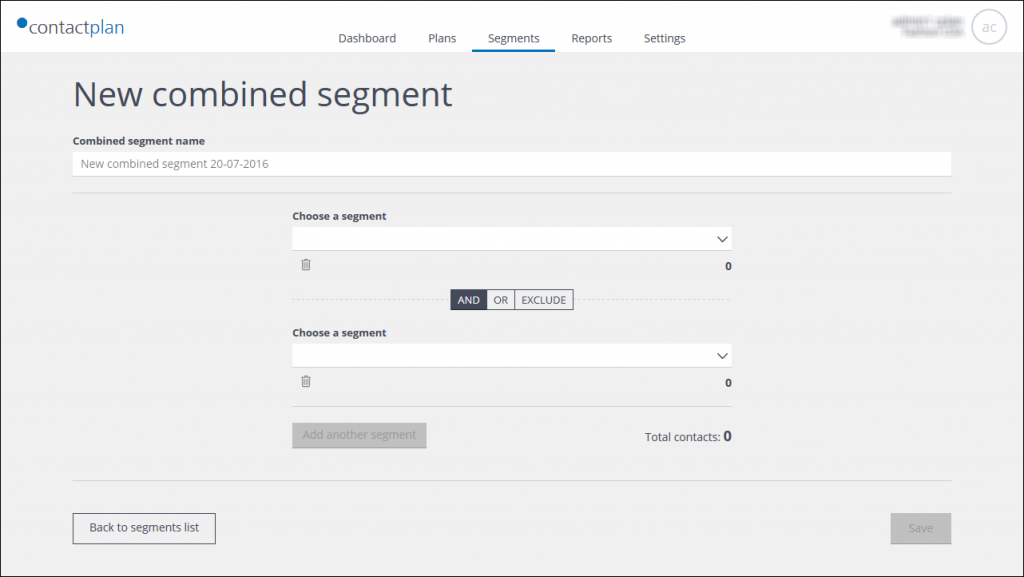
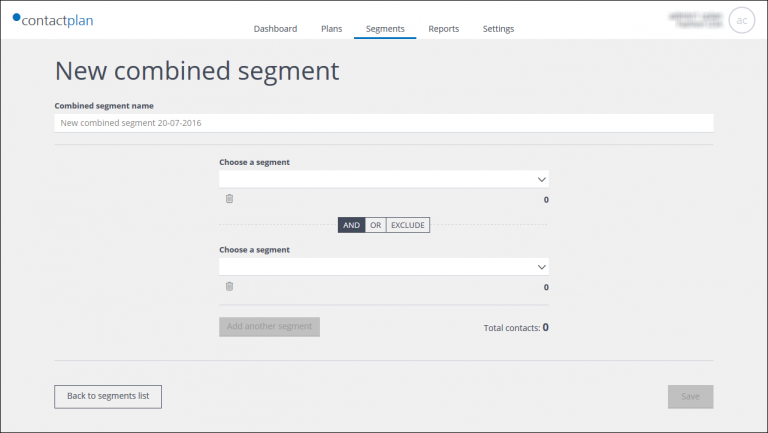
  2. Click Create new combined segment. The New combined segment page displays with a system-generated name and the appropriate selection fields.

  1. Select the system-generated name and enter a unique and recognizable Combined segment name of your choice.

  1. In the top Choose a segment field, select the first segment from the list of those that have previously been created. They will be displayed in alphabetical order.
    Click here to know more about creating a segment.

  1. Select the appropriate interaction condition to define the relationship between the first and second segments.
    AND means that only the contacts who are present in both segments will be selected
    (A ∩ B), OR selects the contacts who are present in either segment (A + B), EXCLUDE removes the contacts who are present in the second segment from those in the first one (A – B).

  1. In the next Choose a segment field, select the second segment. Also in this case segments will be displayed in alphabetical order.
  2. If you want to add more segments, click Add another segment for each one, select a segment, then define the appropriate interaction condition between the new segment and the preceding one. You can add maximum 4 segments.

  1. When you are finished, click Save.
  2. You are returned to the My segments page, the new combined segment is added to the list, and it is available to be used.

When you are combining segments, you need to ensure that you add them to the New combined segment page in the correct order, so you can apply the appropriate interaction condition between consecutive pairs. For example in a case like “Segment A AND segment B OR segment C” the first intersection will be between A and B. The result will be combined with C.

NOTE: at the moment it is not possible to edit combined segments from the UI.

You can find further info in  “Creating a new segment from existing segments” section in Contactplan Guide.

Read more

The magical world of bounces: Emails with no reachable addresses – 1st Episode

Without doubt, the communications bounce rate has become increasingly important to companies in recent times. But few realize, however, that there is a rich, varied and valuable world of information and recommendations behind the word bounce, which even today, is undervalued.

At Contactlab, we have always been deeply involved in this topic and now, we would like to share what we have learned with you, through a series of articles about deliverability. Let’s begin with a definition of a bounce message, then continue by highlighting the value that can result from their analysis.

What is a bounce message?

A bounce message is automatically sent to the originator of an email when it is not accepted by the receiving server. It includes the reason why the email has been bounced. Everyone that sends emails has received one of them, at least once in their online life.
So, what actually happens? When an email is sent, a dialogue is established between the sending and receiving servers. In general, this takes place through SMTP, a collection of rules and convention models that are used to exchange messages.

Unfortunately, the two servers cannot always establish a relationship, and for this reason, bounce messages are created. Depending upon when they are created, bounces can be subdivided into two types. Synchronous messages are sent during the SMTP conversation, while asynchronous ones are sent at other times.

What are the reasons why bounce messages are generated?

There are many reasons. They can be the result of, for example, a nonexistent address, a full inbox, the message being regarded as spam, a poor sender reputation and so on.

There is a three-number code within the bounce message that represents the reason, according to accepted conventions. As a result, the sender can see why the message has not been delivered and attempt to resolve the problem. The code always begins with a 4 or a 5, and is written as 4xx, 5xx, 4.x.x. or 5.x.x.

The code is often followed by text that is intended to clarify the bounce reason. However, despite standards and conventions, every receiving server is independently configured with a certain degree of SMTP message management flexibility. This translates into a large variety of bounce messages, because of the diverse ways in which the same message is communicated by different providers.

The smaller providers, as well as the wide range of company domains, make the situation even more difficult. Completely different and generic messages are delivered, resulting in a lack of clarity and text that can easily be misunderstood.

All providers of professional email delivery tools must be able to correctly collect, understand, analyze and categorize the wide range of bounce messages.

In doing so, Contactlab has defined precise classification rules, resulting in 24 bounce categories. This data is readily available in Contactsend reports and the Trend for Recipient Domains analysis.

How can a bounce be classified?

Bounces are generally categorized as either hard or soft.

Hard bounces are perpetual errors that happen because the contact address is permanently unavailable. Since these errors cannot be resolved, the relevant address/addresses must be removed/deactivated. According to certain best practices, the deactivation must take place after one or two bounce episodes. Hard bounces are always identified with a 5xx code.

Soft bounces are temporary errors that happen because although the address is theoretically active, it is not available at the moment. They can occur, for example, if the inbox is full, or when the relevant software is currently not responding. In the case of soft bounces, the address/addresses should not automatically be deactivated. They will only be removed in the event of prolonged inactivity. Because of the wide range of soft bounce types, there are differences in how they are managed.

Delivery Time Expired is a particular type of soft bounce. A sending system tries to contact the receiving server. If it does not answer, the sending system will periodically try to contact the receiving server again, before eventually giving up.

In this instance, Contactlab tries to deliver the message for 48 hours. If, after this time the receiving server has not answered, a Delivery Time Expired bounce is generated. These bounces, however, do not result in the relevant email address being removed from a list.

The receiving server may not answer for two reasons:

  1. The server itself does not exist. A case can be when the email address includes a nonexistent domain.
  2. The server does not want to answer the sender any more. This can happen if, for example, the server has received too many emails from that sender, or it believes the sender delivers spam messages.

Soft bounces are usually identified with a 4xx code, but they can also have a 5xx one.

Why is it important to monitor bounces?

It is important to be able to recognize bounces because correct management enables the problem to be identified quickly, and potentially be resolved. The following key factors can be linked to bounce messages:

  • The quality of the message content
  • The quality of the contact list
  • The reputation of the sender IP
  • Sending behavior or frequency

For all these aspects, certain bounce types are more relevant than others.

For example, Hard Bounce and Delivery Time Expired are the most important bounces when considering list quality. Reputation is one of the most relevant bounces for sender IP reputation, together with perhaps the content detail of a Delivery Time Expired message, as well as Spam Content and so on.

Bounce Rate, which is calculated by comparing the number of bounces with the quantity of sent emails, is a common metric that helps us understand deliverability. Bounce rate analysis can be particularly helpful when identifying substantial or extended problems. But to be able to understand some issues, they need a deeper analysis, for example, by differentiating between the kind of bounce and the domain/s involved. A bounce rate of 3% is generally not a problem, but what if all the bounces are reputation-related? Or what if some domains have a 100% bounce rate?

Contactsend includes a powerful tool known as Trend for Recipient Domains, which provides a broad view of the available information. It allows, for example, an analysis of performance parameters such as openings, bounces, clicks and similar, which are then ordered by time, type and domains. The analysis of bounces enables us to understand the origin of certain problems and then be able to react.

Bounce data is important from both a quantitative and a qualitative viewpoint. How many bounces? What kind of bounce? Which domains are involved? It is key that the analysis of all these aspects and the overall deliverability data should be as comprehensive and complete as possible.

For this reason we are going to see together, in the next Episode, how to analyse trends for recipient domains, both from a qualitative and quantitative point of view, problems that can be registered and how to solve them.

Read more
Configure your Facebook account with Contactsend and improve your campaigns

Configuring your Ads Account Facebook you will be able to use the integration to create your Custom Audience and Lead Ads.

To configure your Facebook account, do the following:

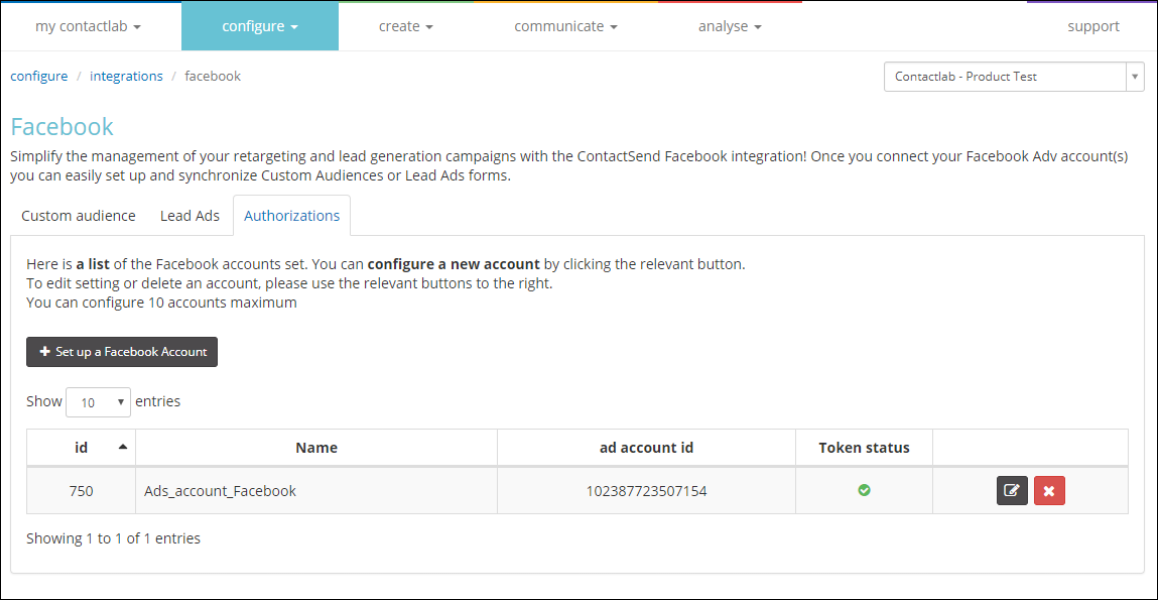
  1. Sign in to Contactsend and click Configure in the main menu, followed by Integrations.
    The Integrations page displays with a series of panels representing all the available Contactsend integrations. Unavailable integrations appear gray.
  2. Click the Facebook panel. The Facebook page displays.

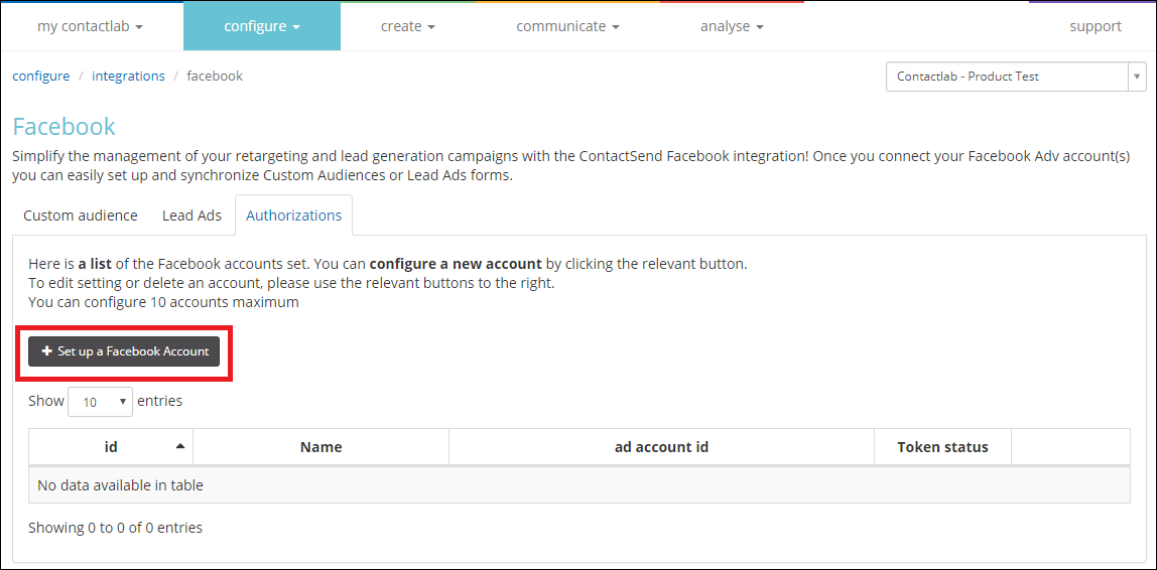
  1. Select the Authorizations tab.
  2. Any existing Facebook Ads accounts are displayed in the Accounts list. The list is empty until accounts are configured.
  3. Click + Set up a Facebook Account. The Facebook new account page displays.

  1. Enter the following:
    a. Under Name, a recognizable name for the Facebook Ads account
    b. Under Ads account ID, the numeric ID for the Facebook Ads account
  2. Click authorize to automatically request and retrieve an access token.
    When requesting the access token, Facebook will ask you to give Contactlab permission to access the Ads account. This is needed to let Contactsend operate in the Facebook account.
    The access token is tied to the relevant Facebook user. If you have already logged in to Facebook, then that account will be used. Otherwise, you need to log in to Facebook as the user who has the appropriate permissions for the Facebook Ads account.
    Note: the access token has an unlimited time validity.

  1. Once you have the access token, click save. The account is added to the Accounts list on the Authorizations tab of the Facebook page. Here, you can edit or delete the Ads account, and display the relevant details

Once you have completed the configuration, Contactsend will be able to access the Ads account to use the configurations.

Note: The following configuration steps must be carried out for every Facebook Ads account you want to use. You must link at least one Facebook Ads account to Contactsend, and can configure up to 10 accounts in total.


To know more about Integrations supported by Contactsend read the dedicated section on the Guide.

Read more

Do you want to retarget contacts who clicked a link or opened a delivery an engage them with new campaigns?

Scope

In this tutorial, you will learn how to use Contactplan to retarget contacts who opened one of your email deliveries, or clicked a link within it.

Retargeting Contacts

Retargeting contacts enables you to identify audiences who have already shown an interest in a brand, and then use them for new, directly focused communication activities. The overall goal may be, for example, to consolidate a message, increase interest, or convert prospects into customers.

Procedure

To understand how to retarget contacts, let’s assume that you want to create a segment that includes all the contacts who clicked a link within selected deliveries that belong to completed and still active campaigns. Whether a campaign has been completed or not, does not influence your ability to use existing data to generate a new segment.

To start, you need to define the rules that are needed to identify the segment. Do the following:

  1. Sign in to Contactplan and click the Segments tab in the Control bar, at the top of the page
  2. Click Create new segment.
    The New segment page displays, with a system-generated name and the appropriate selection options.
    Select the name, and enter a unique and recognizable New segment name of your choice.

  1. Click Create Digital messages rule followed by Create custom Rule, on the next page.

  1. Select the system-generated Rule name, and enter a unique and recognizable one of your choice.
    For example, “Click within the A and B Campaign”.
  2. Under Action, select Have clicked. If you want to target those who have opened a message instead, you should select Have opened.
  3. Under Occurrences, select the appropriate operator and value, to define how often the Action should have taken place.
    If you do not set these fields, they will automatically be completed to include anyone who carried out the defined action at least once.

  1. Under Time frame, select “Anytime”. If you want to select, for example, only those contacts who clicked a link within a specific time frame, such as during the last N days, or in the first N days after the delivery, you can choose either In date range, or In last…

At this point, you can define the relevant deliveries. In this example, they are the deliveries that you want to check for clicks.

  1. Under Match, select ALL. This includes the contacts who satisfy all the conditions you are about to define for the segment rule. Alternatively, you can select ANY, if you want to include all the contacts who satisfy at least one of the conditions.
  2. In the following fields, define the conditions that will be applied to your deliveries, for example: Delivery id, Product Type, Delivery Type, Subject, Comment, Email group name or any other condition that is included in the Add conditions drop-down menu. If you want to find a specific delivery, you should complete the Delivery ID or Subject field. In our example we can consider all the clicks done for the “New collection spring 2018”. You must just inser the delivery subject in the right field or the delivery id. 

  1. Once you have completed all the required fields and conditions, click Add.
    The new rule is created and applied to the segment.
    IMPORTANT: The segment has not yet been saved. You can continue to define and add new rules to the segment before it is created. For example, you can add the contacts who opened a delivery, or include those who clicked a link in a different delivery, and so on.

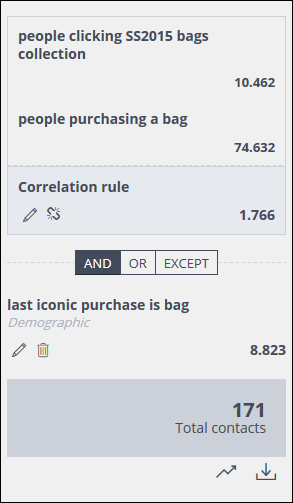
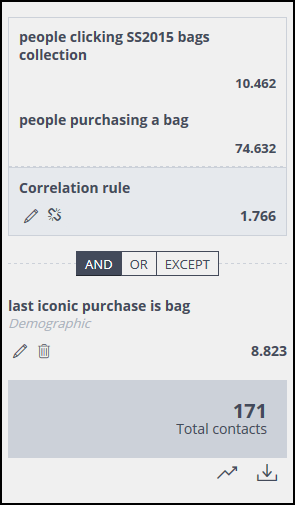
Every time you add a new rule to the segment, it is displayed in the Segment summary panel, positioned to the right of the New segment page.

When you add more than one rule, the way they interact with the previous rule must be defined. As a result, the order in which you create rules is important.

  • The AND option selects all those contacts who conform with both rules. For example, all those contacts who clicked on a link within both deliveries.
  • The OR option selects all those contacts who conform with either rule. For example, all those contacts who clicked on a link in delivery A, or opened delivery B.

  • The EXCEPT option selects all those contacts who conform with the first rule, minus those who match the second one. For example, all those contacts who opened delivery A, minus all those who clicked on a link in delivery B.
  1. When you have defined all the required rules and their interactions, you can Save the segment, or select Start new plan.

See the Contactplan Guide for more about creating a plan directly from a saved segment.

Read more
Collect new contacts to promote your brand and know them better! Create customized subscription forms

Scope

In this tutorial, you will learn how to create a subscription form and collect contact details. A newsletter from the Contactlab Maison website is used as an example.

Procedure

When you create a subscription in Contactsend, a subscription form, the links to the appropriate fields in the database, and the unsubscribe link are generated automatically.
To be able to create a subscription in Contactsend, you need to have set up a database where you can store the contact details, and the appropriate email group (a container that is used to group deliveries).

To create a subscription, do the following:

  1. Sign in to the platform, and click Configure.
  2. Click email groups.
    A list of email groups that are associated with the company display, together with additional information.
  3. Click the subscriptions
    The email groups – subscriptions page displays, listing all the currently available subscriptions.
  4. To create a new subscription, click + Create new form.
    The email groups subscriptions form page displays.

recaptcha

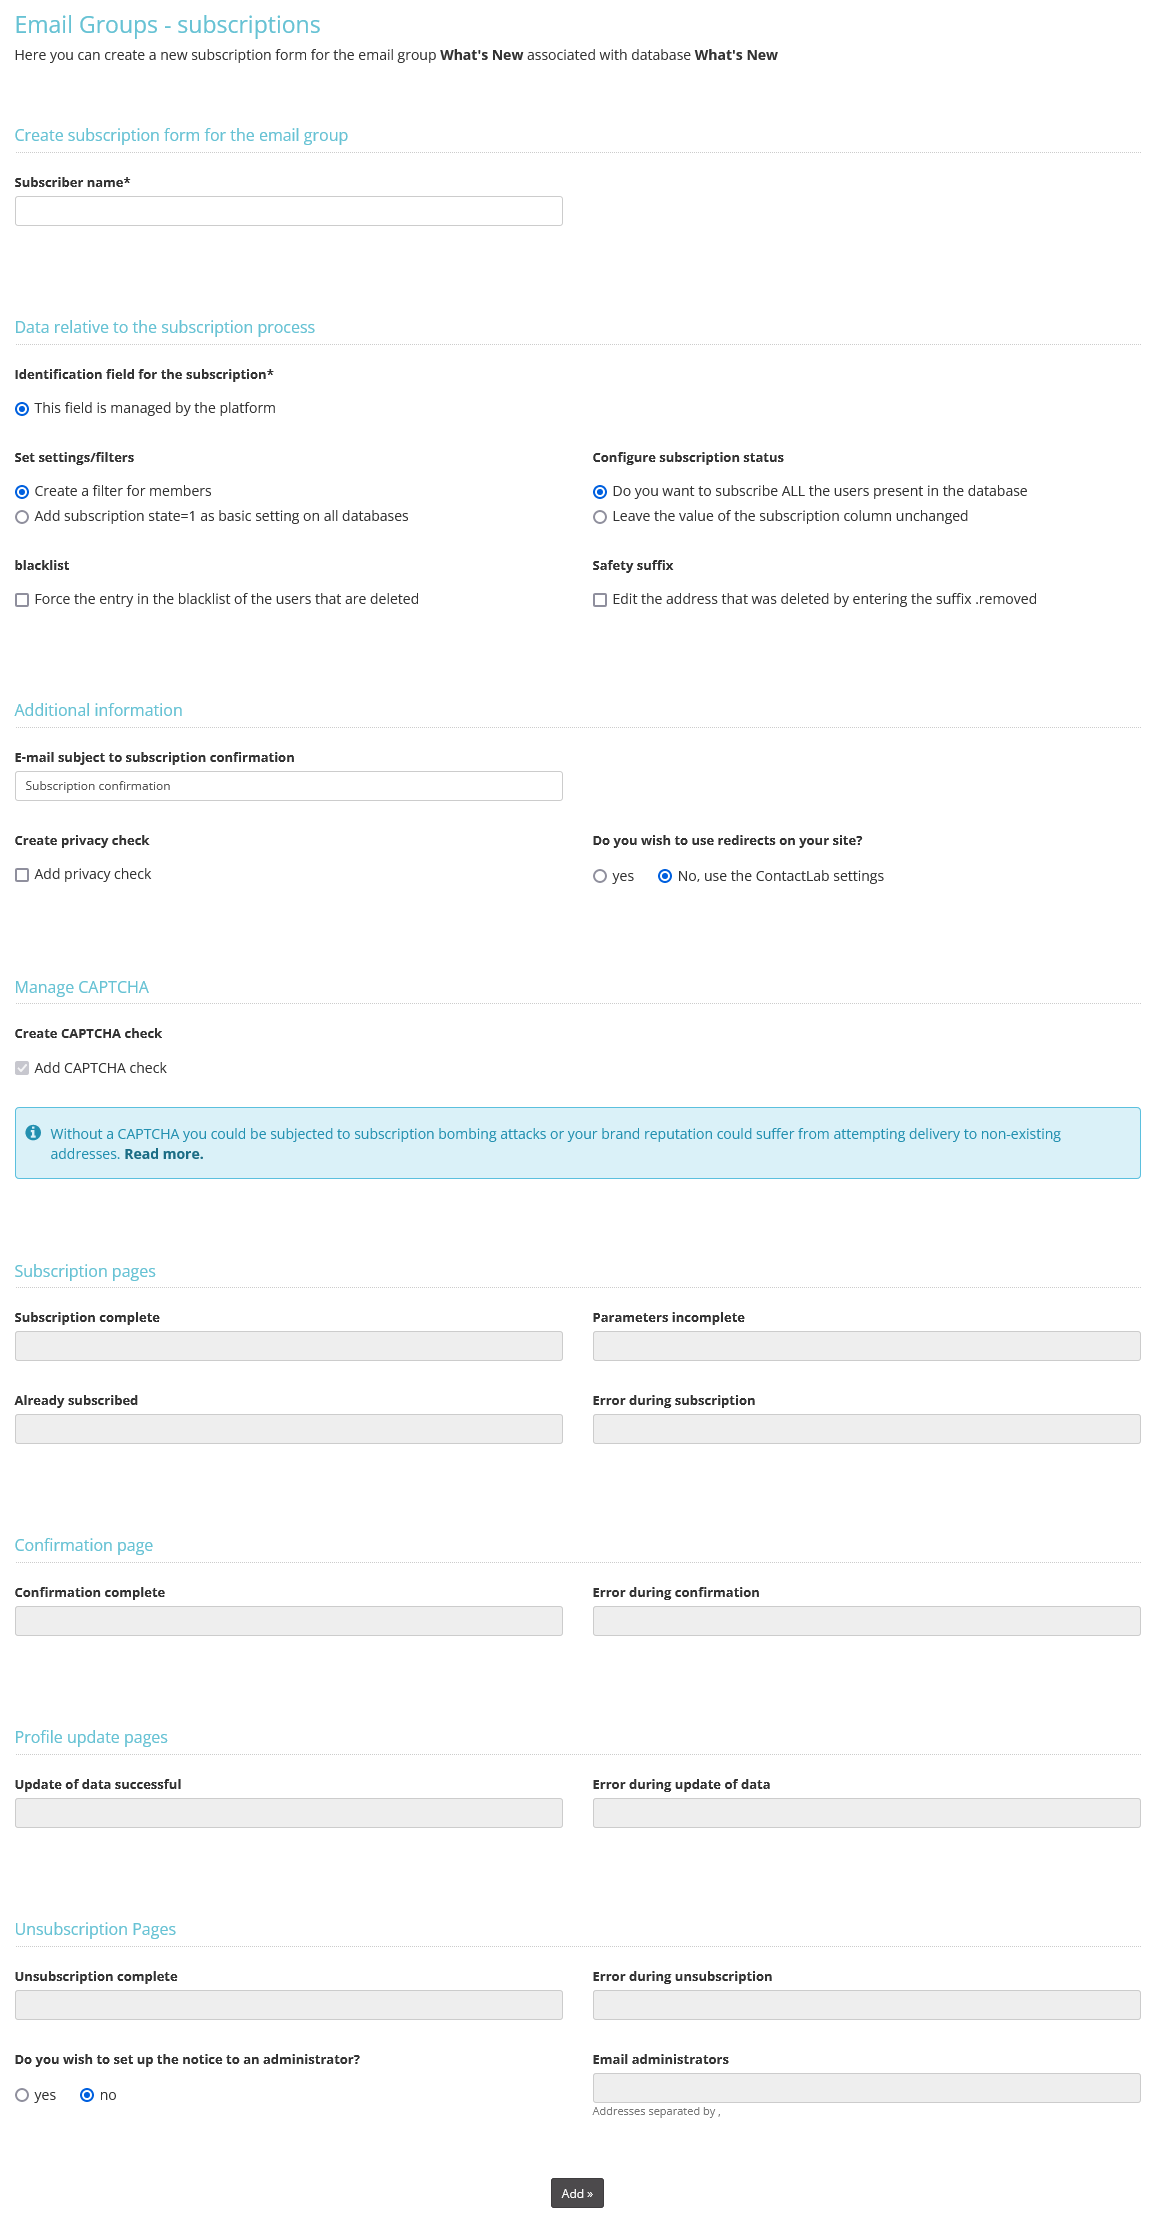
The email groups subscriptions form page

The email groups subscriptions form page enables you to define the properties of the subscription form, according to the selected email group and the associated database.

  1. Under Subscriber name, enter a unique and recognizable name for the form.
    For example, ‘Maison Newsletter subscription’.
  2. Under Data relative to the subscription process, complete the fields as required.
    1. Under Identification field for the subscription, select one of the following:
      1. This field is managed by the platform.
        Choose this, if you want Contactsend to manage the subscription registration field in the form. The system automatically creates a new field in the database, with a name such as _cls, _cls1, _cls2 and so on.
      2. This field is already present in the database.
        Choose this, if you want Contactsend to use an existing database field.

Regardless of your choice, the subscription registration field for each contact will contain one of the following numerical values, according to the subscription status:
1: The contact has subscribed
-1: The contact has unsubscribed
0: The contact is pending.

  1. Under Set settings/filters, select either:
    1. Create a filter for members.
      Choose this, to automatically create a filter for the database, which includes all the contacts who have subscribed.
      or:
    2. Add subscription state = 1 as basic setting on all databases.
      The subscription registration field is set to 1 (subscribed) for all records. Any contacts set to 0 or -1 will not be displayed in the database.
  1. Under blacklist, select Force the entry in the blacklist of the users that are deleted, if required.
  2. Under Configure subscription status, select either:
    1. Do you want to subscribe ALL the users present in the database.
      By default, Contactsend automatically sets the subscription registration field to 0. If you choose this option, all contacts will be set to 1 (subscribed).
      or:
    2. Leave the value of the subscription column unchanged.
  1. Under Safety suffix, select Edit the address that was deleted by entering the suffix .removed, if required.
    This helps avoid returning an unsubscribed contact to the subscription list.

The email groups subscriptions form page creates a double opt-in subscription process. You can customize some of these options.

  1. Under Additional information, do the following as required:
    1. Under E-mail subject to subscription confirmation, enter a new subject for the confirmation email, as appropriate.
    2. Under Create privacy check, select Add privacy check, if required.
      This adds a privacy statement to the email, which contacts must accept before subscribing.

The subscription process requires different pages, to which contacts can be redirected, as needed. You can choose to let Contactsend manage these pages or use ones on your website.
Under Do you wish to use redirects on your site, select Yes or No.

  1. The CAPTCHA check, i.e. the test that checks whether the contact is human or a bot, is active by default and is the so-called invisible captcha. For more details, go to the subscription page.
  2. If you selected Yes under Do you wish to use redirects on your site, enter the appropriate URL for each page type under Subscription pages, Confirmation page, Profile update pages and Unsubscription pages.
  3. When you are finished, click Add >>.
    You are returned to the email groups – subscriptions page and the subscription is added to the list.

To complete the example used here, the subscription form can now be added to the Contactlab ‘Maison’ website and used to collect contact details in the database.

See the Contactsend Guide for more abut creating and managing subscriptions.
Read more