
To access the user db section, click configure in the main menu and then click the user db panel. The database list displays (figure 1).
Click the appropriate link below to scroll to the information you require:
Overview
This section (figure 1) enables you to create and manage the database/s that contain the group contact (user) data.

Figure 1: The database list
A contact or user database (DB) can be:
- Associated with one or more groups.
- Isolated
It is not linked to any group.
The contacts in the database can be subdivided into segments by applying filters.
The Last delivery column displays the latest email or SMS delivery that was sent using that database. If it is empty, the database has not been used to send a delivery.
If a red No Entry icon appears in the Status column, the system has temporarily put the database into read-only mode. A lightning bolt icon indicates that the user activity monitor is active.
If you click on the + icon, to the left of a database entry, further details are displayed, such as:
- The number of fields.
- The number of filters.
Test and real filters. - The field set as the primary key.
- The configured channel.
Email, SMS, and similar. - The last delivery.
- Statistics.
Creating a new database
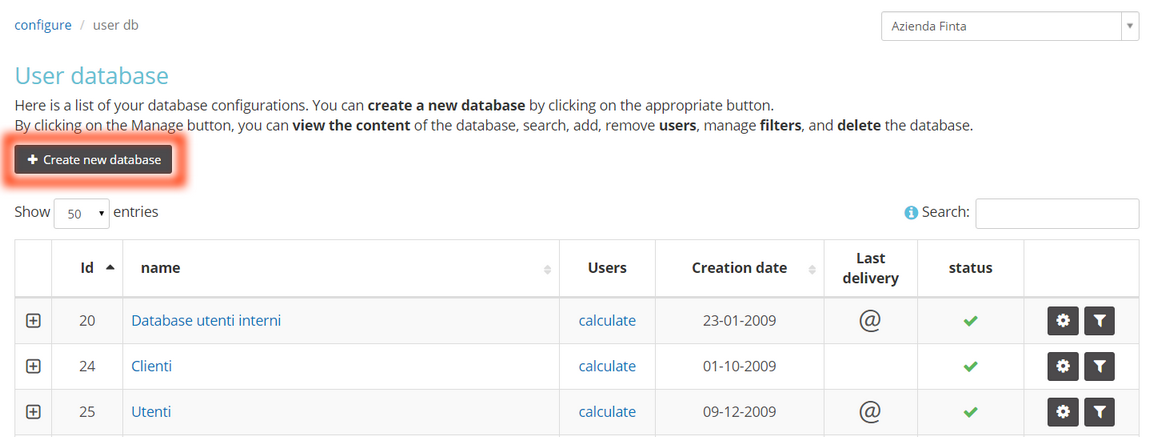
Figure 2: The Create new database button on the database list page
To create a new database, do the following:
- Click Create new database on the database list page (figure 2).
The Create new database wizard displays (figure 3), which guides you through the procedure.
The first page includes the database mode options.
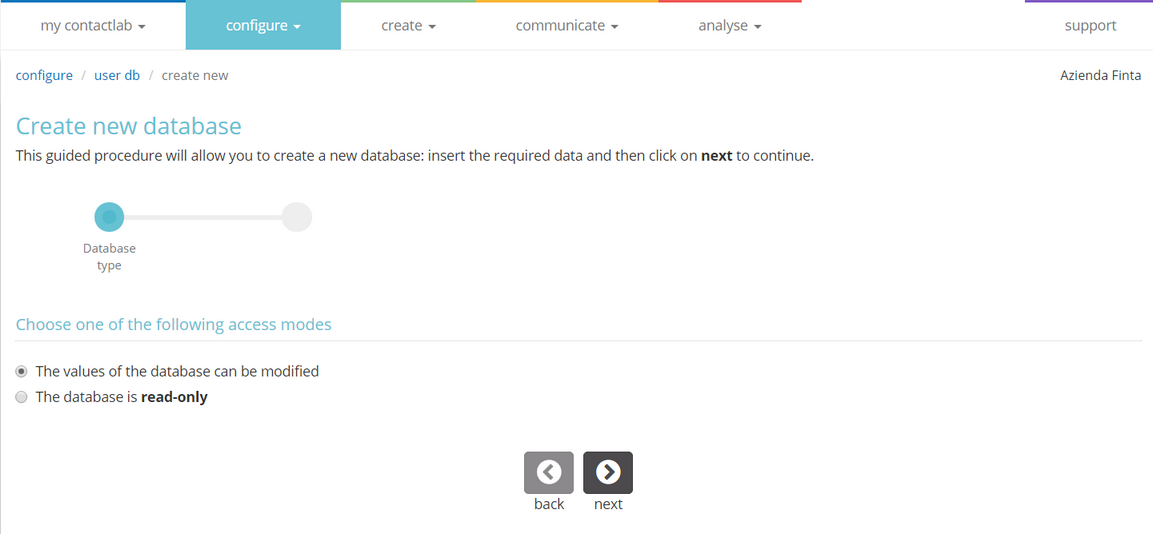
Figure 3: The first Create new database wizard page with the database mode options
- On the database mode wizard page (figure 3), select whether the database can be modified, or if it is to be read-only.
Read-only databases can be viewed and the data they contain can be downloaded, but they cannot be edited. - Click next.
The database details and structure wizard page displays.
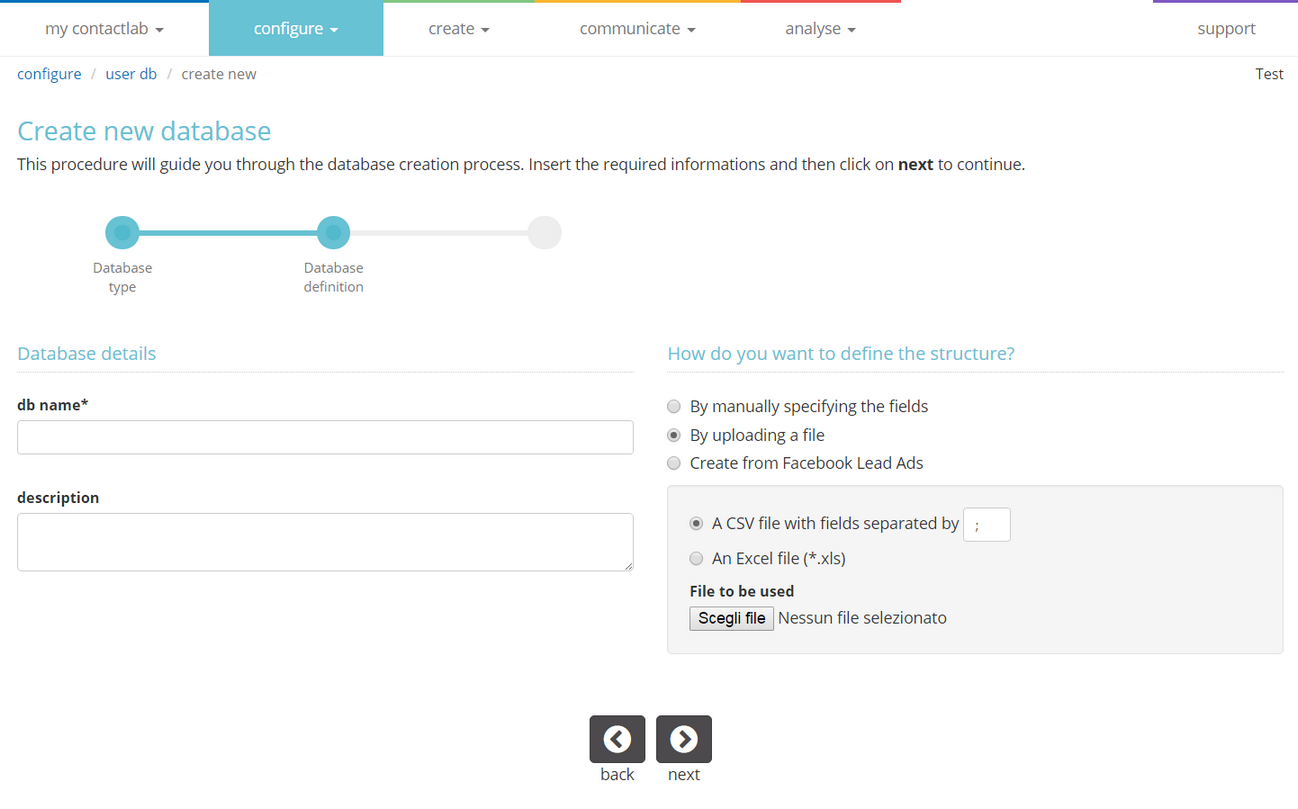
Figure 4: Example of the database details and structure wizard page
- On the database details and structure wizard page (figure 4), under Database details, enter the db name and optional description.
- Under How do you want to define the structure? choose between the following options to determine how you want to create the database:
- By manually specifying the fields.
Enter the contacts (users) directly, using Contactsend. - By uploading a file.
Import the list of contacts (users) from an external file, for example, an Excel speadsheet file, or a CSV file. - Create from Facebook Lead Ads.
Import contacts (users) directly from Facebook Lead Ads.
- By manually specifying the fields.
Note:
When you create a database using any of these options, you can choose to activate user activity monitor on this database. This ensures that the date and time a recipient last opened a message, or clicked a link, is recorded in the database. The following fields are added to the database, as a result:
__cl_last_view
The date and time of the last open.
__cl_last_click
The date and time of the last click.
If you also select Perform historical data recalculation (if possible) for the following date range, you will be able to calculate opens and clicks for every user, within the defined period.
- Click the appropriate link above for the next steps, according to how you want to create your database.
ATTENTION: The maximum number of db per company is 200. Once this limit is reached, no more databases can be created, but obsolete databases must be deleted.
Manually specifying the database fields
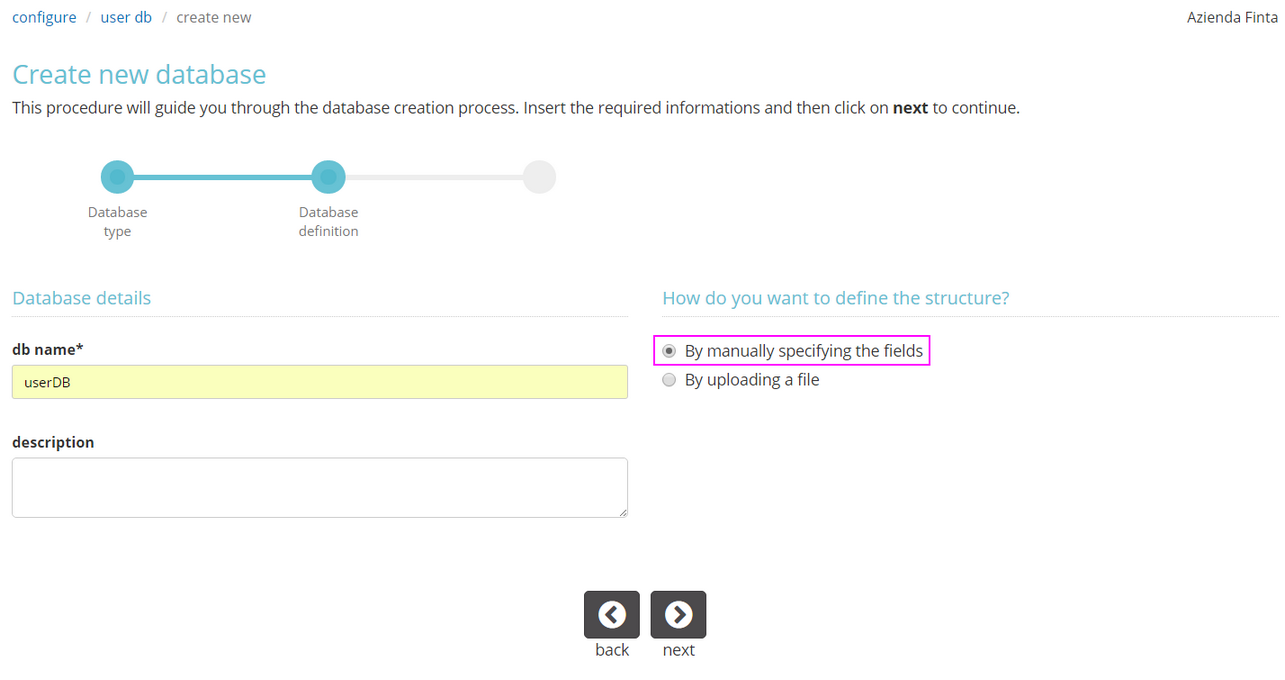
Figure 5: The database details and structure wizard page, with By manually specifying the fields selected
You can manually specify the database fields by doing the following:
- Once you have entered the db name and selected By manually specifying the fields in the database details and structure wizard page (figure 5), click next.
The Database structure wizard page displays.
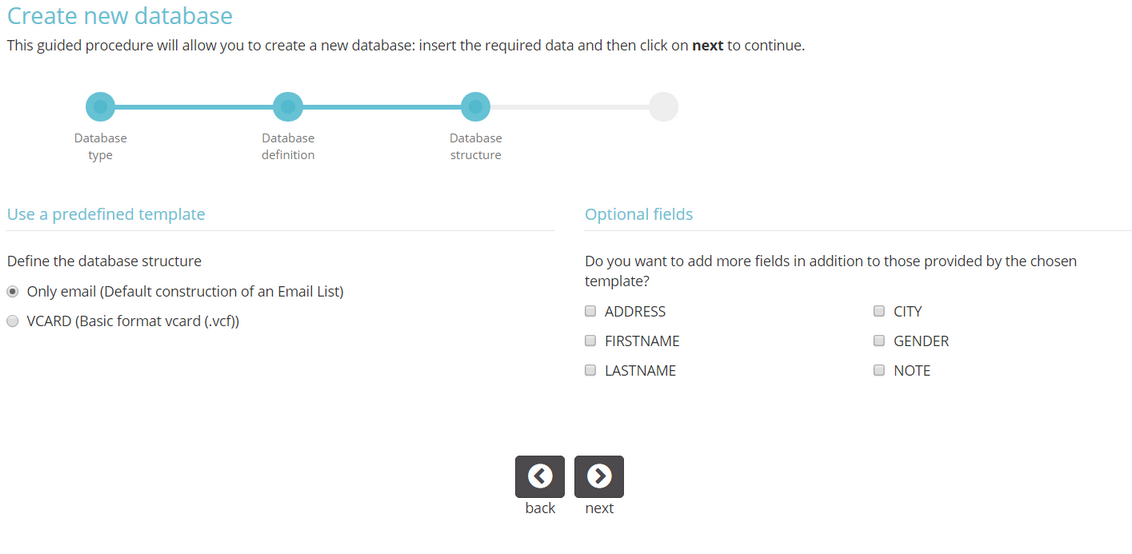
Figure 6: The database structure wizard page
- Under Use a predefined template (figure 6), select one of the following to define the database structure:
- Only email
The initial database structure comprises of just an email field. You can add further fields, such as FIRSTNAME, LASTNAME, ADDRESS and similar, by selecting them under Optional fields. See below for more details. - VCARD
Enables you to import the predefined structure from a VCard (the format used for address books by many email clients, such as Outlook, Eudora and similar). For example, NAME, SURNAME, EMAIL, PHONE, COMPANY, ADDRESS and so on.
- Only email
- Under Optional fields, select any further fields that you require, in addition to those in the template.
You can always add fields later.
- When you are finished, click next.
The Configuration Summary and confirmation wizard page displays.
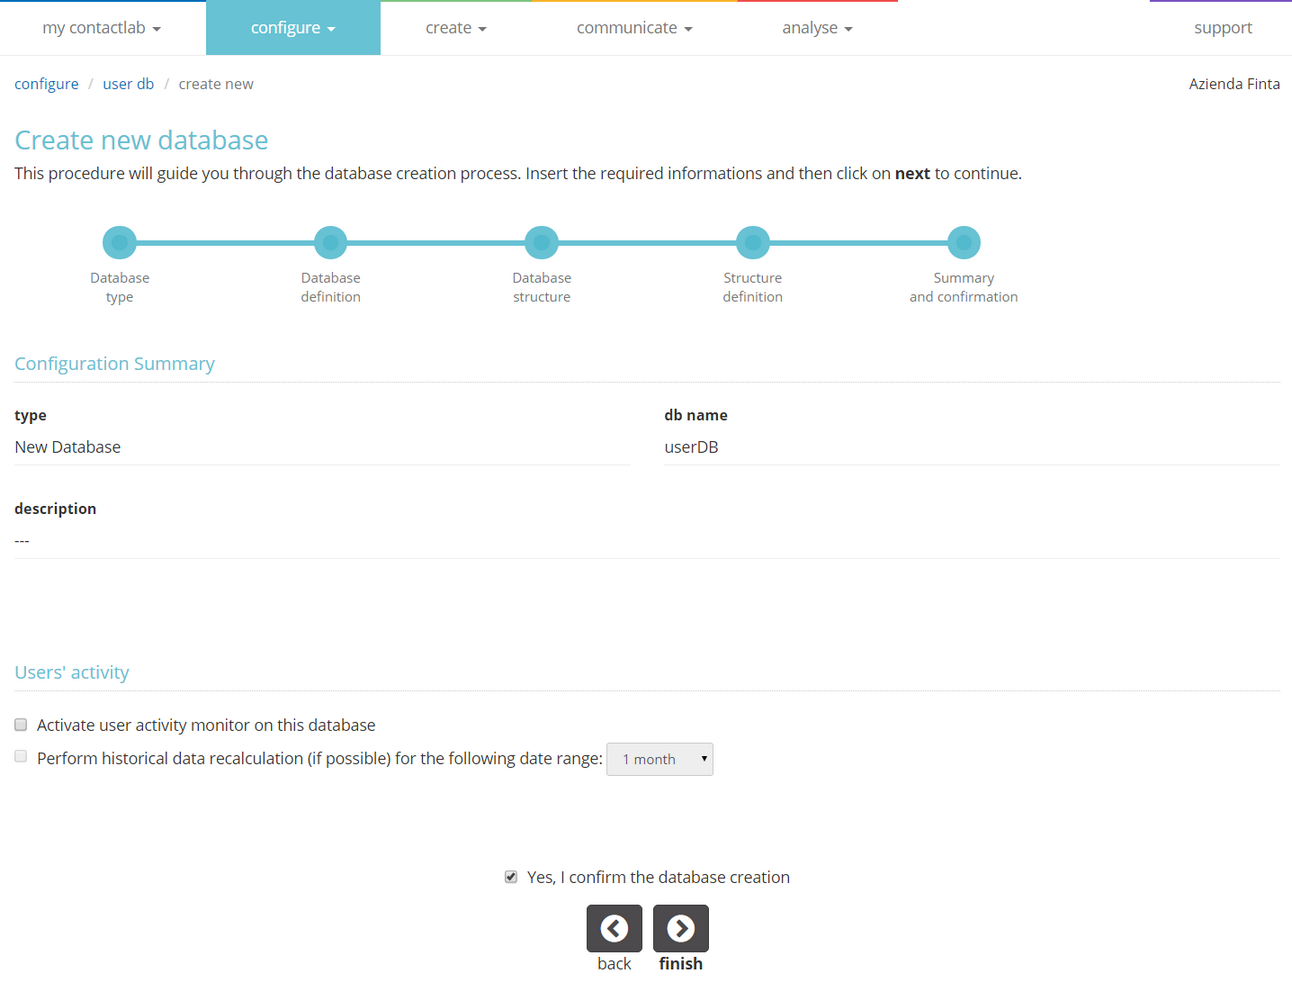
Figure 7: The Configuration Summary and confirmation wizard page
- Do the following:
- Check the details.
- Select one or both of the options under Users’ activity (figure 7), if required:
- Activate user activity monitor on this database.
- Perform historical data recalculation, within the selected date range.
- Click Yes, I confirm the database creation.
- Click finish to create the database.
A window confirms that the database is created.
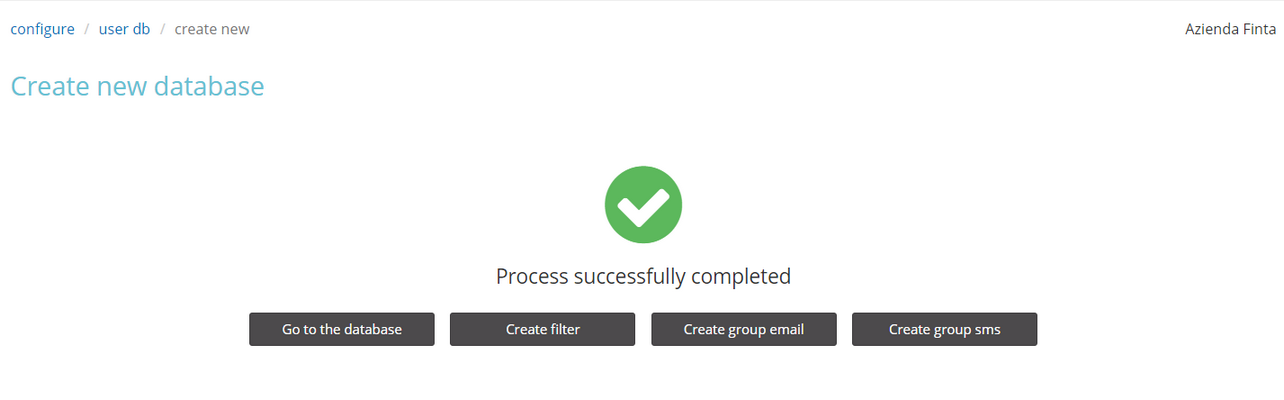
Figure 8: The confirmation window
See Viewing and managing an existing database for more about using the database.
Uploading a file to create the database
Figure 9: The database details and structure wizard page, with By uploading file selected
You can use an existing Excel (.xls) or CSV file to create a new database, by doing the following:
- Once you have entered the db name and selected By uploading file in the database details and structure wizard page (Figure 9):
- Select the appropriate format.
- Select the file to be uploaded.
Note:
If you are using an Excel file, all the data must be included in the first worksheet. Any data in other worksheets is not uploaded.
The first row of your file should consist of the column headings.
- Click next.
The Database structure wizard page displays.
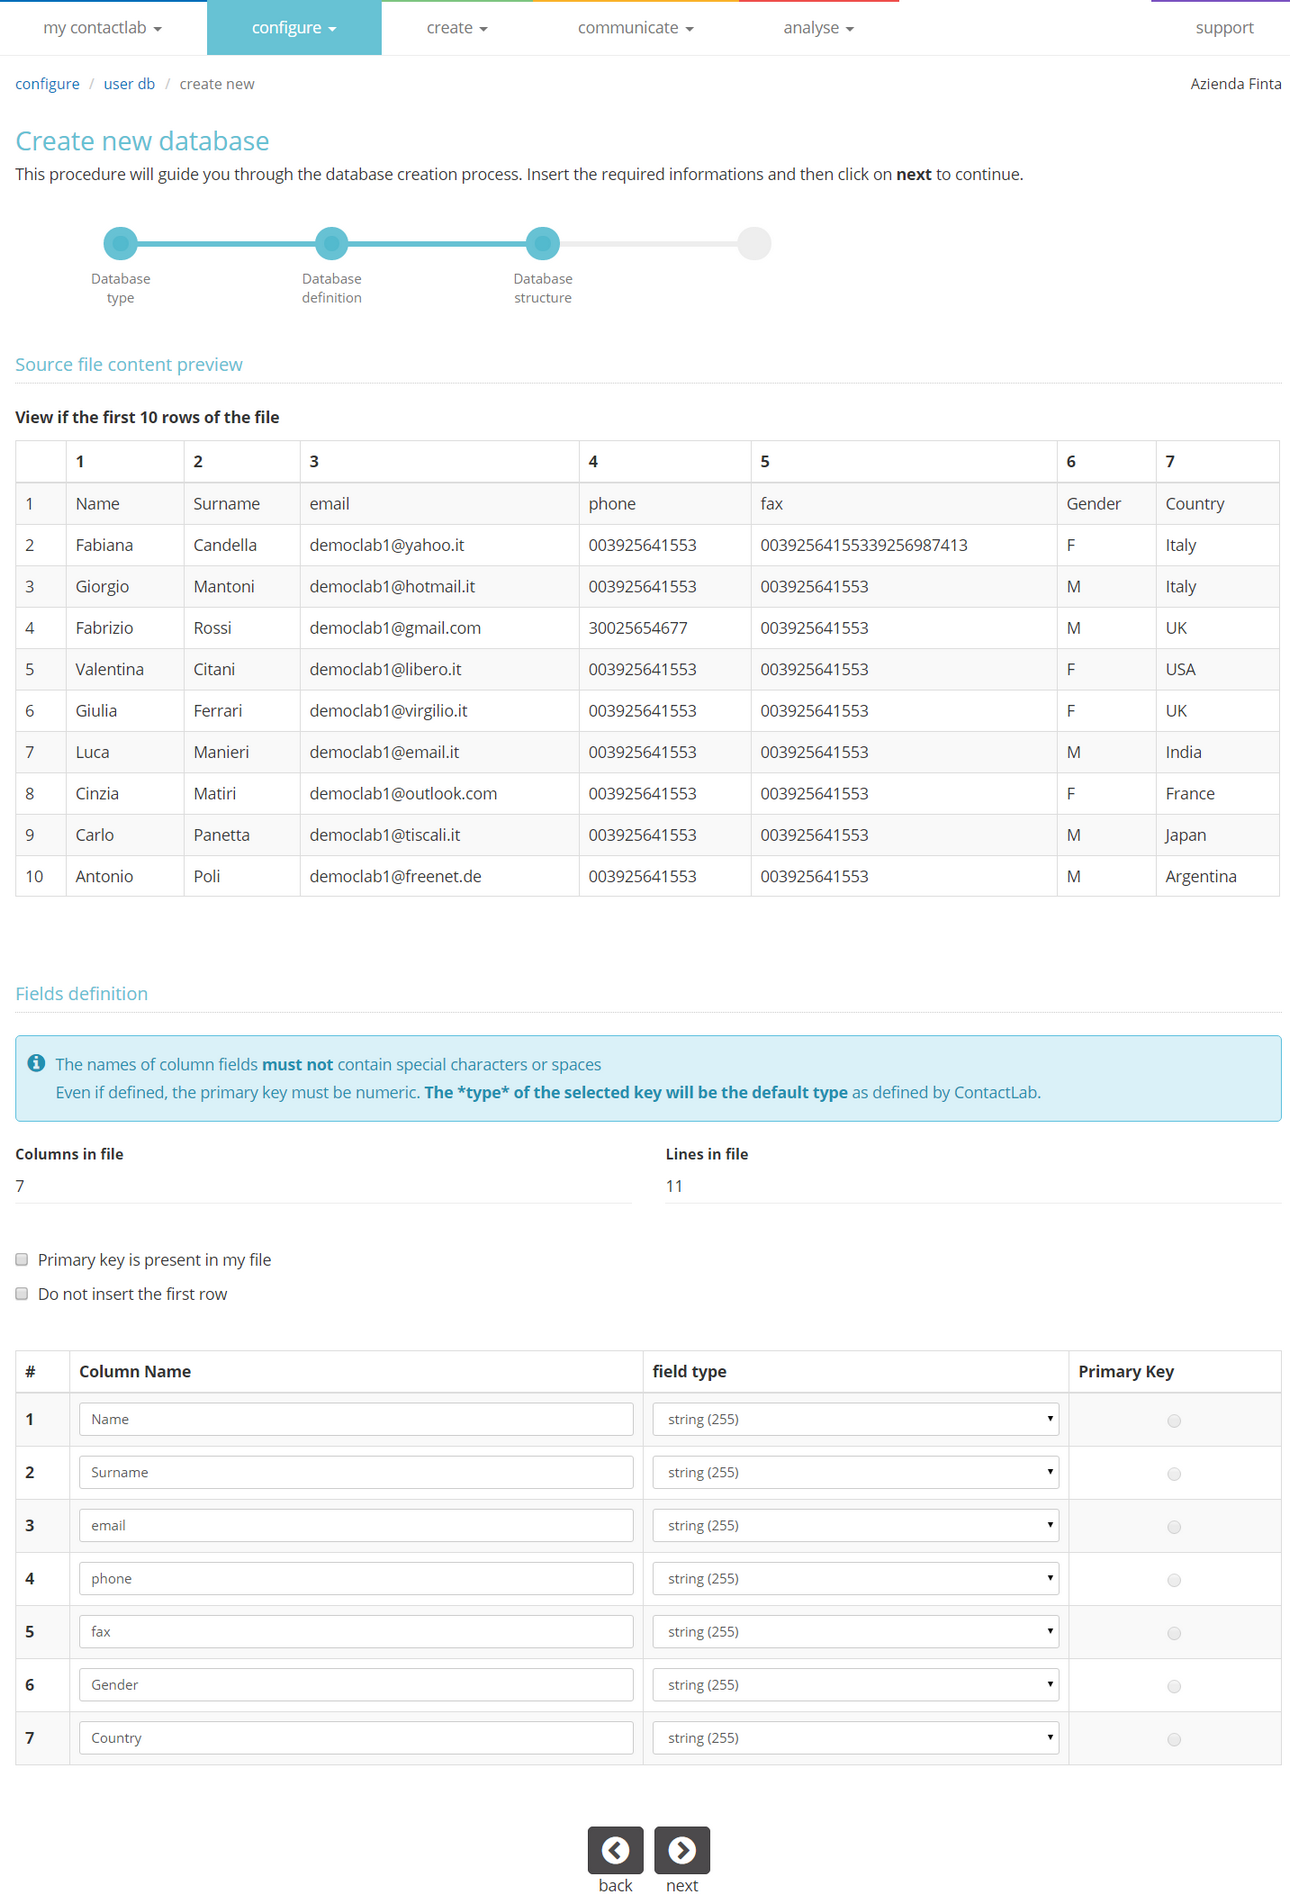
Figure 10: The database structure wizard page
- Under Source file content preview (figure 10), check that all the data has been included correctly in the first ten rows of the file.
Under Fields definition, the number of Columns in file (fields) and Lines in file (rows) are displayed, for information purposes.
- Do the following, as required:
- If you want to manage the primary key of the database, select Primary key is present in my file.
The primary key must be an integer and cannot be negative.
If you do not select this option, the primary key is managed by Contactsend, and a PK_ID column is added to the database. - If you do not want the first row of your file to appear as a contact (user) record, select Do not insert the first row.
We recommend that you select this option, if the first row of your file consists of the column headings.
- If you want to manage the primary key of the database, select Primary key is present in my file.
The next table displays the current column names. By default, these are taken from the cells in the first row of your file. Do the following, as required:
- Enter or edit the column names, if needed.
Note:
Column names cannot include spaces, hyphens or special characters. Only unaccented a-z and A-Z characters, numbers and underscores (_) are allowed.
Remember that some names are unavailable, because they are reserved for use by Contactsend. If you try to use a reserved name, a message is displayed. - Edit the field type if required. Here is a short description of each type:Character (1) : Fixed dimension field (1 character). E.G: value M or F for the gender.
Character (2) : Fixed dimension field (2 characters). E.G: value UK standing for United Kingdom or IT for Italian language.
Text: Field that can contain up to 64 K of text. For short textual content we suggest to use a string field instead.
String (255): Textual field up to 255 characters maximum.
Numeric (1): Campo numerico di 1 cifra. Esempio: valore 0 oppure 1 per indicare la sottoscrizione o meno ad un servizio.
Numeric (11): Campo numerico di 11 cifre massimo.
Numeric (non negative): Campo numerico che non può essere negativo. Esempio: l’id numerico usato come chiave primaria dal database.
Date: Campo che esprime una data Mysql “yyyy-MM-dd” (anno-.mese-giorno).
Date and time: Campo che esprime una data Mysql “yyyy-MM-dd hh.mm.ss” (anno-mese-giorno ora-minuto-secondo)If you define a field as a date or a date/time type, you are asked for the date format, so it can be converted by the system to the yyyy-MM-dd MySQL format. - Select the column that includes the primary key, if appropriate. See above for more details.
- When you are finished, click next.
The Structure definition wizard page displays. - In the E-mail column of the table under Column definition (figure 11), select the field (column) name from the uploaded file, where the email addresses can be found.
In this example, it is the email field (column) name. - Do the same for SMS, if they are enabled in your contract.
- When you are finished, click next.
The Configuration Summary and confirmation wizard page displays.
Figure 12: The Configuration Summary and confirmation wizard page
- Do the following:
- Check the details.
- Select one or both of the options under Users’ activity (figure 12), if required:
- Activate user activity monitor on the database.
- Perform historical data recalculation, within the selected date range.
- Click Yes, I confirm the database creation.
- Click finish to create the database.
A window confirms that the database is created.
Figure 13: The confirmation window
See Viewing and managing an existing database for more about using the database.
Creating the database from Facebook Lead Ads
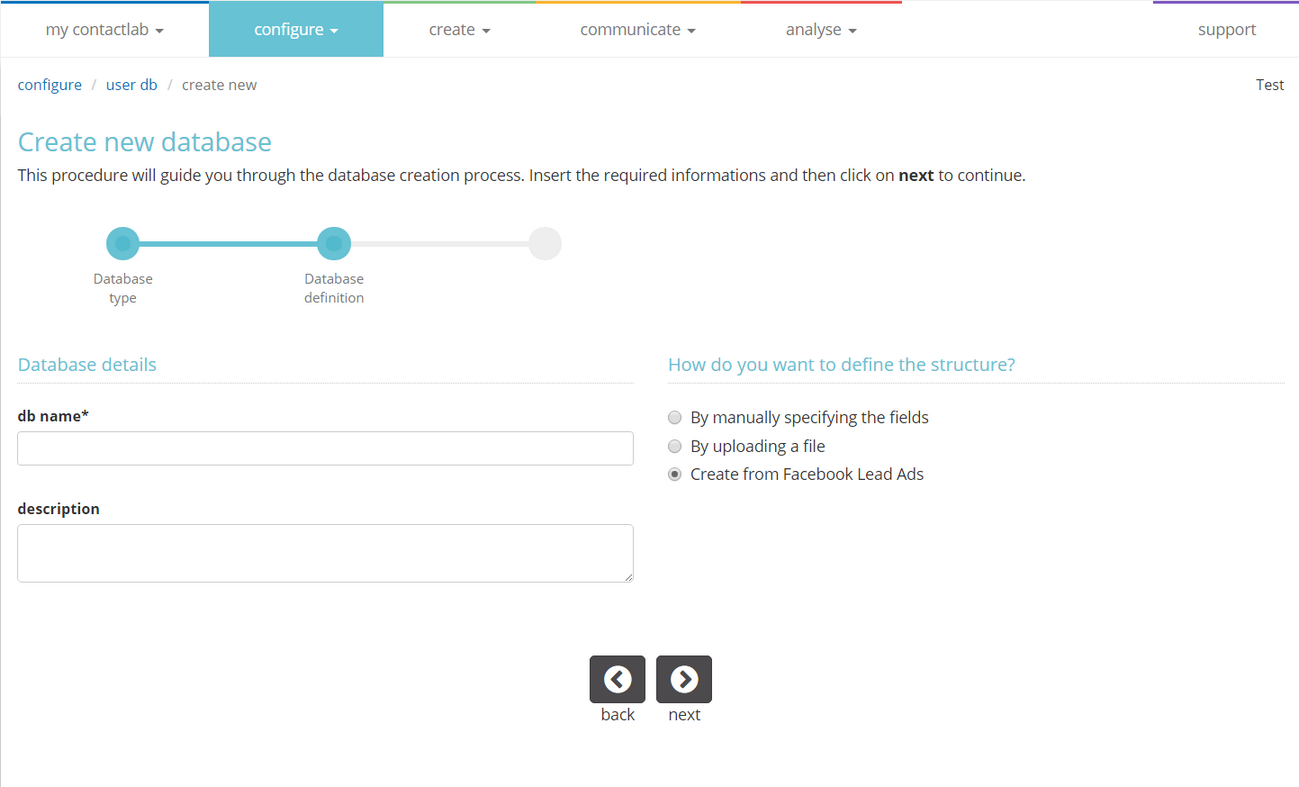
Figure 14: The database details and structure wizard page, with Create from Facebook Lead Ads selected
You can create the database from Facebook Lead Ads by doing the following:
- Once you have entered the db name and selected Create from Facebook Lead Ads in the database details and structure wizard page (Figure 14), click next.
The Select form wizard page displays.
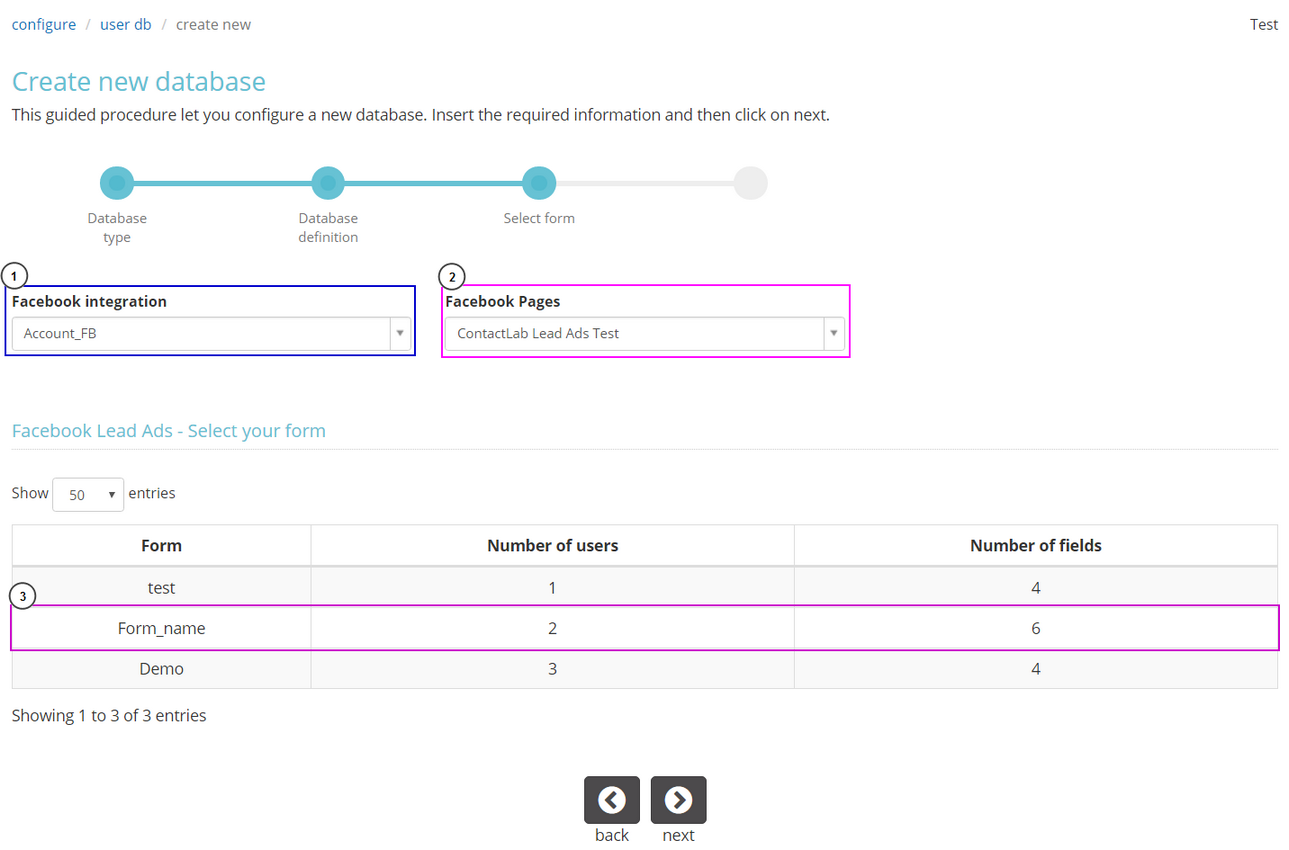
Figure 15: The Select form wizard page
- Select the Facebook integration and Facebook page (figure 15) that you want to use to create the database.
- Under Facebook Lead Ads – Select your form, select the appropriate form.
- Click next.
The Field configuration wizard page displays.
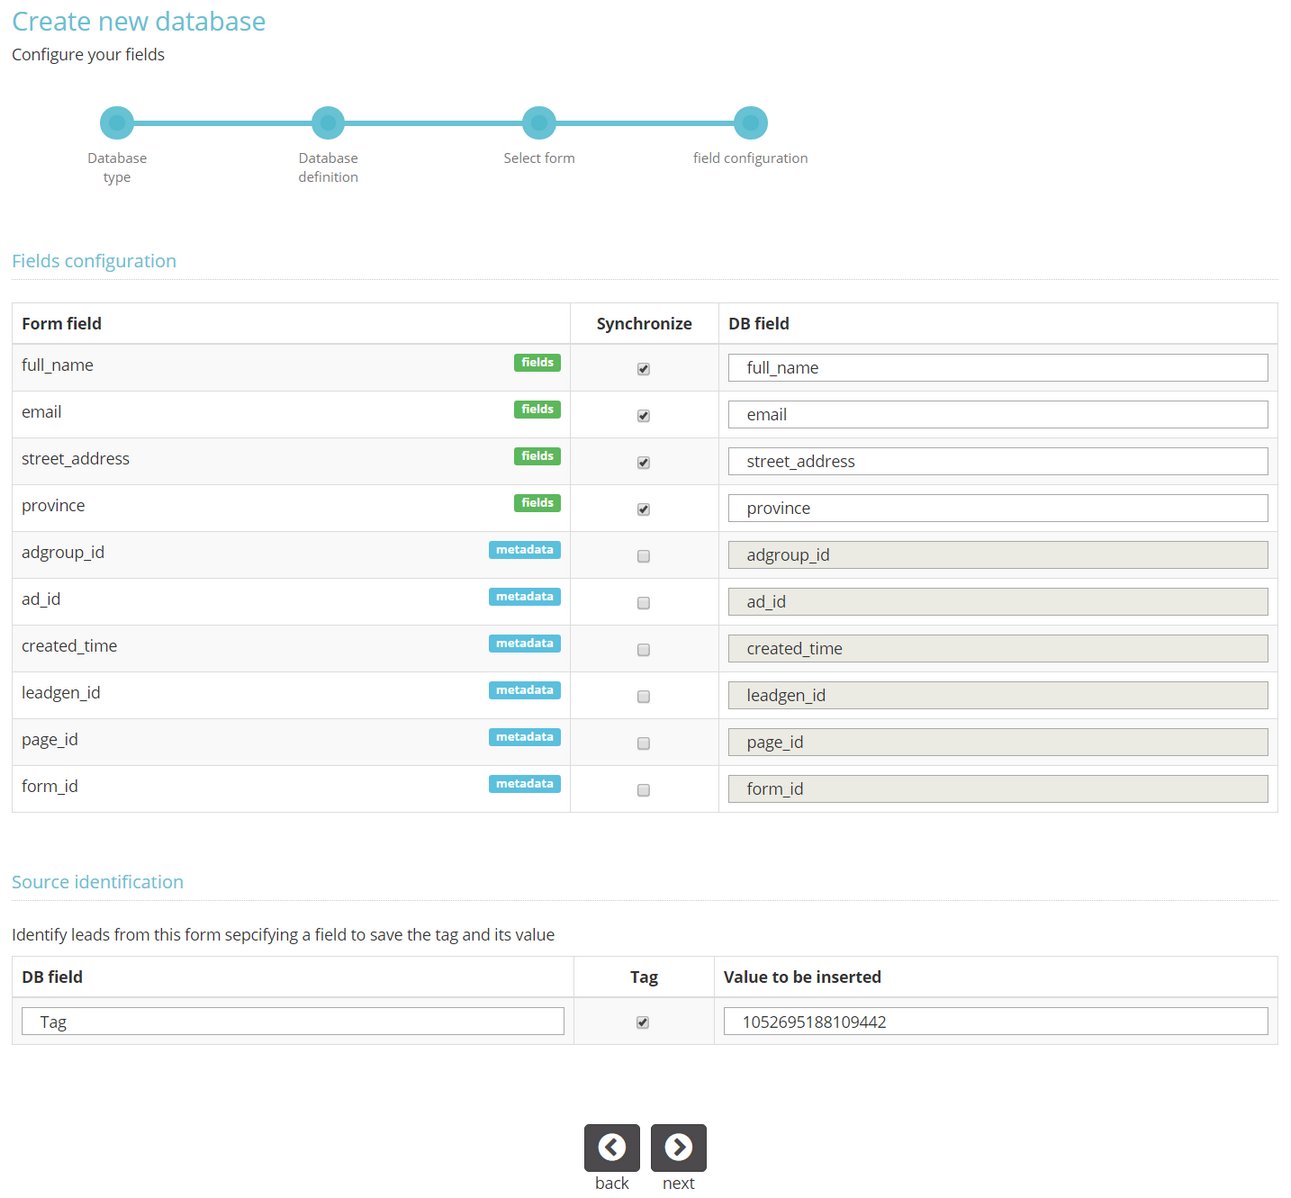
Figure 16: The Field configuration wizard page
- Under Fields configuration (figure 16), select the fields from the Facebook form that you want to include in the Contactsend database.
You can also choose to include metadata, such as adgroup_id, ad_id, created_time, leadgen_id, page_id and form_id. - Under Source identification, you can choose to enter a constant value in a defined database field, such as Tag, for every new record from the form.
The default ID of the form is used by default. - When you are finished, click next.
The Structure definition wizard page displays.
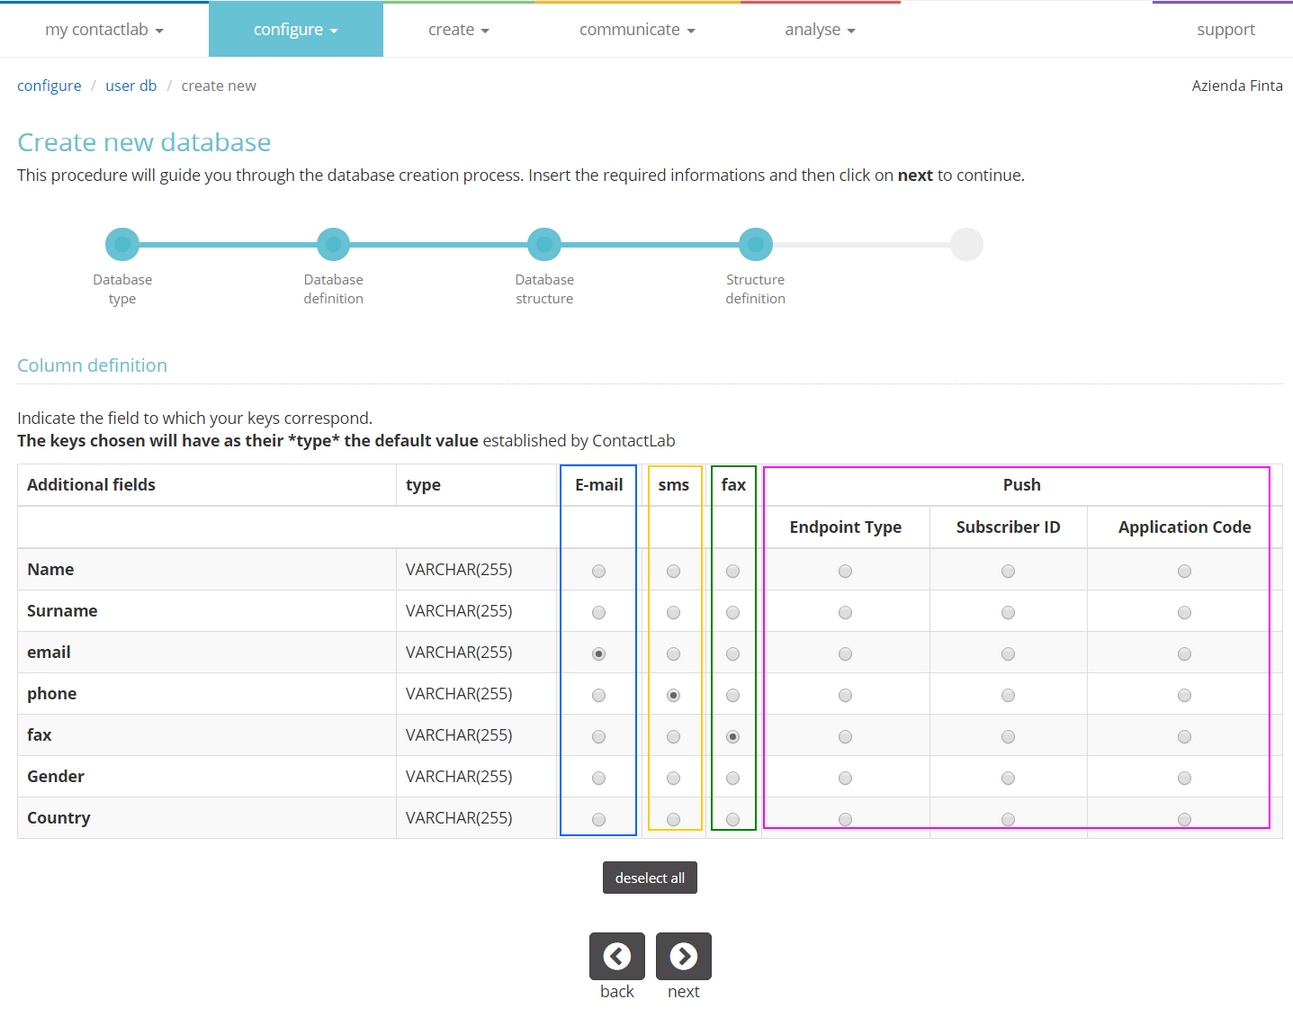
Figure 17: The Structure definition wizard page
- In the E-mail column of the table under Column definition (figure 17), select the field (column) name where the email addresses can be found.
In this example, it is the email field (column) name. - Do the same for SMS, if they are enabled in your contract.
- When you are finished, click next.
The Configuration Summary and confirmation wizard page displays.
Figure 18: The Configuration Summary and confirmation wizard page
- Do the following:
- Check the details.
- Select one or both of the options under Users’ activity (figure 18), if required:
- Activate user activity monitor on the database.
- Perform historical data recalculation, within the selected date range.
- Click Yes, I confirm the database creation.
- Click finish to create the database.
A window confirms that the database is created.
Figure 19: The confirmation window
See Viewing and managing an existing database for more about using the database.
Viewing and managing an existing database and filters
To view and manage an existing database, click configure in the main menu and then click the user db panel. The database list displays (figure 20).
Figure 20: The database list
- Locate the relevant database in the list, and check in the status column to see if it is available to be modified at present.
A green check (tick) mark indicates that it can be modified. A red No Entry icon means that it is currently in read-only mode.
The system automatically puts a database in read-only mode when:
- A group associated with the database is being created (create > campaign).
- A campaign belonging to a group that is associated with the database is queued, in communicate > delivery queue.
- A campaign is being deployed.
- A campaign has been scheduled.
This is done to avoid serious system errors being generated as a result of modifying data in the relevant database, for example, email addresses, while a campaign is being deployed or has been scheduled. This safety system puts a database in read-only mode, until the associated delivery processes have been terminated.
- Click the manage icon in the appropriate database row.
The database management page for the selected database displays (figure 21).
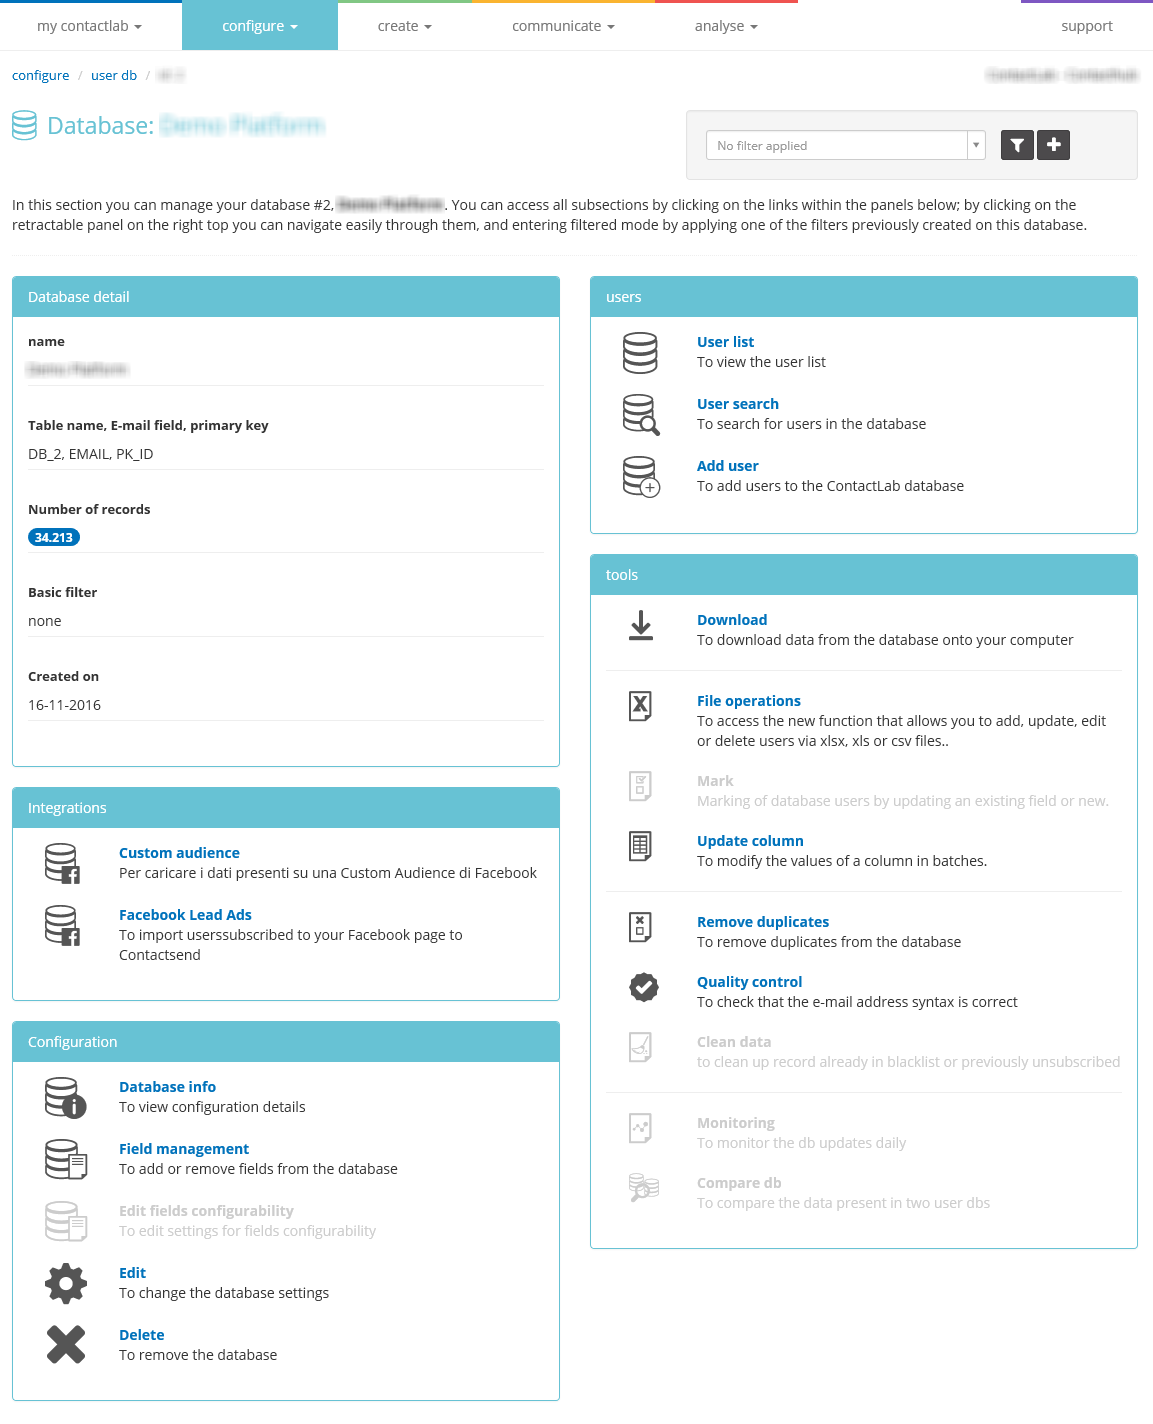
Figure 21: Example of the database management page
The database management page
The database management page enables you to view and manage all aspects of the selected database. It is subdivided into the following panels:
- Filter management
By default, all contacts (users) in the database are available. The filter management panel, positioned towards the top-right of the page, enables you to apply, manage and edit an existing filter, or create a new one. - Database details
Displays a summary of details related to the database. - Integrations
Enables you to manage any integrations that are associated with the database. - Configuration
Provides access to database configuration information and tools. - Users
Enables you to:- View and search the list of contacts (users) in the database.
- Add new contacts (users).
- Tools
Provides access to a range of database management utilities.
Click the appropriate link above for more about the database management panel that you are interested in.
Using the filter management panel

Figure 22: The filter management panel
Overview
Filters are contact (user) subsets, which are grouped according to certain attributes. You can group contacts according to a single characteristic, or a combination of attributes that are included in the relevant database fields, for example, age, gender, location, subscription date and similar.
Creating filters is an important activity. For example, suppose you have a group with an Italian version and an English one. To manage this situation, you do not need to create two separate databases. You simply create a single database with a LANGUAGE field, then define a filter named, for example, English speakers, which is used to group all the database records with the LANGUAGE field set to ENG. When delivering a newspaper in English, instead of sending To all users, simply select the English speakers filter.
Test filters
Selected contacts can be identified in the database and added to a test filter, which can then be used to test the group, before sending a message to all those in the database.
Note:
Test campaigns can be delivered to a maximum of 30 recipients. If a filter that is used for a test contains more contacts, only the first 30 will be included in the test delivery.
Click the appropriate link below, for more about the filter management panel functionality:
Applying an existing filter to a database
To apply an existing filter to a database:
- Click the downwards pointing arrow to the right of the filter field.
The available filters display. - Select the appropriate filter from the drop-down list.
The filter is applied to the database.
Creating a new filter
- To create a new filter for a database, do one of the following:
- In the database list, locate the relevant database and click filters.
The manage filters page displays. - Click + create new filter.
The create filter page displays, with a series of tabs.
or:
- In the filter management panel, click Manage filters.
The manage filters page displays. - Click + create new filter.
The create filter page displays, with a series of tabs.
or:
- In the filter management panel, click create new filter.
The create filter page displays, with a series of tabs.
- In the database list, locate the relevant database and click filters.
The create filter page consists of a series of tabs, which represent the different modes that can be used to create a filter:
IMPORTANT:
Once a filter has been created using one of the modes, it can only be modified or edited by using the same mode. For example, if a filter is created using the simple mode, it cannot be modified with the intermediate or advanced modes.
Click the appropriate link above for more about each of the modes.
Simple mode
The simple mode is suitable for creating filters to identify contacts (users) on the basis of their details or actions, and which can be defined using up to 10 conditions. In general, the simple mode is best applied to fields with potentially many different values, such as FIRSTNAME, CITY, ADDRESS and similar.
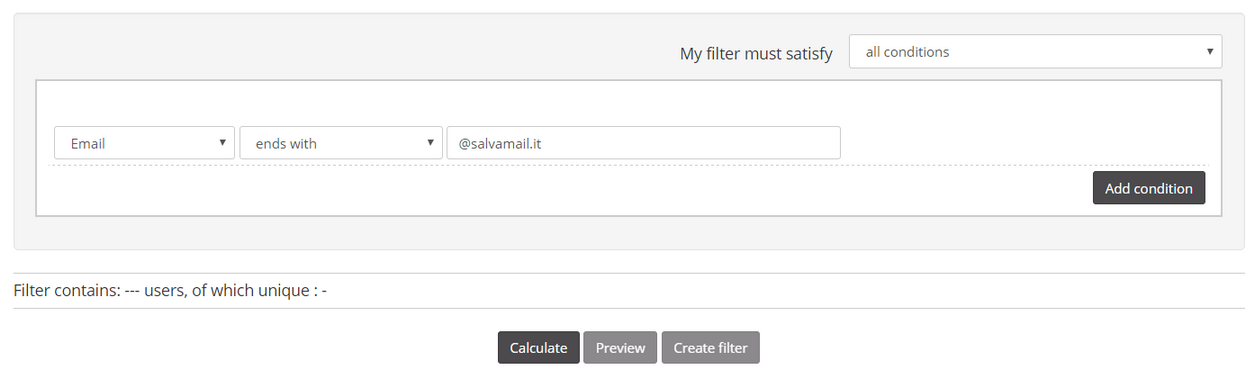
Figure 23: Detail from the create filter simple mode tab
To create a filter in the simple mode, do the following:
- Select the simple tab in the create filter page.
- Enter a Filter name.
- Under To be used for campaigns, select whether the the filter is to be used for test deliveries or real deliveries.
- Select whether the contacts (users) identified by the filter must satisfy all conditions, or at least one of the conditions.
- Use the drop-down lists to define the condition that is to be used to identify the contacts the filter will select.
For example, PK_ID, EMAIL, ADDRESS, User has opened and similar, and begins with, equals, is empty and so on. - Use the remaining field/s to complete the condition.
For example, if you have set the drop-down lists to FIRSTNAME and begins with, enter the first letters of the relevant name, such as Geo.
The system will select all contacts whose name begins with those letters, for example, Geoffrey, George, Georgina, Georgette and similar. - If you want to add a further condition, click Add condition and repeat steps 5 and 6.
Note:
The simple mode allows you to define up to 10 conditions. If you require a filter with more, you should use the advanced mode. - To view how many contacts are identified by the filter, click Calculate, or Preview to see a list of the last 10 records.
- If you are satisfied with the results, click Create filter.
In the example in figure 23, the filter will include all users with an email address ending in @salvamail.it.
See Search the database for contacts for more about creating a simple mode filter from a database contact (user) search.
Intermediate mode
The intermediate mode is best used to define a filter when there is potentially a large number of contact (user) records associated with fields that can have just a few possible values. For example, GENDER is a suitable field, with only two values, while FIRSTNAME is inappropriate.
Before using the intermediate mode, you should set the required filter fields, as follows:
- In the Configuration panel on the database management page, click Field management.
The field management page displays.
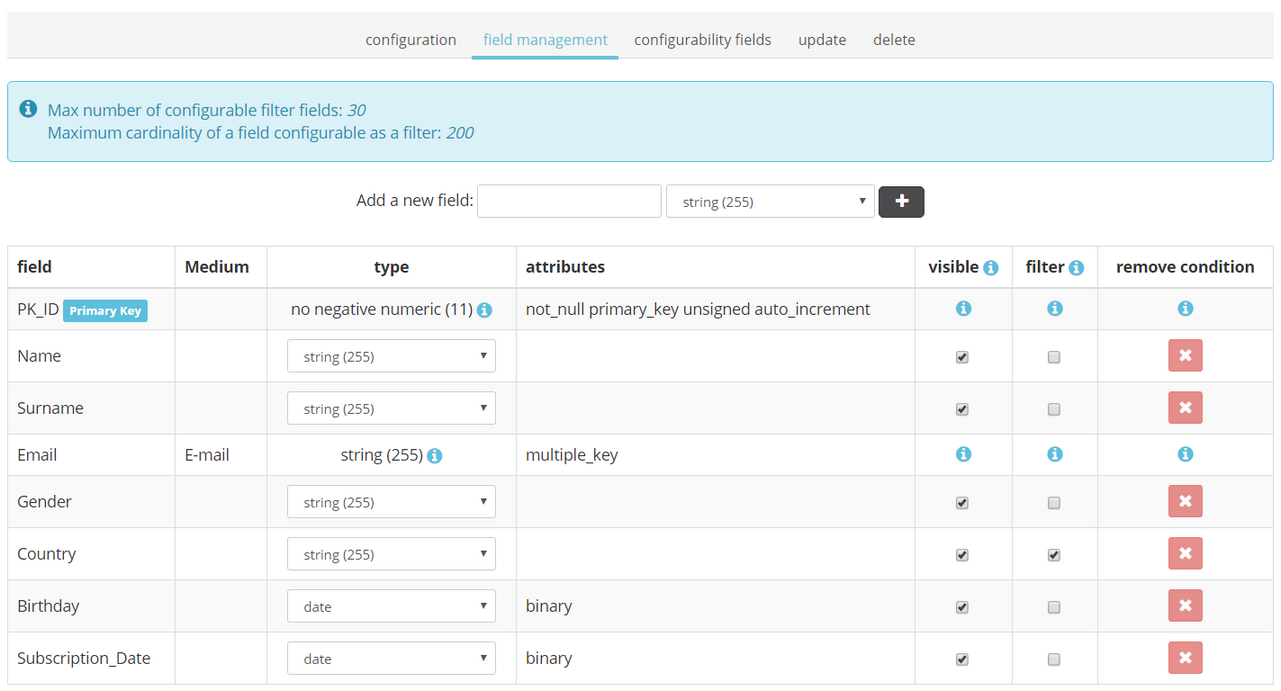
Figure 24: The field management page
- In the filter column of the field management page, select the fields that you want to use in the filter.
When you select a field, a floppy disk icon displays for a few seconds, to indicate that the setting has been saved.
See Field management for more about using this page. - Click configure > user db and the filters icon next to the relevant database, to return to the manage filters page.
- Click + create new filter and select the intermediate tab.
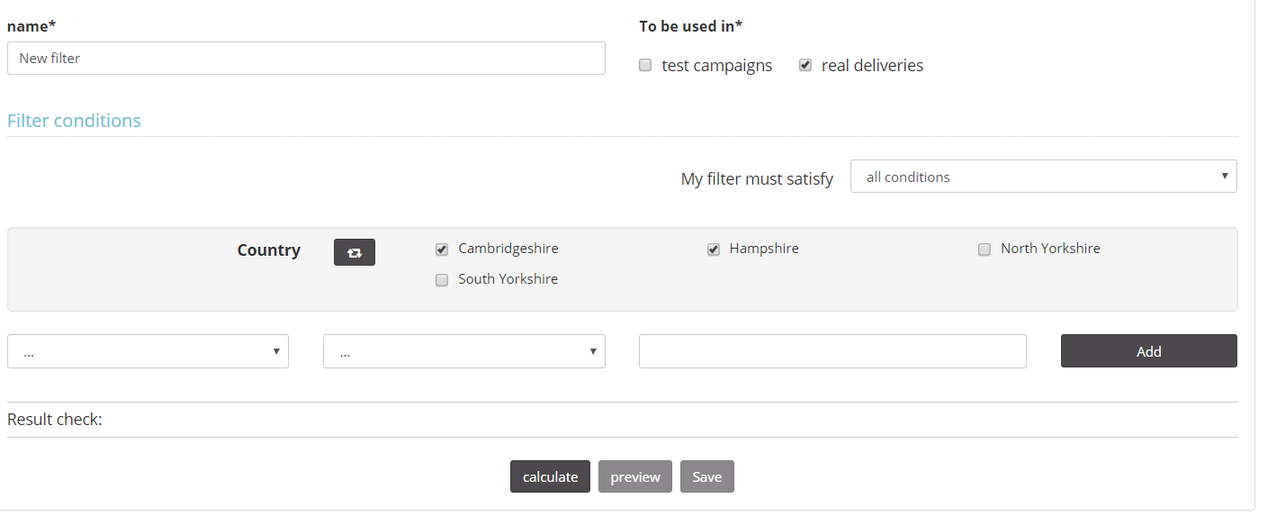
Figure 25: Example of the detail from the create filter intermediate mode tab, with a filter field defined in Field management
- Enter a Filter name.
- Under To be used for campaigns, select whether the the filter is to be used for test deliveries or real deliveries.
- Select whether the contacts (users) identified by the filter must satisfy all conditions, or at least one of the conditions.
- In the highlighted panel, select one or more values from the filter field, which has previously been defined in the field management page.
For example, in figure 25, a small number of regions are available for selection.
If instead, the GENDER field had been selected in the field management page, the available values would be Male and Female. - Use the drop-down lists to define a condition to further determine the contacts that the filter will select, if required.
For example, PK_ID, EMAIL, ADDRESS, User has opened and similar, and begins with, equals, is empty and so on. - Use the remaining field/s to complete the condition.
For example, if you have set the drop-down lists to FIRSTNAME and begins with, enter the first letters of the relevant name, such as Geo.
The system will select all contacts whose name begins with those letters, for example, Geoffrey, George, Georgina, Georgette and similar. - If you want to add a further condition, click Add and repeat steps 9 and 10.
- To view how many contacts are identified by the filter, click calculate, or preview to see a list of the last 10 records.
- If you are satisfied with the results, click Save.
In this instance, using the intermediate mode simplifies the filter definition process, when compared with the steps that would be required if the simple mode was used.
Advanced mode
The advanced mode enables you to define the filter using three different types of rule , which can be applied to:
- All the fields in the database.
The Database-fields based rule. - Any date field.
Rule based on date-type fields. - Any user activity monitor field (if enabled).
The User-activity based rule.
You can apply:
- Conditions to each rule with AND or OR operators between each.
- And, Or, And not or Or not operators between each consecutive rule.
By combining rules and conditions, you can create complex filters without using SQL syntax. For example, filters that are based on a birth date, for happy birthday campaigns, or for registrations, to send welcome messages.
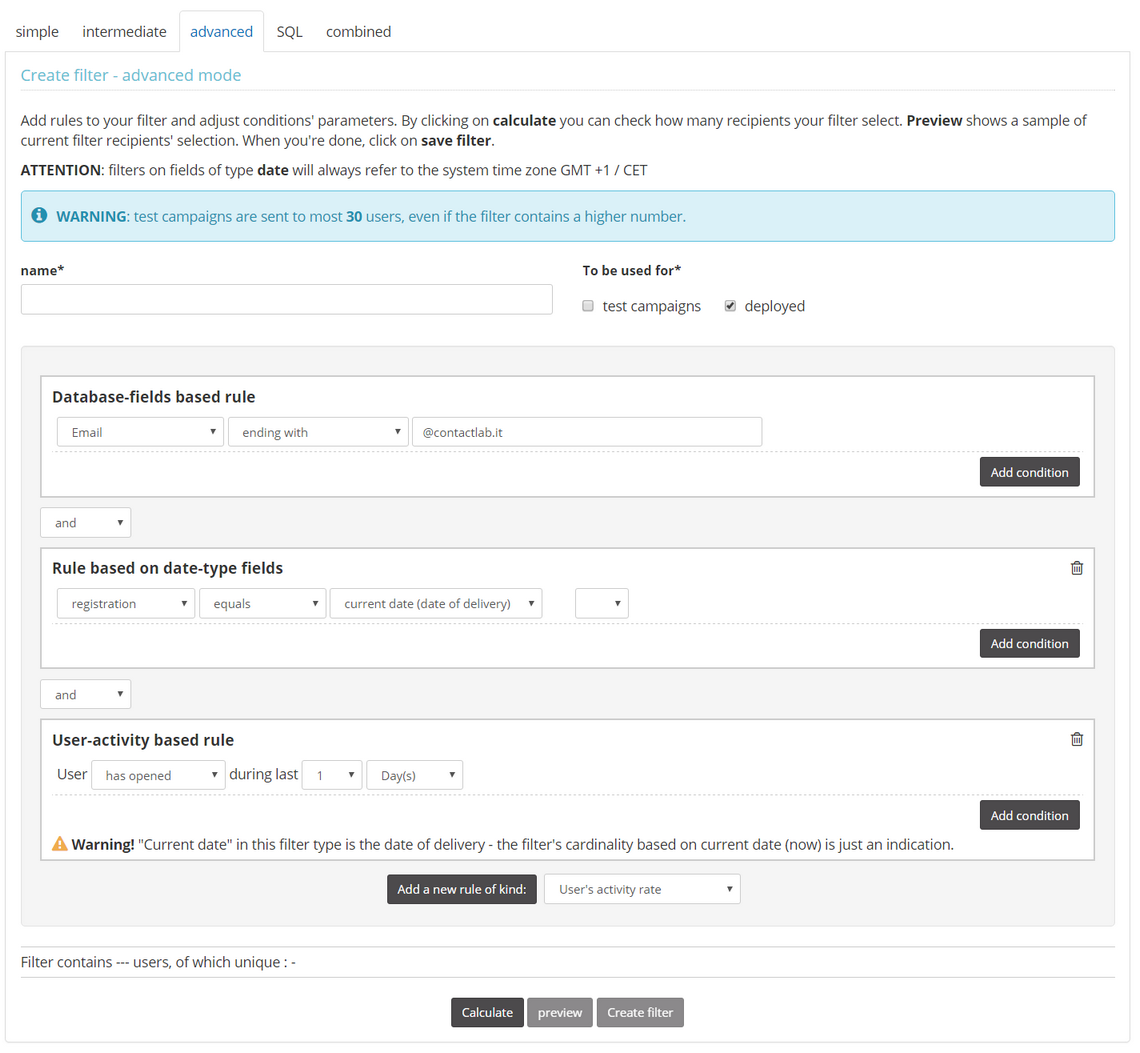
Figure 26: The create filter advanced mode tab
To create a filter in the advanced mode, do the following:
- Select the advanced tab in the create filter page.
- Enter a filter name.
- Under To be used for, select whether the the filter is to be used for test campaigns or deployed deliveries.
- Under Add a new rule, select the type of rule that you want to include in the filter and click Add a new rule of kind:
The relevant rule panel displays, for example, a Database-fields based rule. - Use the drop-down lists to define the condition that is to be applied to the rule.
For example, FIRSTNAME and begins with. - Use the remaining field/s to complete the condition.
Using the example in step 5, enter the first letters of the relevant name. - If you want to add a further condition, click Add, repeat steps 5 and 6, then select the operator that you want to apply to the two conditions.
You can apply either the AND or the OR operator. - If you want to add another rule, repeat steps 4 to 7.
- Select the operator that you want to apply to the two rules.
You can apply the And, Or, And not or Or not operators. - If you want to add more rules, repeat steps 4 to 7 and step 9.
- To view how many contacts are identified by the filter, click Calculate, or preview to see a list of the last 10 records.
- If you are satisfied with the results, click Create filter.
SQL mode
The SQL mode enables you to define the filter by entering the conditions directly as an SQL query. It is a prerequisite that you know the exact syntax of SQL queries.
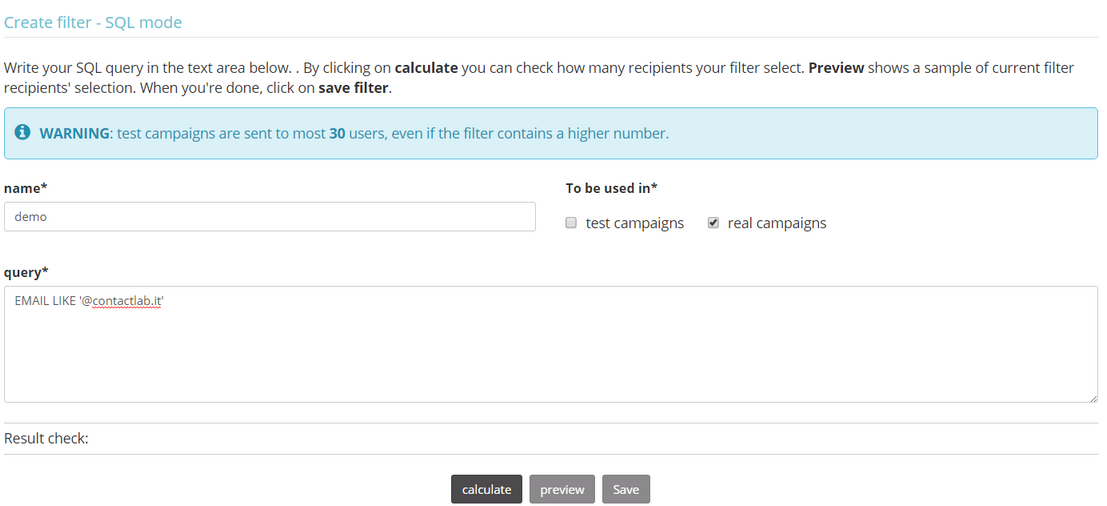
Figure 27: Detail from the create filter SQL mode tab
To create a filter in the SQL mode, do the following:
- Select the SQL tab in the create filter page.
- Enter a filter name.
- Under To be used in, select whether the the filter is to be used for test campaigns or real campaigns.
- Under query, enter the relevant SQL query.
- To view how many contacts are identified by the filter, click calculate, or preview to see a list of the last 10 records.
- If you are satisfied with the results, click Save.
Combined mode
The combined mode enables you to define a new filter by combining two or more existing ones.
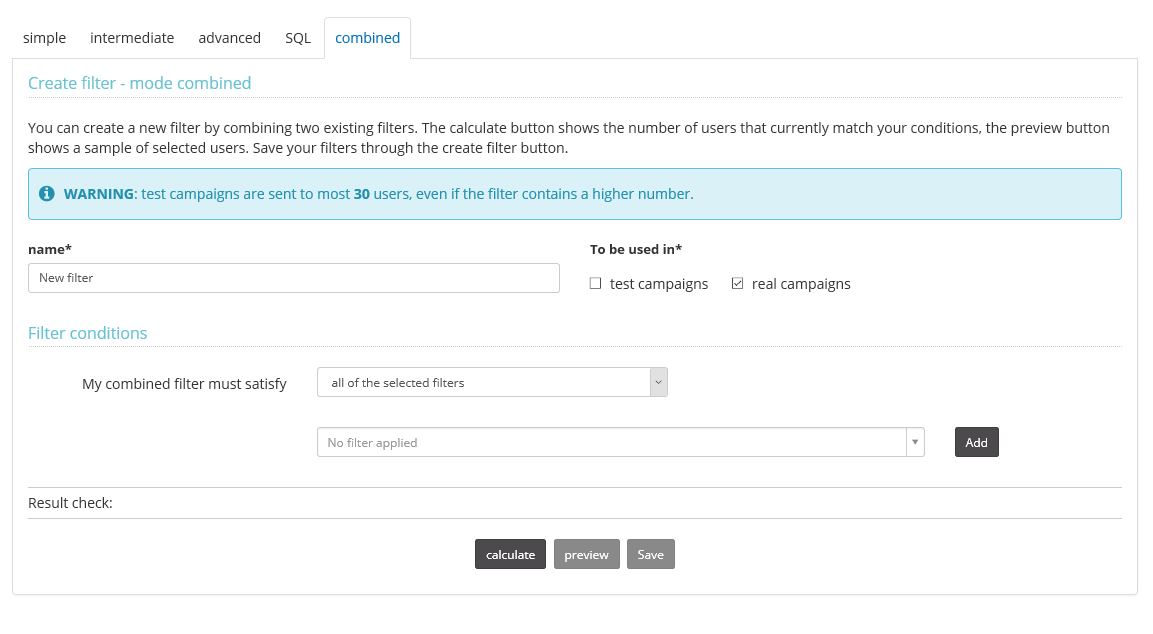
Figure 28: The create filter combined mode tab
To create a filter in the combined mode, do the following:
- Select the combined tab in the create filter page.
- Enter a filter name.
- Under To be used in, select whether the the filter is to be used for test campaigns or real campaigns.
- Under My combined filter must satisfy, select the condition that should be applied to the selected filters.
For example:- All of the selected filters.
- At least one of the selected filters.
- First filter selected and exclude all other selected filters.
- Click the arrow to the right of the next field, and select the appropriate filter from the drop-down list.
- Click Add to select the next filter and repeat step 5.
If you select the wrong filter, click erase.
Note:
If you add another filter, erase is no longer available for filters that were added earlier. - If you want to add another filter, repeat step 6.
- To view how many contacts are identified by the combined filter, click calculate, or preview to see a list of the last 10 records.
- If you are satisfied with the results, click Save.
Managing existing filters
To duplicate, archive, or delete an existing filter, do the following:
- Do one of the following:
- In the database list, locate the relevant database and click filters.
The manage filters page displays.
or:
- In the filter management panel, click Manage filters.
The manage filters page displays.
- In the database list, locate the relevant database and click filters.
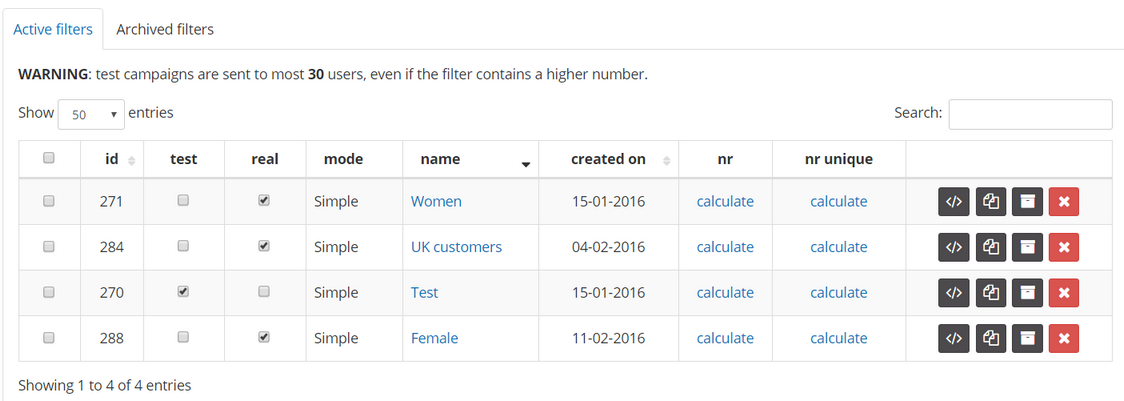
Figure 29: Example of the Active filters tab on the manage filters page
- In the Active filters tab, click the duplicate, archive, or delete button, positioned to the right of the appropriate filter row, as required.
A confirmation window displays. - Click OK to proceed.
The selected action is completed.
To delete or archive multiple filters, do the following:
- In the Active filters tab, select the check (tick) box to the left of the appropriate filters.
- According to the action that you want to carry out, click either Delete selected filters or Archive selected filters.
- Click OK to proceed.
The selected action is completed.
Editing a filter
To edit a filter, do the following:
- In the Active filters tab on the manage filters page, click the name of the appropriate filter.
The filter management page displays.
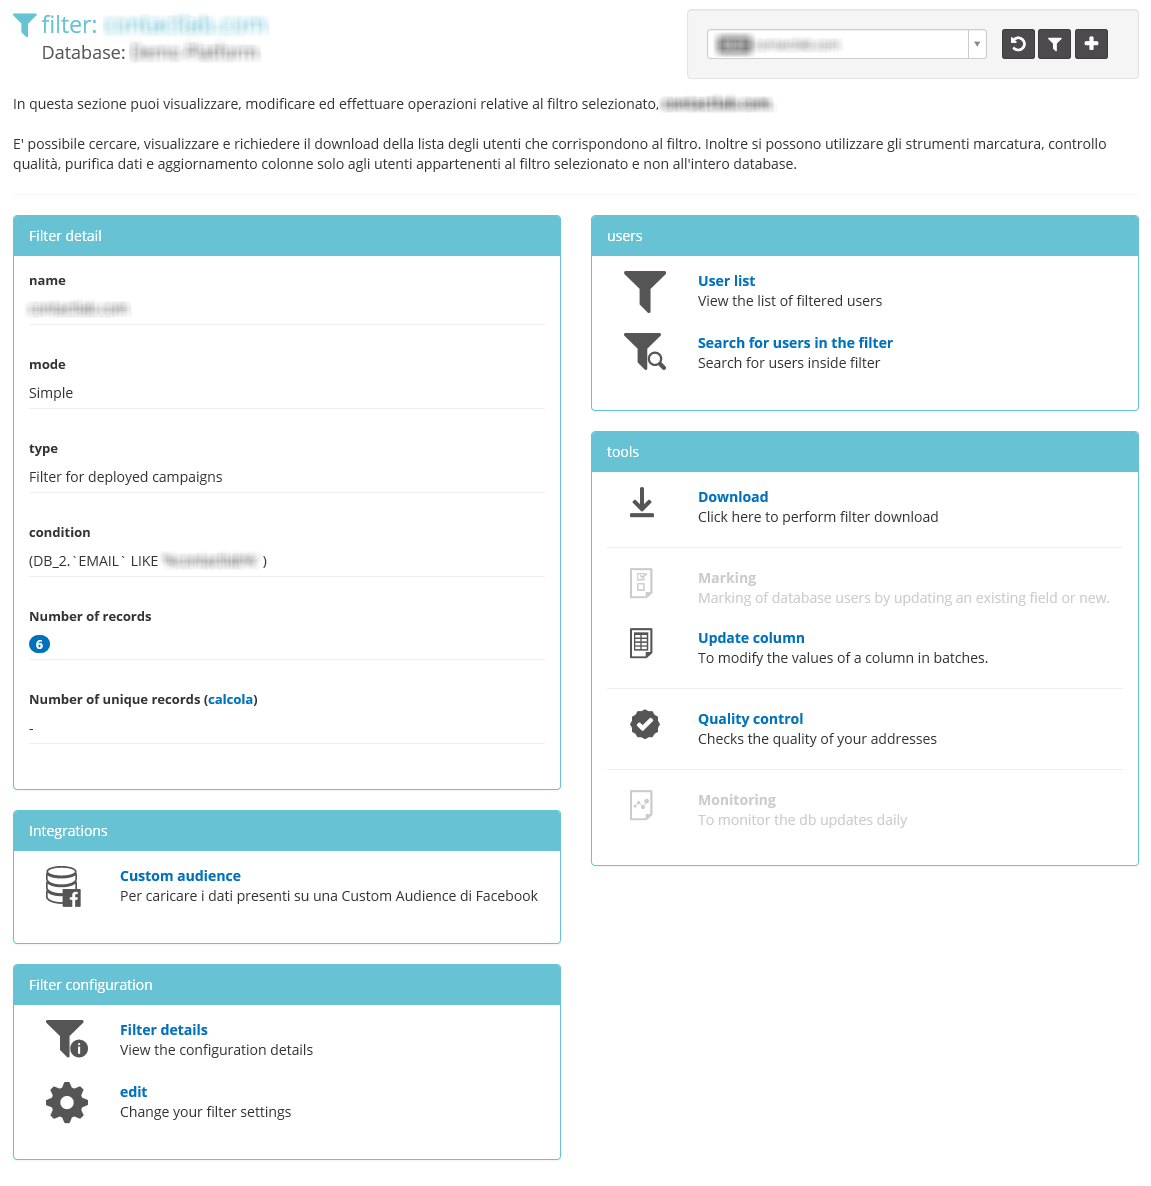
Figure 30: Example of the filter management page
- Under Filter configuration, click edit.
The filter displays in the filter mode that was used when it was created. - Make the required changes.
- To view how many contacts are identified by the combined filter, click calculate, or preview to see a list of the last 10 records.
- If you are satisfied with the results, click Update filter.
Using the integrations panel
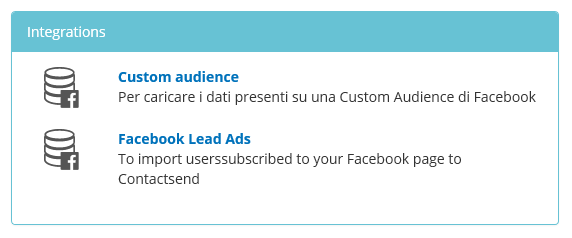
Figure 31: The integrations panel
The integrations panel enables you to manage any integrations that are associated with the database. It is subdivided into the following sections:
Click the appropriate link above for more about each of the sections.
Custom audience
This section enables you to upload data to a Facebook Custom Audience. To create a new custom audience, Do the following:
- Click Custom audience in the Integrations panel.
The Custom audience tab of the Facebook integrations page displays (figure 32), showing the previous audiences that have been created using the current database, including those were a filter has been applied. If instead, you have applied a filter before clicking Custom audience in the Integrations panel, only the audience history for that filter is displayed.
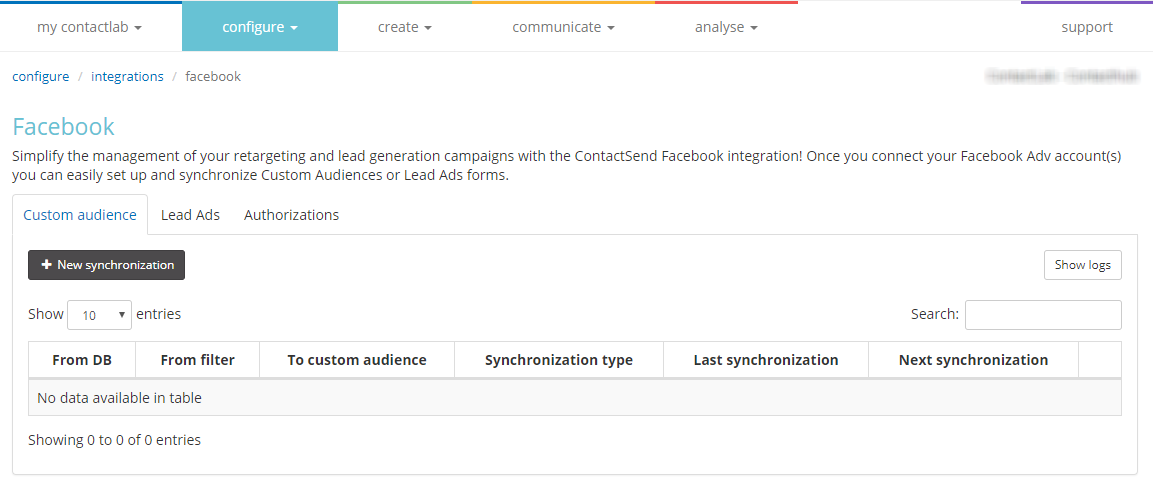
Figure 32: Example of the Facebook Custom audience history page
- Click + New synchronization.
The Synchronization settings page displays.
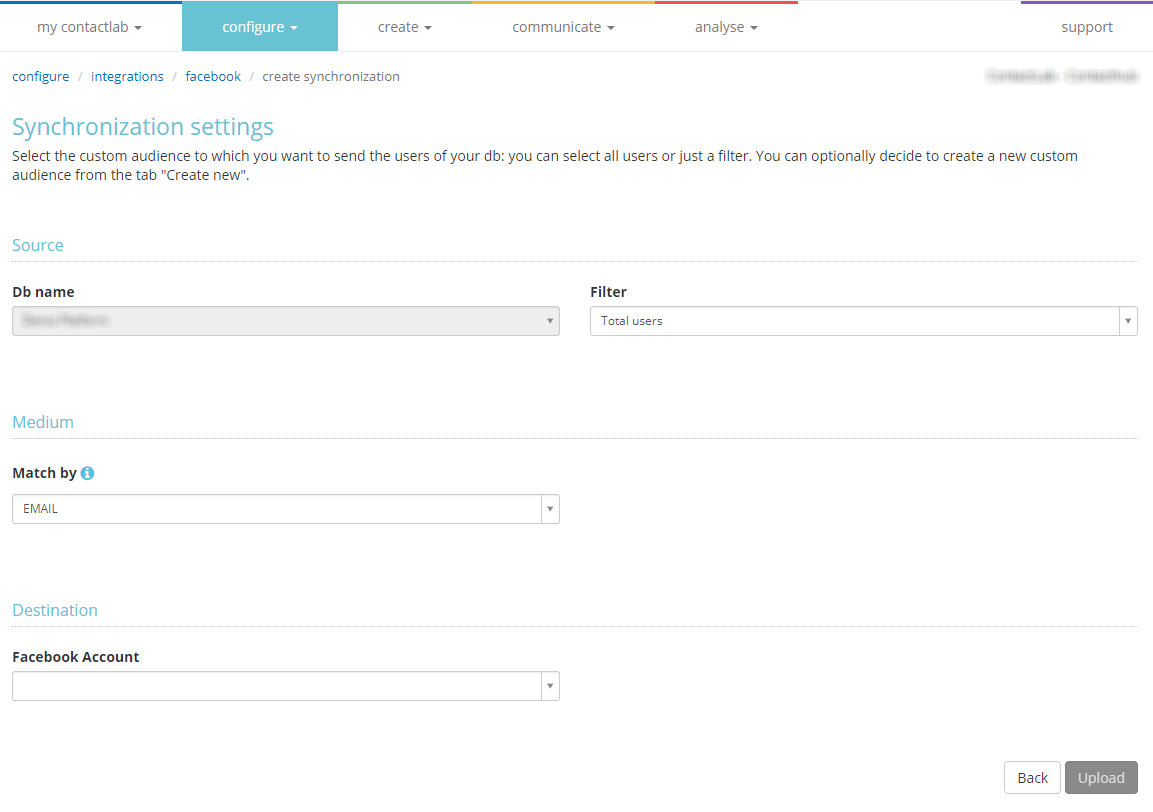
Figure 33: Example of the Synchronization settings page
- Under Source, you can optionally apply a filter to the database by clicking the downwards pointing arrow to the right of the Filter field, and selecting the appropriate filter.
- Under Medium > Match by, select the medium that you want to use to search for contacts (users) on Facebook.
For example, EMAIL or SMS. - Under Destination > Facebook Account, click the downwards pointing arrow to the right of the field, and select the appropriate Facebook account to use for the custom audience.
- When you are finished, click Upload.
The custom audience upload starts.
Note:
Upload requests are asynchronous and may take some time. You can use the Custom audience tab to check the status of upload requests, together with the number of exported contacts and any who are not valid.
Facebook Lead Ads
This section enables you to import subscriptions from Facebook into Contactsend. To synchronize with a new Lead Ads form, do the following:
- Click Facebook Lead Ads in the Integrations panel.
The Lead Ads tab of the Facebook integrations page displays (figure 34), showing a graph of the synchronization history for your Facebook Lead Ads campaigns, during the last 14 days.
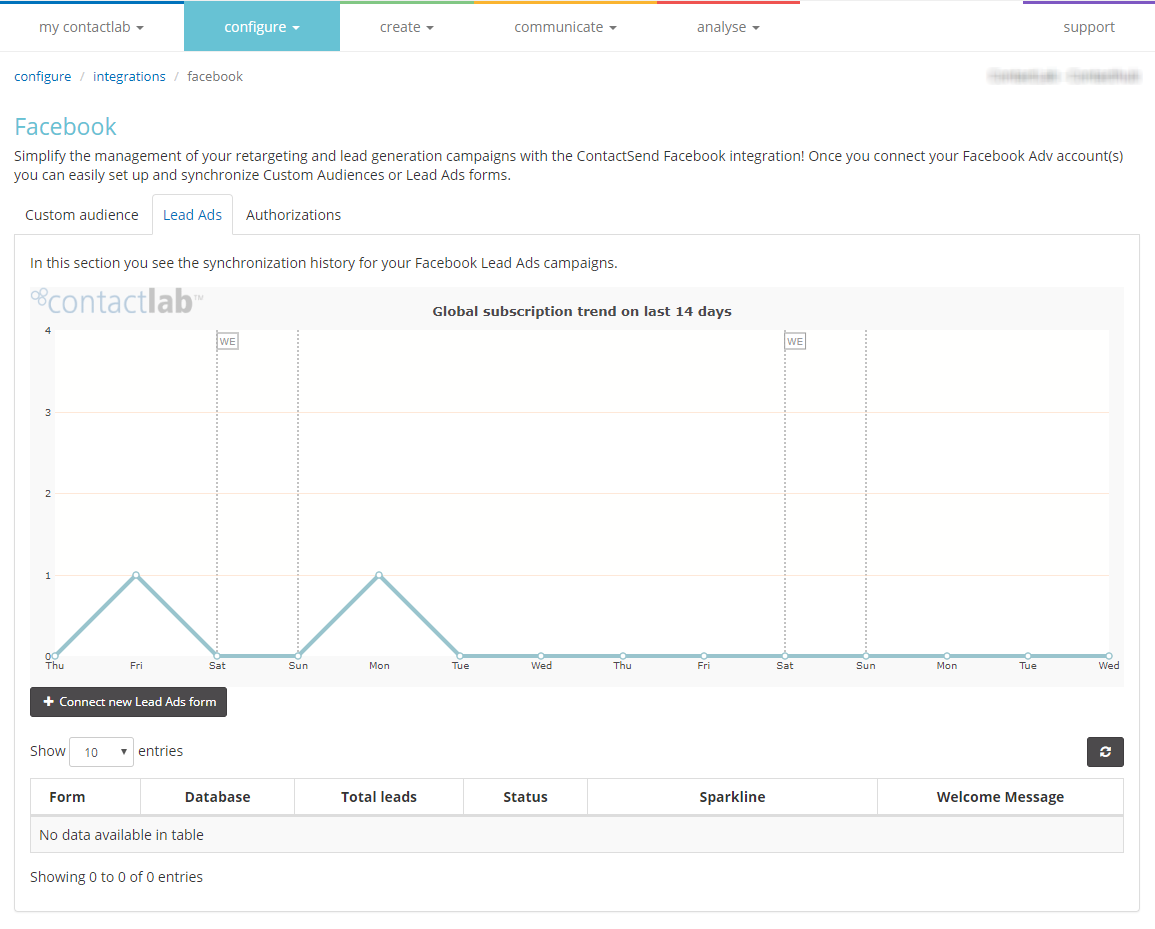
Figure 34: Example of the Facebook Lead Ads page
- Click + Connect new Lead Ads form.
The Select your Facebook Lead Ads form page displays.
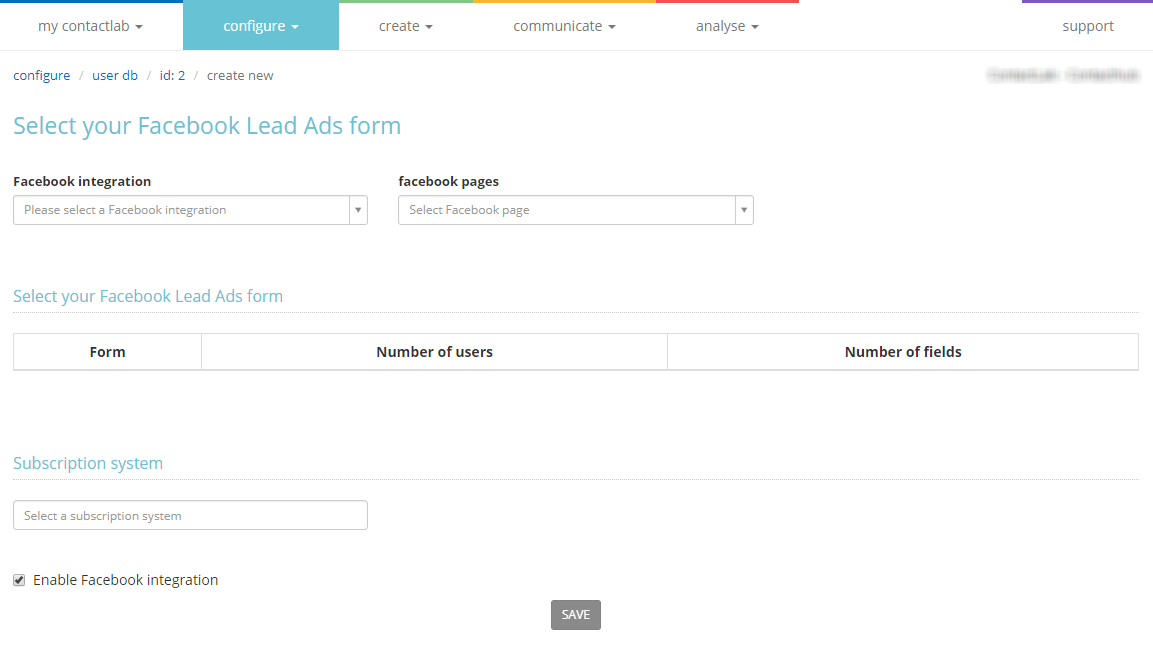
Figure 35: The Select your Facebook Lead Ads form page
- Under Facebook integration, click the downwards pointing arrow to the right of the field and select the appropriate integration.
- Under Facebook pages, click the downwards pointing arrow to the right of the field and select the appropriate page.
The available forms display under Select your Facebook Lead Ads form. - Select the appropriate form in the table.
The form and database fields display under Fields configuration.
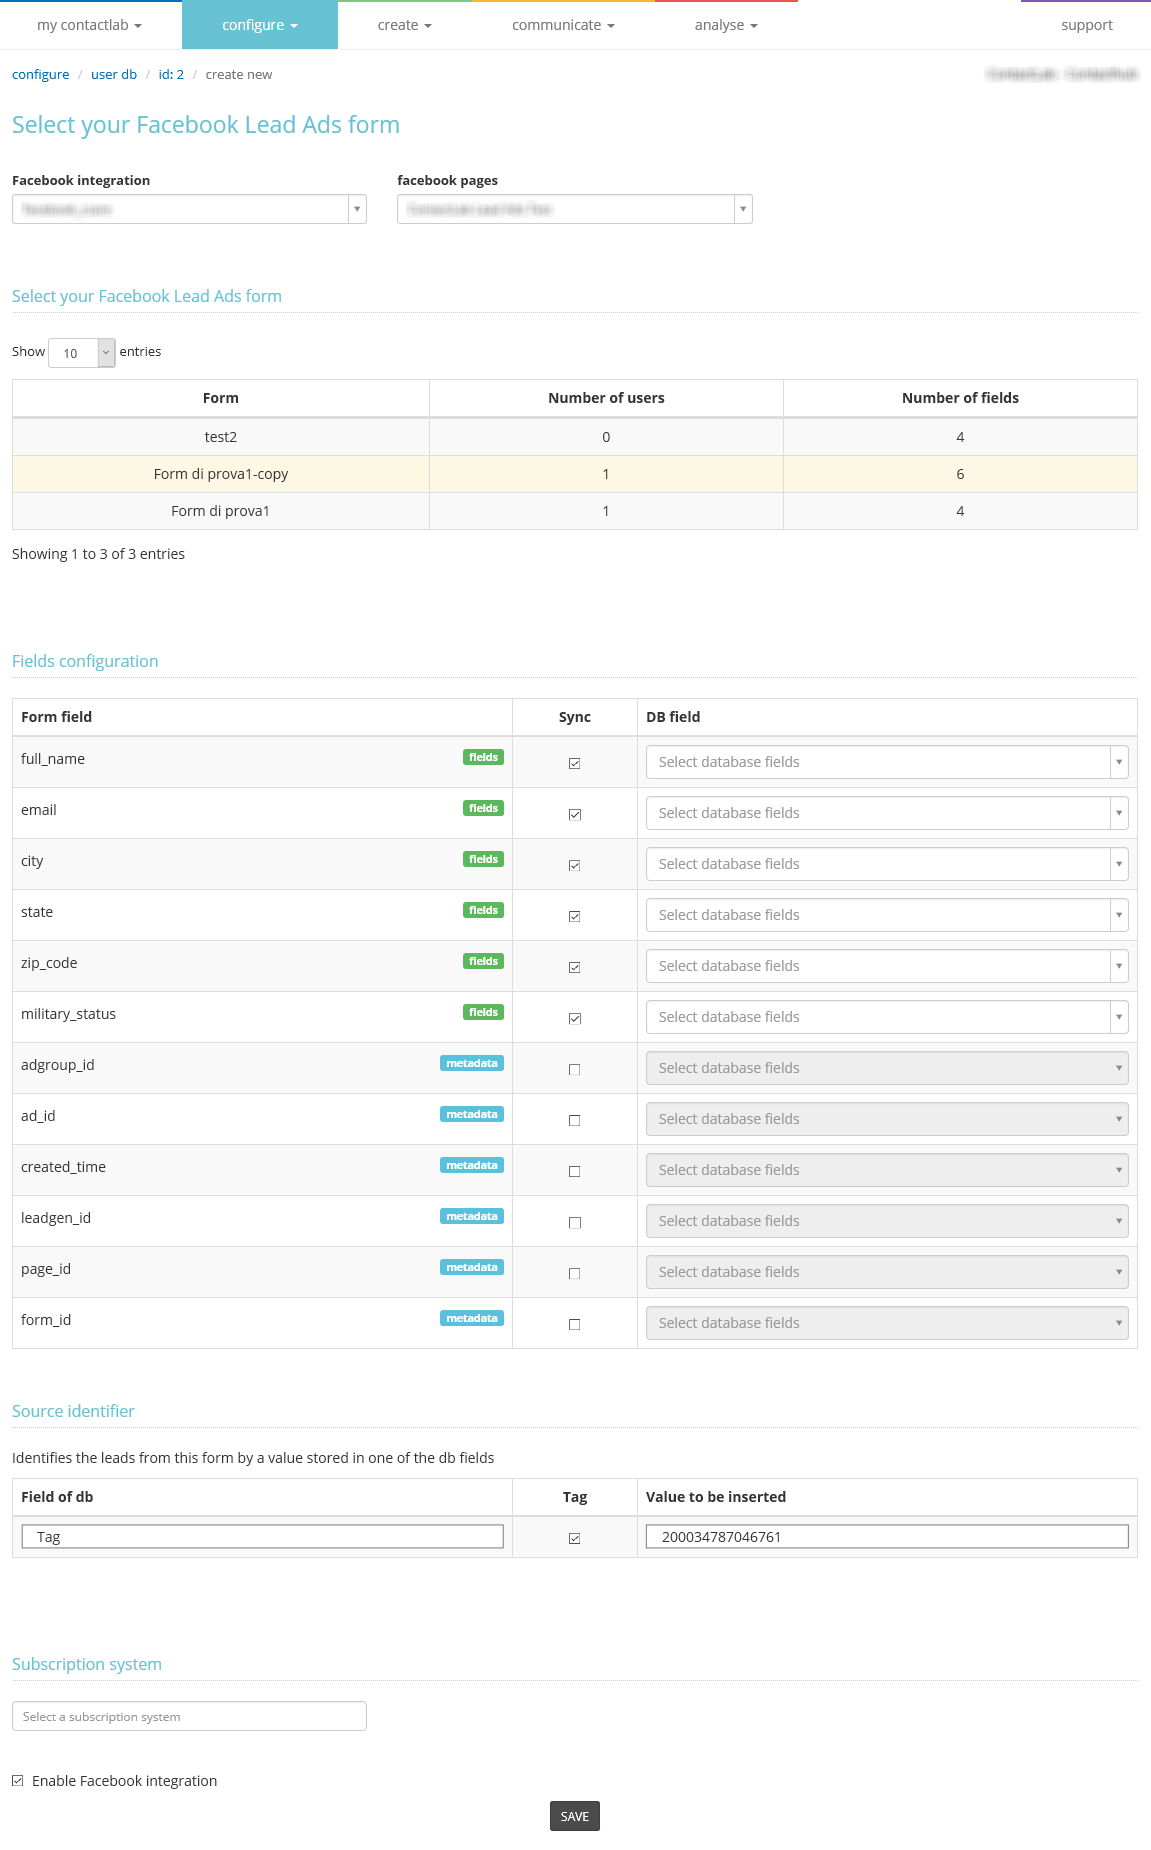
Figure 36: Example of the Select your Facebook Lead Ads form page with a Lead Ads form selected
- Under Fields configuration (figure 36), select the fields from the Facebook form that you want to synchronize.
You can also choose to include metadata, such as adgroup_id, ad_id, created_time, leadgen_id, page_id and form_id. - Under Source identifier, you can choose to enter a constant value in a defined database field, such as Tag, for every new record from the form.
The default ID of the form is used by default. - Under Subscription system, click the field and select the appropriate system, if configured.
- Ensure that Enable Facebook integration is selected.
- When you are finished, click SAVE.
Using the configuration panel
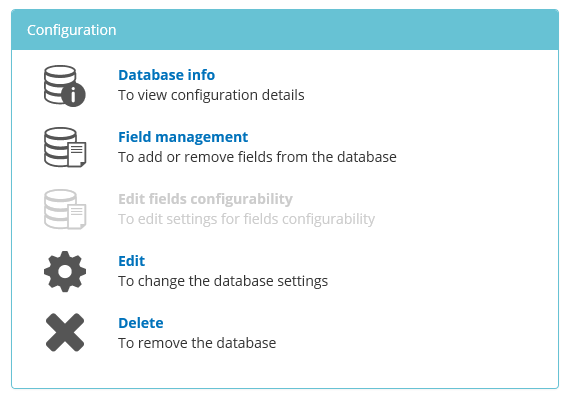
Figure 37: The Configuration panel
The Configuration panel enables you to view and manage all the settings for the relevant database. It is subdivided into the following sections:
Click the appropriate link above for more about each of the sections.
Database info
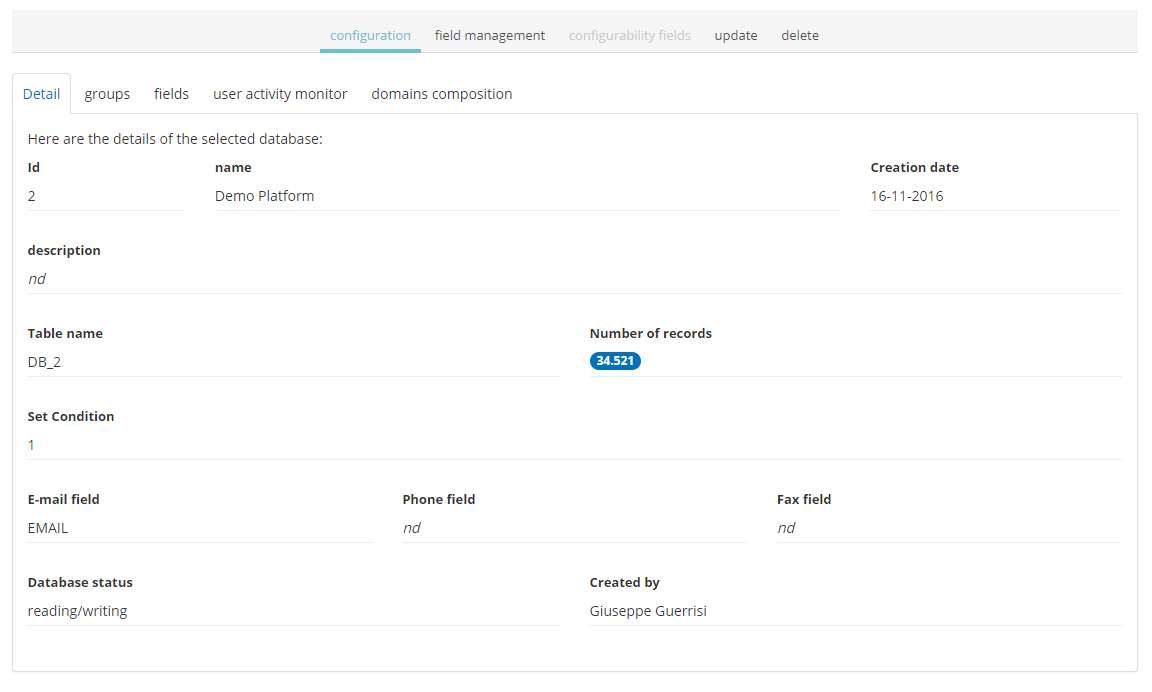
Figure 38: Example of the Database info section
When you click Database info, the configuration section displays, with a series of tabs:
- Detail
Displays a read-only summary of the current database details. - Groups
Displays a read-only summary of the groups associated with the database. - Fields
Displays a read-only summary of the fields in the database. - User activity monitor
Displays whether the user activity monitor is active for the database.
If not, you can activate it here, and optionally select Perform historical data recalculation (if possible) for the following date range. See Creating a new database for more about the user activity monitor. - Domains composition
Displays the recipients in the database, subdivided by email domain. Also enables you to download a full report.
Field management
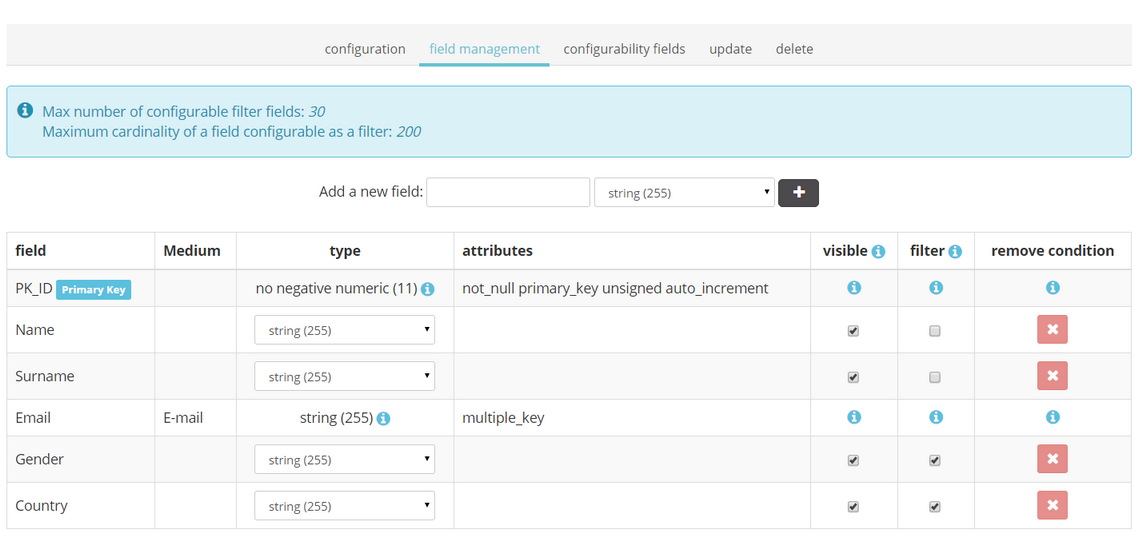
Figure 39: Example of the field management section
The field management section enables you to:
- Add or delete database fields.
- Make a field visible.
Appears in the users panel of the database management page. - Select a field to use as a filter.
Allows the filter to be used to create filters in the intermediate mode, and to generate extended reports in the Analyse section.
Adding a field
To add a field, do the following:
- Under Add a new field, enter the field name.
Field names cannot include spaces, hyphens or special characters. Only unaccented a-z and A-Z characters, numbers and underscores (_) are allowed. - Select the field type (string, text, numeric and similar).
The with numbers (1) type can contain values between -128 and 127, while with numbers (11) can contain positive values up to a maximum of 4294967295. The date format is yyyy-mm-dd, and date and time is yyyy-mm-dd 00:00:00. - Click +.
The field is added.
Edit fields configurability
This section enables you to edit the settings for field configurability. You need the appropriate permissions to be able to access this section of the Configuration panel.
Edit
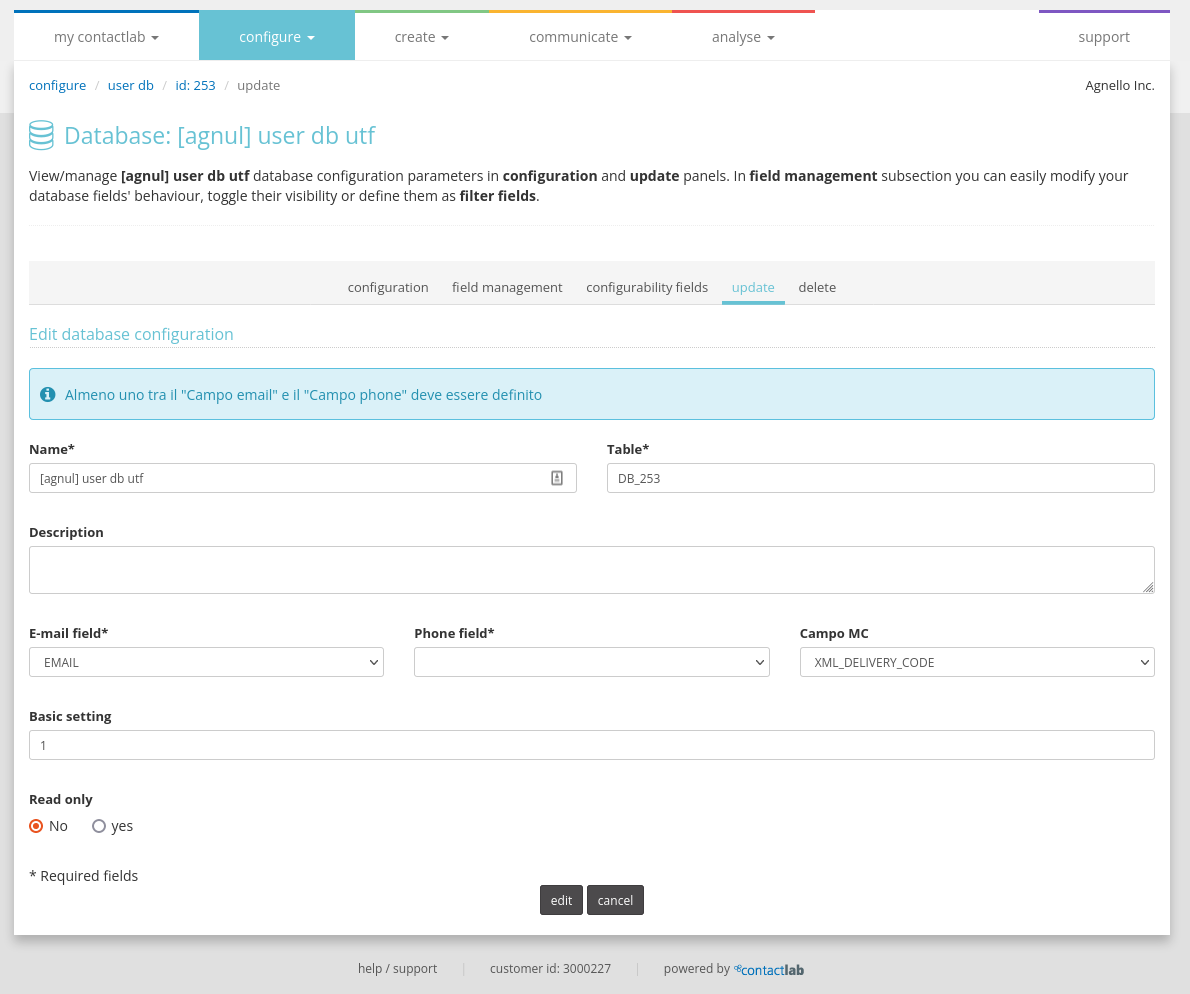
Figure 40: Example of the Edit database configuration section
When you click Edit, the update section displays, where you can to edit database configuration parameters, such as the database name, the description, the name of the email field and similar.
You can also decide which column in the user DB maps the Marketing Cloud ID of the customer.
Delete
If you click Delete, a warning window displays, asking if you want to delete the relevant database.
IMPORTANT:
This action cannot be reversed.
NOTE: database deletion is deferred. The request is taken over and when completed, a toast message appears.
NOTE: Not all databases can be removed. A referenced db cannot be removed.
Using the users panel
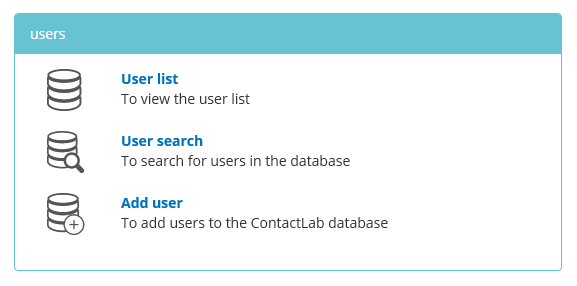
Figure 41: The users panel
The users panel sections enable you to:
- View a list of contacts (users) that the database includes.
- Search the database for contacts (users).
- Add contacts (users) to the database.
Click the appropriate link above for more about each of the sections.
Viewing a list of contacts
To view a list of contacts (users), do the following:
- Click User list in the users panel.
The User list > Search results page displays all available records, together with all visible fields that have been defined in the Field management section of the Configuration panel.
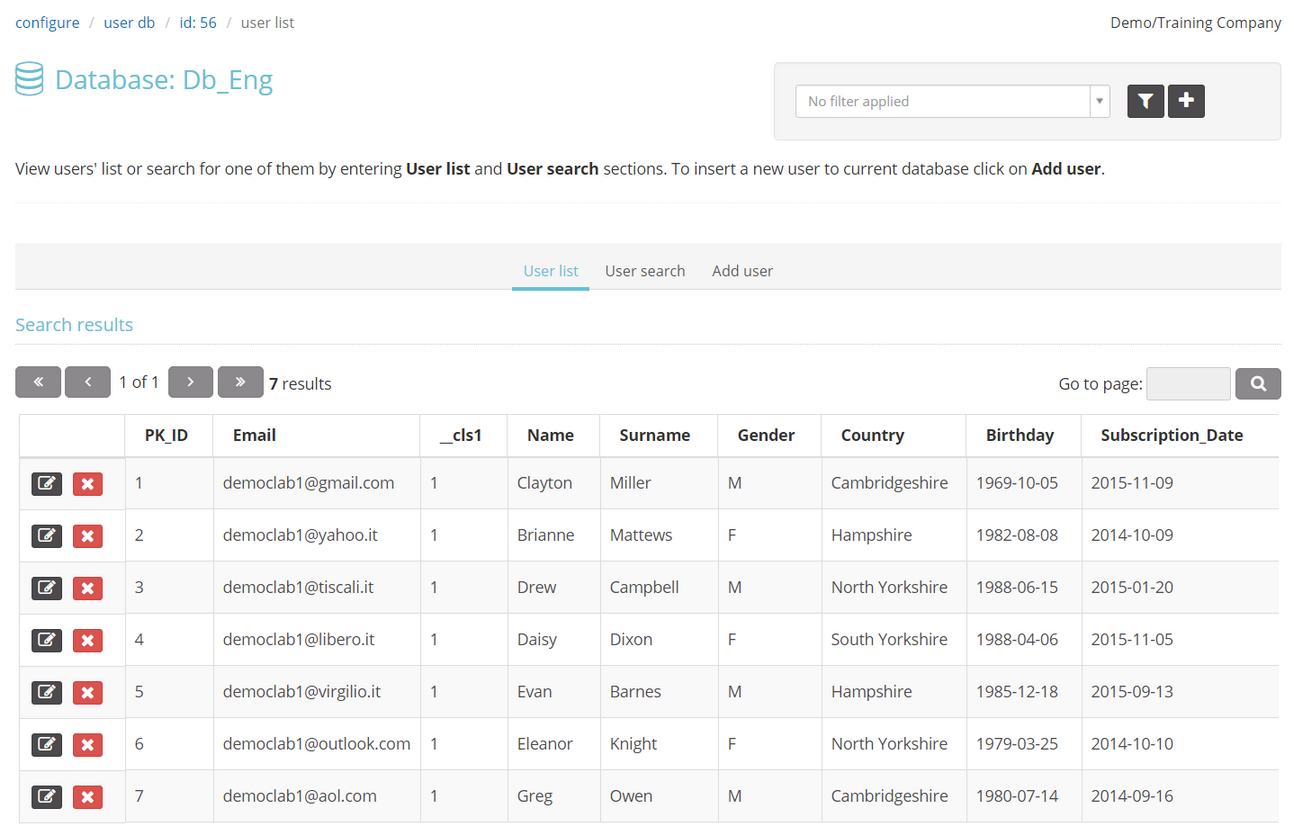
Figure 42: Example of the User list page
The User list page also enables you to edit a contact’s record, as follows:
- Click the Change this record icon in the appropriate row.
- Edit the record as required.
- When you are finished, click edit.
To delete a contact’s record:
- Click the erase icon in the appropriate row.
A warning window displays. - Click OK to proceed.
IMPORTANT:
This action cannot be reversed.
Searching the database for contacts
To search the database for contacts (users), do the following:
- Click User search in the users panel.
The User search > Search engine page displays a list of available fields.
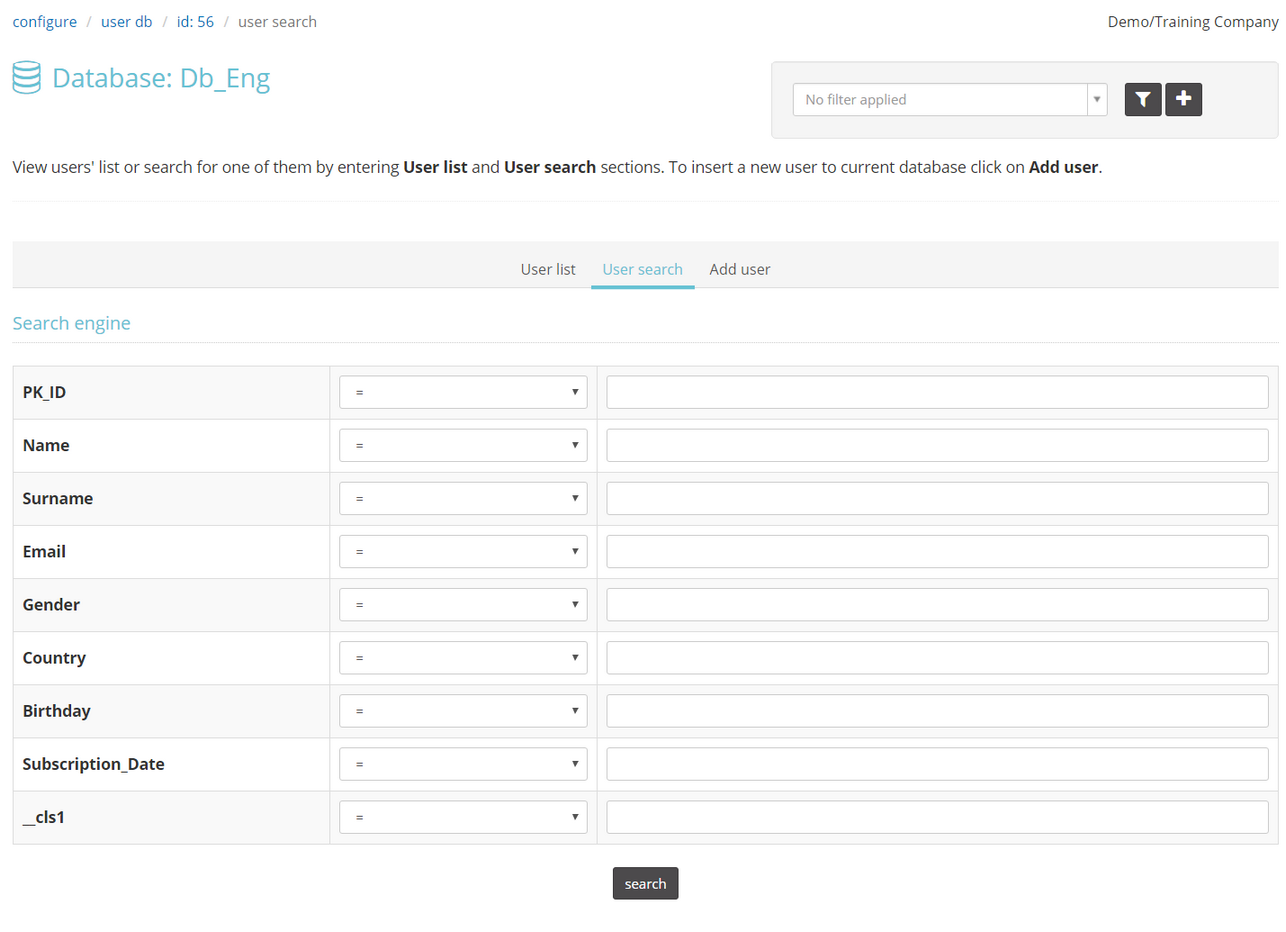
Figure 43: Example of the Search engine page
- Select the appropriate operator for the relevant field.
For example, EMAIL > similar, or _cl_last_view > NULL. - Enter a search term, if required.
For example, gmail.com. The NULL operator does not require a search term. Depending upon the operator that you choose, you can search for complete or partial values. - If you want to refine your search further, repeat steps 2 and 3.
- When you are finished, click search.
The Search results page displays.
If required, you can save the search results as a simple mode filter, as follows:
- Under Save this search result as a filter, enter a name for the filter.
- Under To be used in, select test campaigns or real campaigns.
- Click Save.
Adding contacts to the database
The Add user section is used to manually add new contacts (users) to the database, one at a time. If you want to add a large number of contacts, you should use the tools > File operations section to upload a file that contains the relevant records, such as an Excel speadsheet, or a CSV file. See File operations for more details.
To add individual contacts (users) to the database, do the following:
- Click Add user in the users panel.
The Add user > Add record page displays a list of available fields.
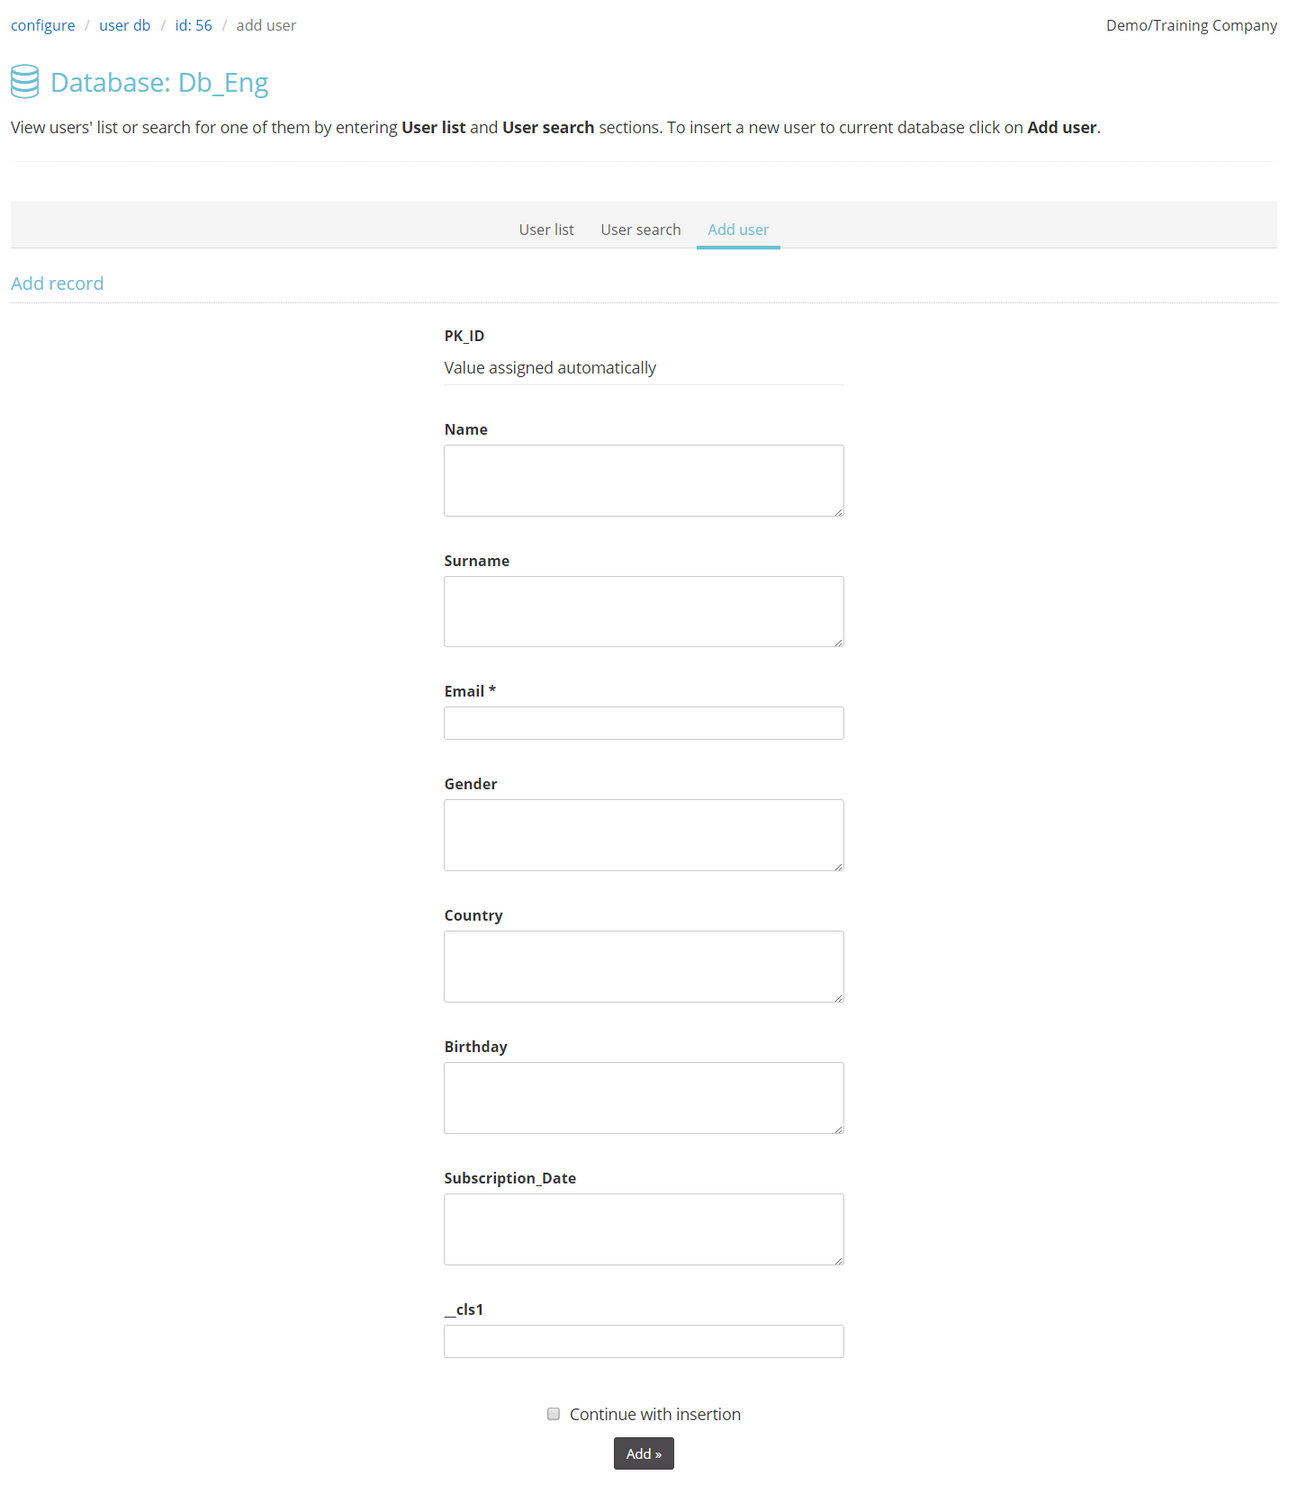
Figure 44: Example of the Add record page
- Complete the fields as appropriate.
- Select Continue with insertion.
- When you are finished, click Add >>.
Using the tools panel
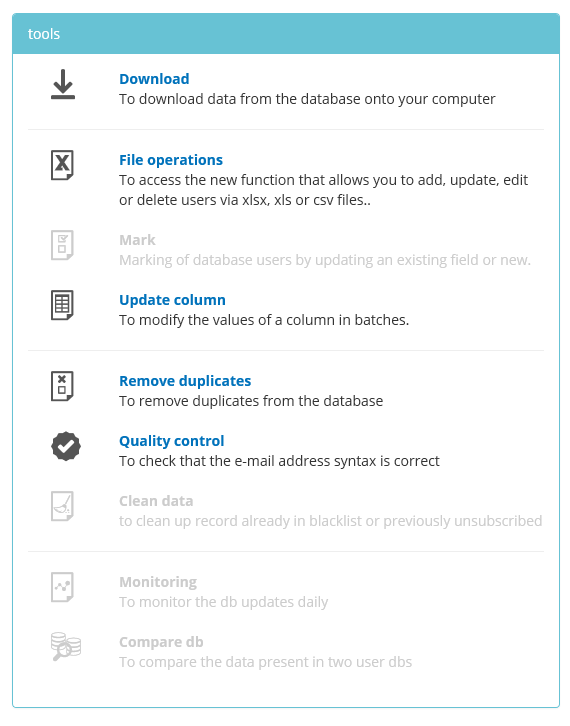
Figure 45: The tools panel
The tools panel provides access to a range of utilities to help you manage the appropriate database.
Note:
Certain utilities are only available if you have the appropriate permissions.
The tools panel is subdivided into the following sections:
- Download
- File operations
- Mark
- Update column
- Remove duplicates
- Quality control
- Clean data
- Monitoring
- Compare db
Click the appropriate link above for more about each of the sections.
Download
The Download section enables you to export the contents of one or more database fields to a CSV file. You can:
- Choose to ignore the basic filter.
- Select the database fields that you want to include in the file.
To initiate a download, do the following:
- Click Download in the tools panel.
The Download page displays.
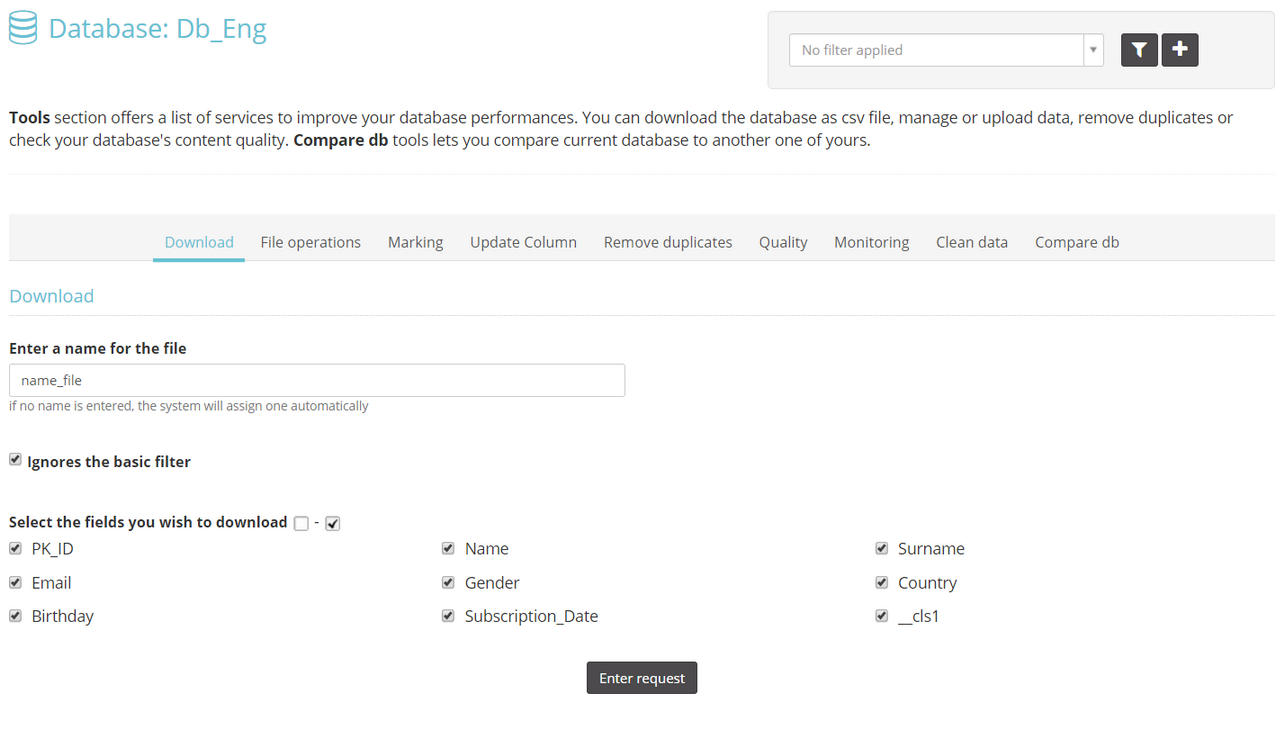
Figure 46: The Download page
- Under Enter a name for the file, enter a name.
The system automatically assigns the file a name, if you do not enter one. - Select Ignores the basic filter, if required.
- Select the fields that you want to download by doing one of the following:
- Select the fields individually.
or:
- Click the check (tick) mark icon, positioned to the right of Select the fields you wish to download, to select all the fields.
You can deselect all fields by clicking the empty checkbox icon, to the left of the check (tick) mark icon.
- When you are finished, click Enter request.
An email is automatically sent to the address in your user profile, with instructions for downloading the file. The file will then be available in the my contactlab > downloads section. See Downloads & Requests for more about the downloads section.
File operations
The File operations section enables you to add, edit or delete database records, by uploading an Excel (.xls or .xlsx) or CSV file, up to 30 MB in size. You can apply changes to every record in the database. You can also simulate an operation, before executing it.
To initiate the appropriate operation, do the following:
- Click File operations in the tools panel.
The File operations page displays two tabs:- Create new request.
Displays the first step of a wizard that helps you carry out an operation and upload a file. - Last week history.
Displays the history of correctly executed real and simulated File operations for the last week. You can download a history file as required.
- Create new request.
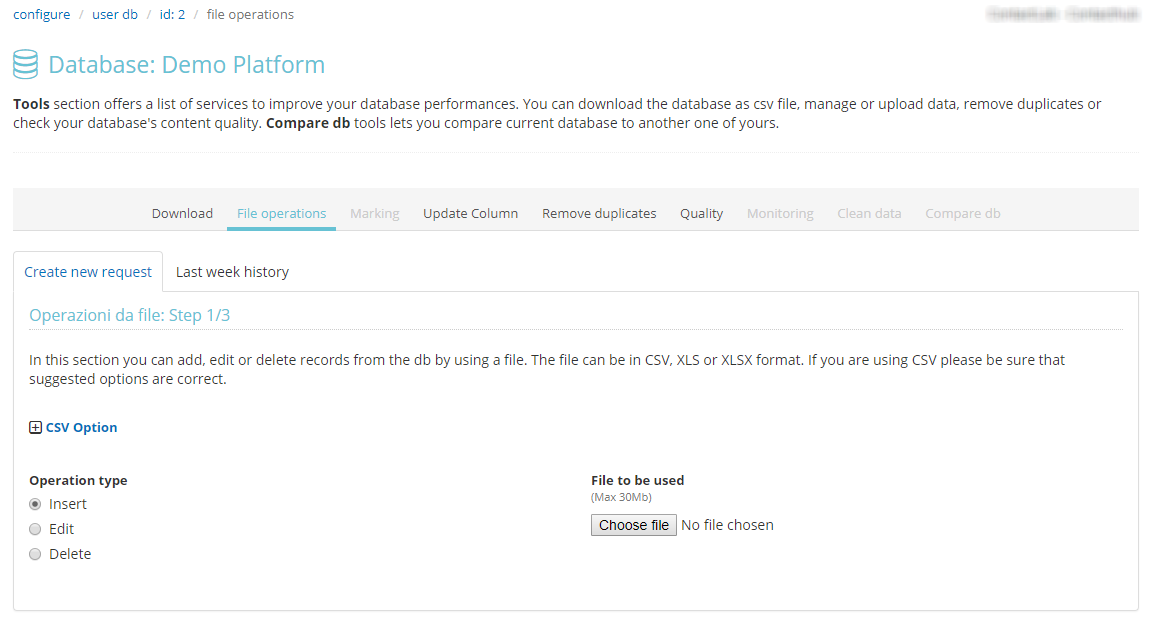
Figure 47: The Create new request tab of the File operations page
- On the Create new request tab, do the following:
- If want to upload a CSV file:
- Click CSV Option.
The available options display. - Ensure that the Field delimiter, Escape and Field encloser match those in the file, otherwise enter the appropriate characters.
- Click CSV Option.
IMPORTANT:
If you are using an Excel file, all the data must be included in the first worksheet. Any data in other worksheets is not uploaded.
- Under Operation type, select the operation that you want to carry out:
- Under File to be used, click Choose file, navigate to the appropriate file and select it, then click Upload.
- Click proceed .
The next wizard step page displays.
To continue, select the appropriate link above in step 4, according to the operation that you want to carry out.
Insert
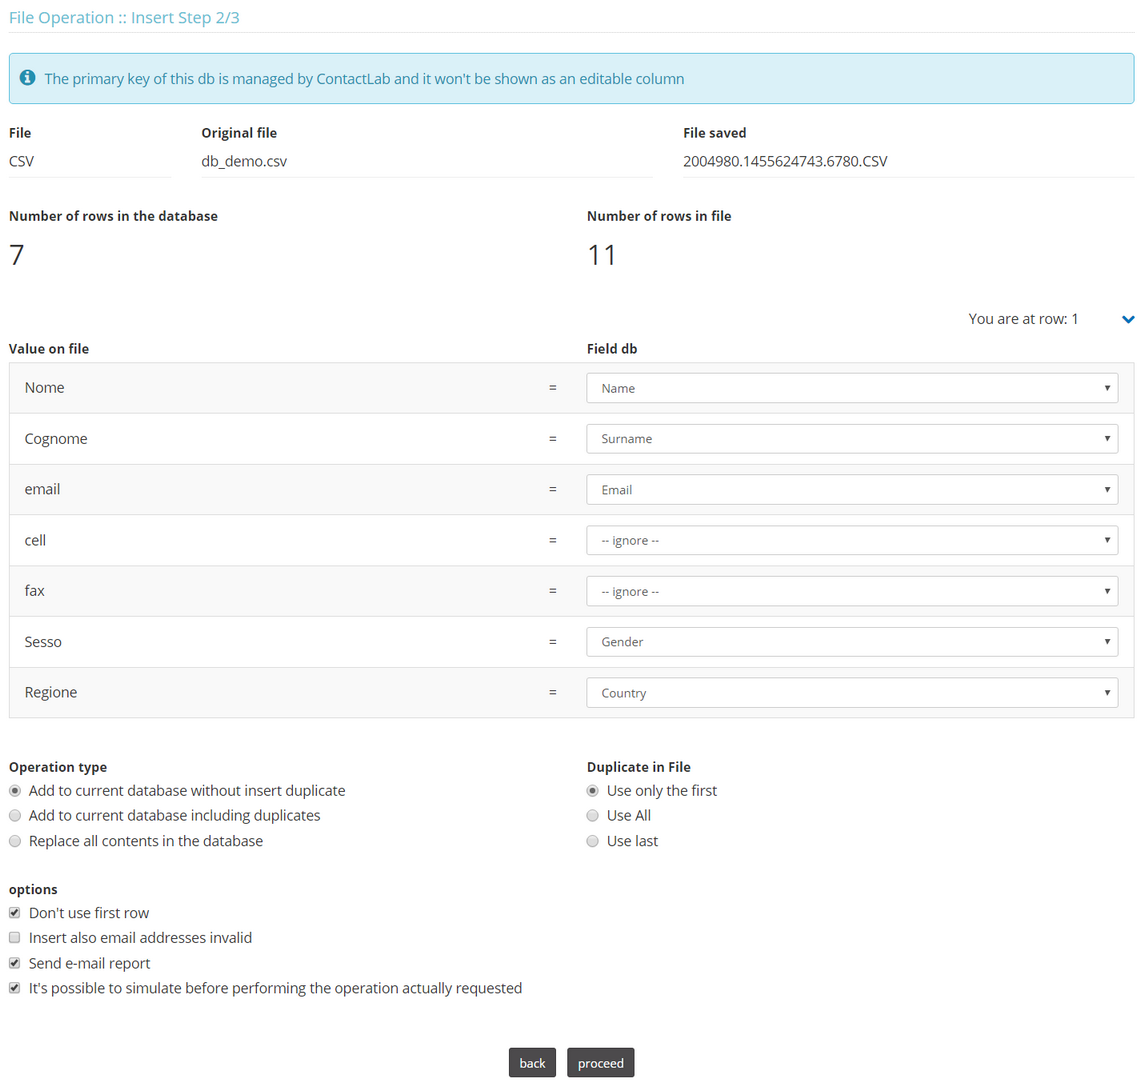
Figure 47: The File operation Insert Step 2/3 page
The File operation Insert Step 2/3 page displays:
- The type of file that has been uploaded.
- The original file name.
- The name of the saved file.
- The number of rows in the database.
- The number of rows in the file.
Do the following:
- Under Value on file and Field db, map the columns in your file to the field names in the Contactsend database.
Note:
If your column names match those in the database exactly, including upper and lower case characters and similar, the system automatically maps the fields. - Under Operation type, select the operation that you want to carry out:
- Add to current database without inserting duplicates.
Only new contacts (users) in the uploaded file are added to the database, if they are not already present. The email address is used to control duplicates. - Add to current database including duplicates.
All contacts (users) in the uploaded file are added to the database, including duplicates. The email address is used to identify duplicates. - Replace all contents in the database.
Overwrite the existing database with the content of the uploaded file.
IMPORTANT:
If you have set up an automatic subscribe, unsubscribe and modify service iteration, make sure that you do not overwrite the database when loading new contacts (users). You should add the new records to those that already exist. Otherwise, the unsubscribe data in the registration field will be lost. See Email groups > Managing subscription, unsubscribe and modify requests for more details.
- Add to current database without inserting duplicates.
- Under Duplicate in File, select how you want the system to manage duplicate email addresses in the uploaded file:
- Use only the first.
Use only the first instance in the file. - Use All.
Use all the instances in the file. - Use last.
Use only the last instance in the file.
- Use only the first.
- Under options, select the following, as required:
- Don’t use first row.
For example, If it consists of the column headings. - Also insert invalid email addresses.
Insert email addresses, even if their syntax is invalid. - Send email report.
When the file operation is completed, send an email report with a summary of the activity. - It’s possible to simulate before performing the operation actually requested.
Instruct the system to simulate the operation so you can check it, before final execution.
- Don’t use first row.
- When you are finished, click proceed to display the next wizard step.
For the next steps, see Confirm the operation.
Edit
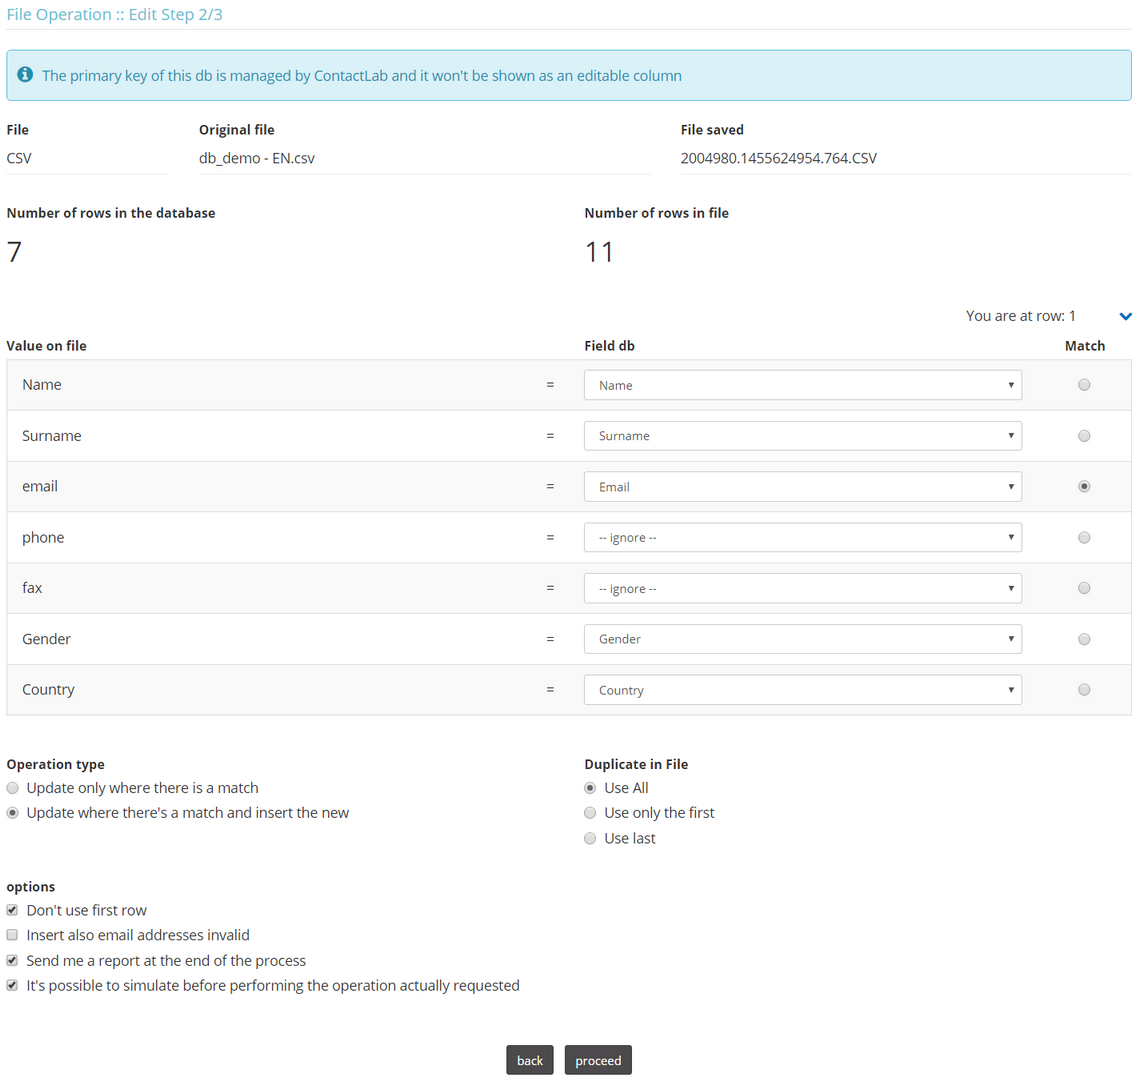
Figure 48: The File operation Edit Step 2/3 page
The File operation Edit Step 2/3 page displays:
- The type of file that has been uploaded.
- The original file name.
- The name of the saved file.
- The number of rows in the database.
- The number of rows in the file.
Do the following:
- Under Value on file and Field db, map the columns in your file to the field names in the Contactsend database.
Note:
If your column names match those in the database exactly, including upper and lower case characters and similar, the system automatically maps the fields. - Under Match, select the field that is to be used to determine that records match.
For example, the email address. - Under Operation type, select the operation that you want to carry out:
- Update only where there is a match.
All records that are identified as matching the condition defined in step 2 are updated. - Update where there’s a match and insert new.
All records that are identified as matching the condition defined in step 2 are updated, and all contacts (users) not matching an existing record are added to the database.
- Update only where there is a match.
- Under Duplicate in File, select how you want the system to manage duplicates in the uploaded file:
- Use only the first.
Use only the first instance in the file. - Use All.
Use all the instances in the file. - Use last.
Use only the last instance in the file.
- Use only the first.
- Under options, select the following, as required:
- Don’t use first row.
For example, If it consists of the column headings. - Also insert invalid email addresses.
Insert email addresses, even if their syntax is invalid. - Send me a report at the end of the process.
When the file operation is completed, send an email report with a summary of the activity. - It’s possible to simulate before performing the operation actually requested.
Instruct the system to simulate the operation so you can check it, before final execution.
- Don’t use first row.
- When you are finished, click proceed to display the next wizard step.
For the next steps, see Confirm the operation.
Delete
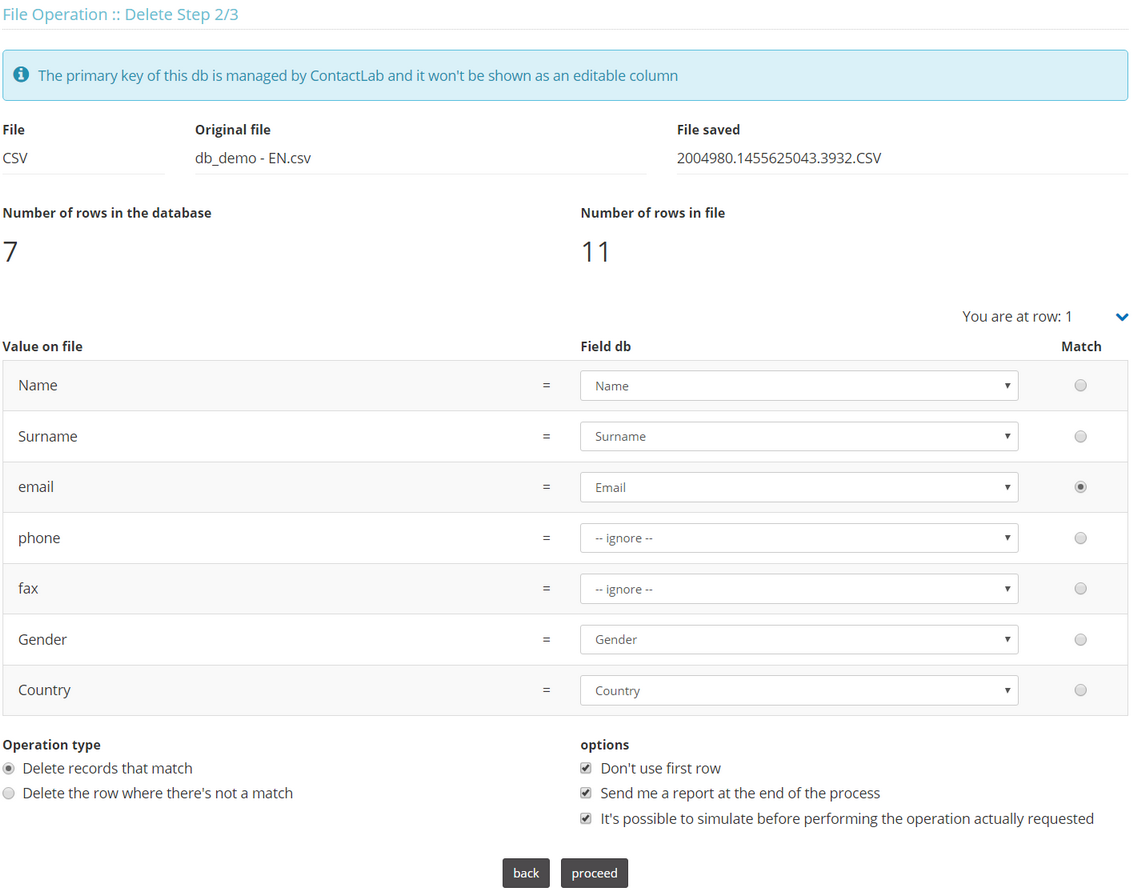
Figure 49: The File operation Delete Step 2/3 page
The File operation Delete Step 2/3 page displays:
- The type of file that has been uploaded.
- The original file name.
- The name of the saved file.
- The number of rows in the database.
- The number of rows in the file.
Do the following:
- Under Value on file and Field db, map the columns in your file to the field names in the Contactsend database.
Note:
If your column names match those in the database exactly, including upper and lower case characters and similar, the system automatically maps the fields. - Under Match, select the field that is to be used to determine that records match.
For example, the email address. - Under Operation type, select the operation that you want to carry out:
- Delete records that match.
All records that are identified as matching the condition defined in step 2 are deleted. - Delete the row where there’s not a match.
All records that are identified as matching the condition defined in step 2 are not deleted, while non-matching rows are.
- Delete records that match.
- Under options, select the following, as required:
- Don’t use first row.
For example, If it consists of the column headings. - Send me a report at the end of the process.
When the file operation is completed, send an email report with a summary of the activity. - It’s possible to simulate before performing the operation actually requested.
Instruct the system to simulate the operation so you can check it, before final execution.
- Don’t use first row.
- When you are finished, click proceed to display the next wizard step.
For the next steps, see Confirm the operation.
Confirm the operation
Once you have defined an Insert, Edit or Delete operation and clicked proceed, the system processes it, and displays the initial File operation Confirm Step 3/3 page (figure 50). At this stage, you can wait for the process to complete, or leave the page.
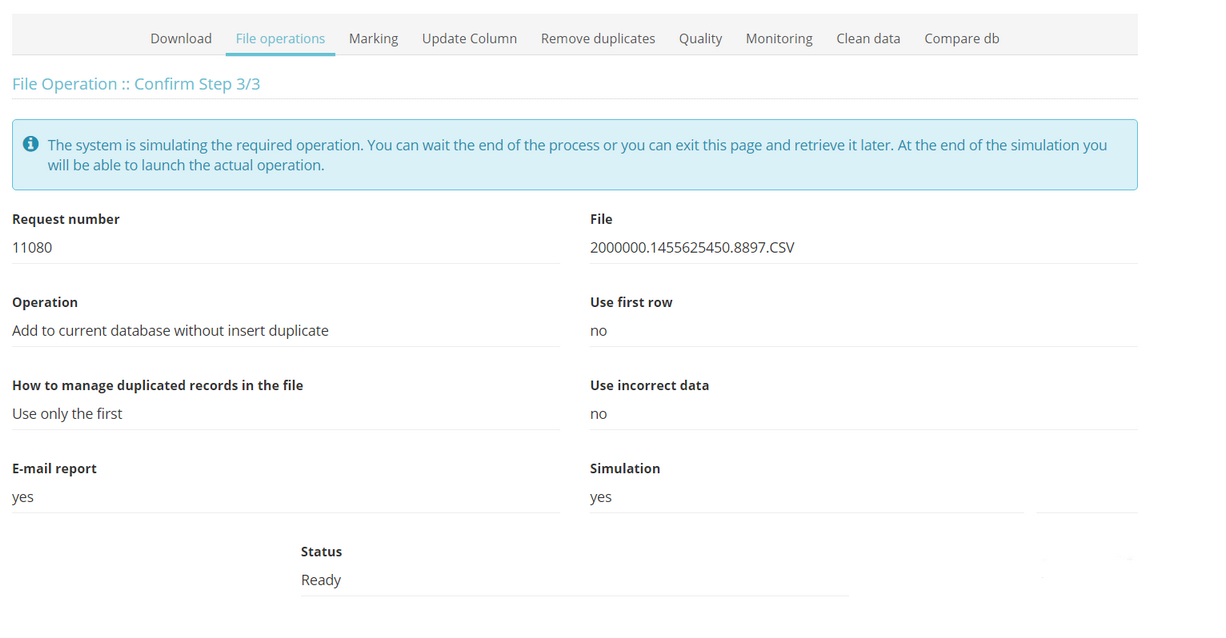
Figure 50: Example of the initial File operation Confirm Step 3/3 page, for a simulated operation
The next page that the system displays depends upon whether you have selected the It’s possible to simulate before performing the operation actually requested option, while defining your Insert, Edit or Delete request. If so, the summary page in figure 51 displays, when the process is complete. If not the summary page in figure 52 displays.
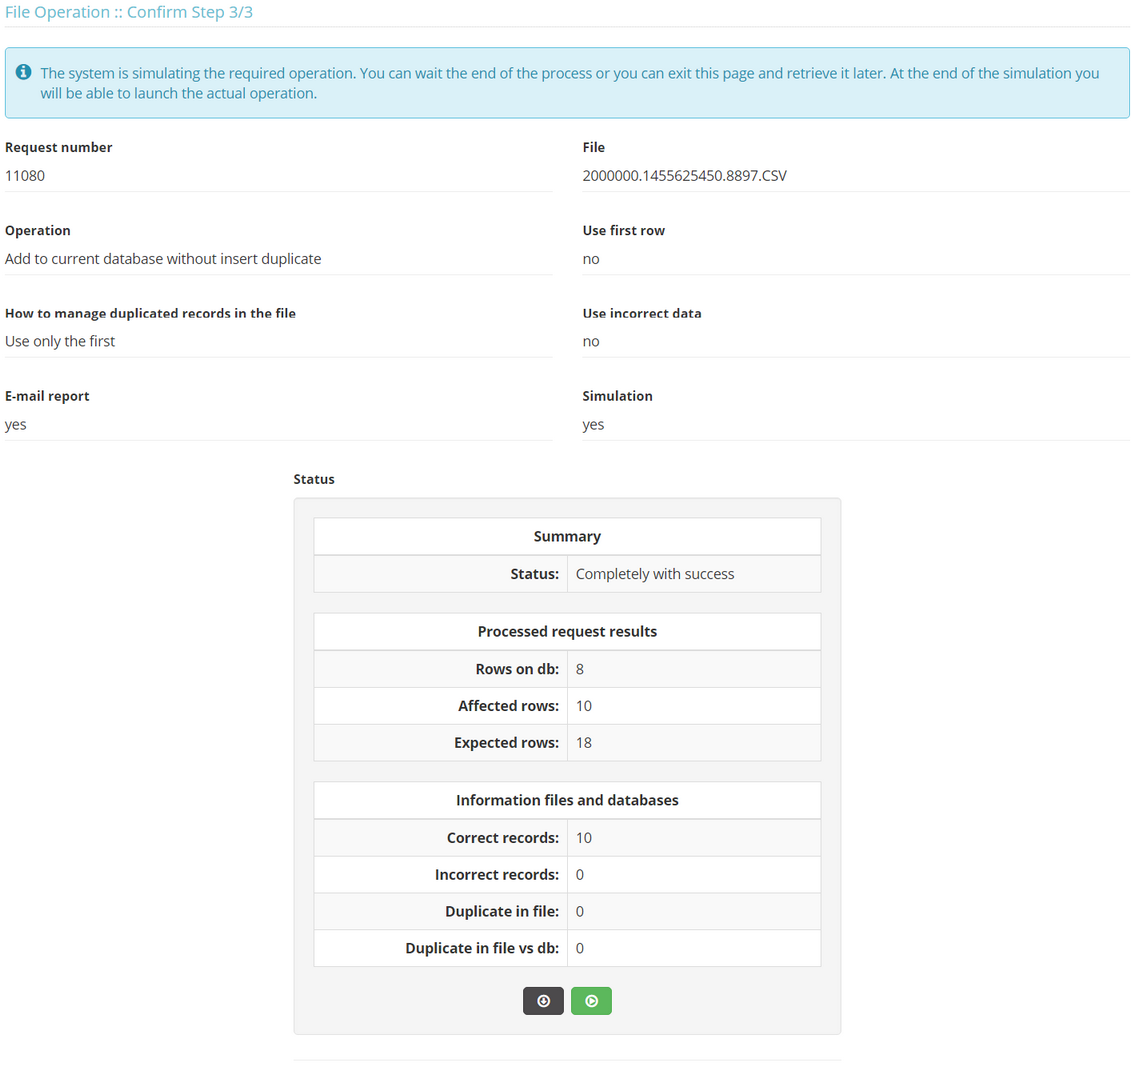
Figure 51: Example of the File operation Confirm Step 3/3 page, after a simulation
Do the following:
- Click the
 icon to download a report showing the results of the simulated operation.
Enables you to review the results before confirming the operation. - Click the
 icon to execute the actual operation.
When the actual operation is complete, a confirmation displays.
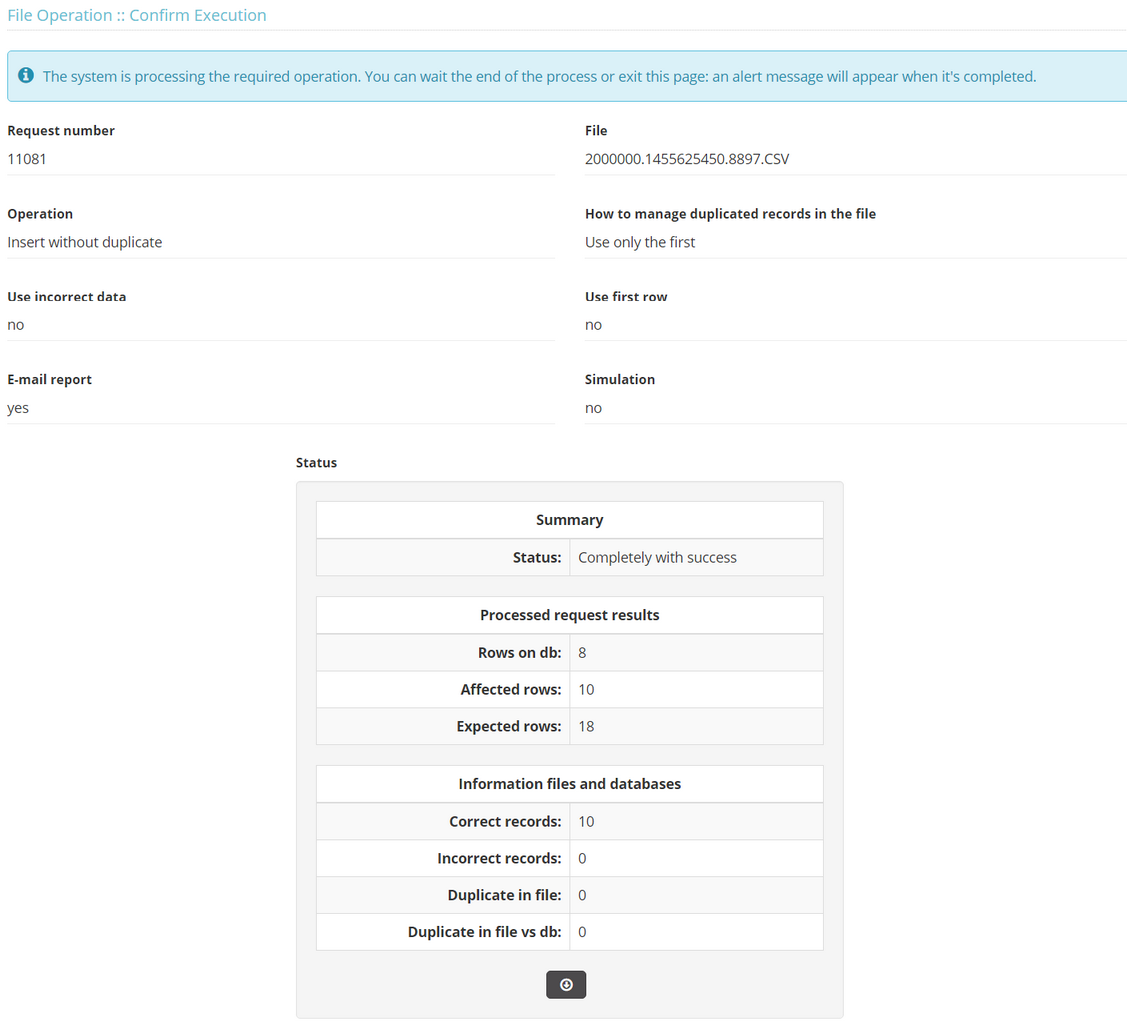
Figure 52: Example of the File operation Confirm Step 3/3 page, after a completed operation
Do the following, if required:
- Click the icon to download a report showing the results of the actual operation.
Enables you to review the results of the operation.
Mark
Note:
You require the appropriate permissions to use this tool.
The Mark section enables you to create two marker types:
- Random block marker.
Currently enables you to randomly add a marker to database rows, by entering a defined value in a specified field, to subdivide contacts (users) into multiple groups. - Behavioral marker.
Enables you to create a new field in the database, or use an existing one, to add a marker according to how a contact (user) reacts to a specific campaign.
For example, when they open a message or click a link.
To initiate a marker operation, do the following:
- Click Mark in the tools panel.
The Marking page (figure 53) displays two panels.
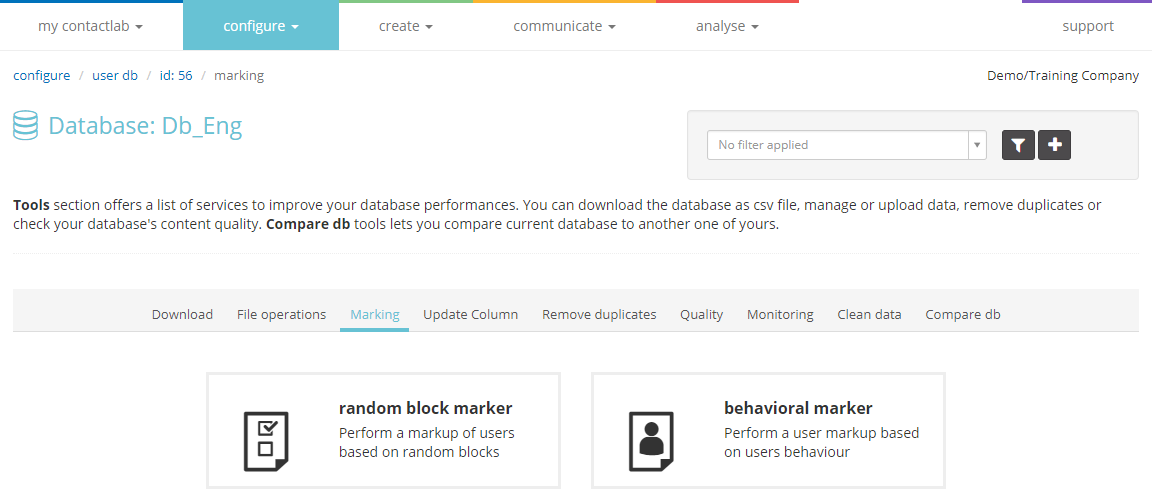
Figure 53: The Marking page
- Click the appropriate panel:
- Random block marker.
Displays the Mark the database page. - Behavioral marker.
Displays the Behavioral marker page.
- Random block marker.
To continue, select the appropriate link above in step 2, according to the marking operation that you want to carry out.
Random block marker
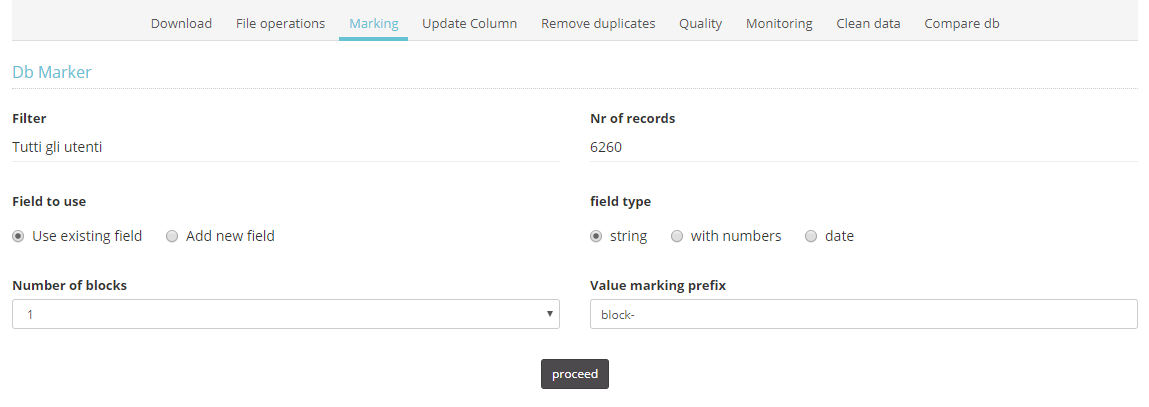
Figure 54: The Mark the database page
To configure random block marking, do the following:
- Under Field to use, select one of the following:
- Use existing field.
- Add new field.
IMPORTANT:
Take care if you choose to use an existing database field, as its values will be overwritten.
- Under Number of blocks, select how many groups you want to divide the database into.
- Under field type, select between:
- String
- with numbers
- date
- Under Value marking prefix, enter the appropriate prefix to complete the field content.
For example, Block_. - When you are finished, click proceed.
The second Mark the database page displays.
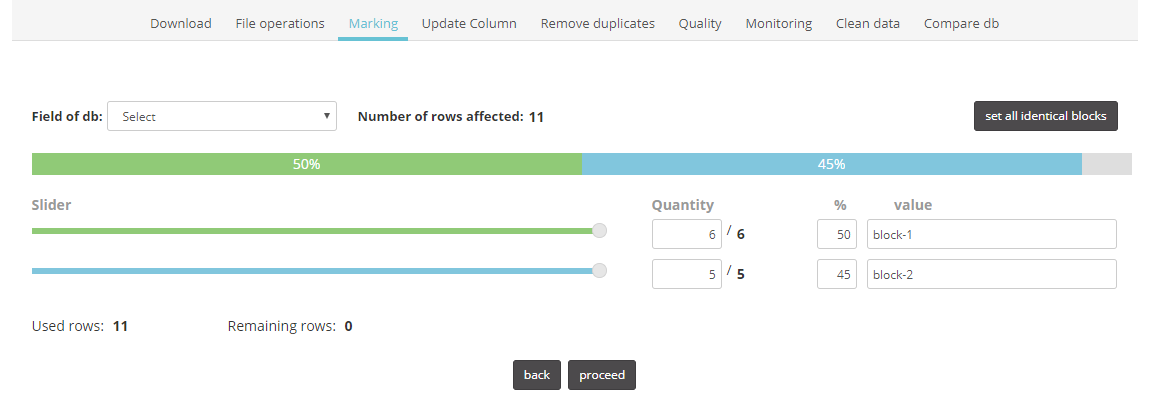
Figure 55: The second Mark the database page
- In the box to the right of Field of db, select an existing database field.
- Do one of the following:
- If you want to subdivide the database into equal-sized blocks, click set all identical blocks.
or:
- Use the Slider, Quantity or % controls to define the size of each block.
- When you are finished, click proceed.
Behavioral marker
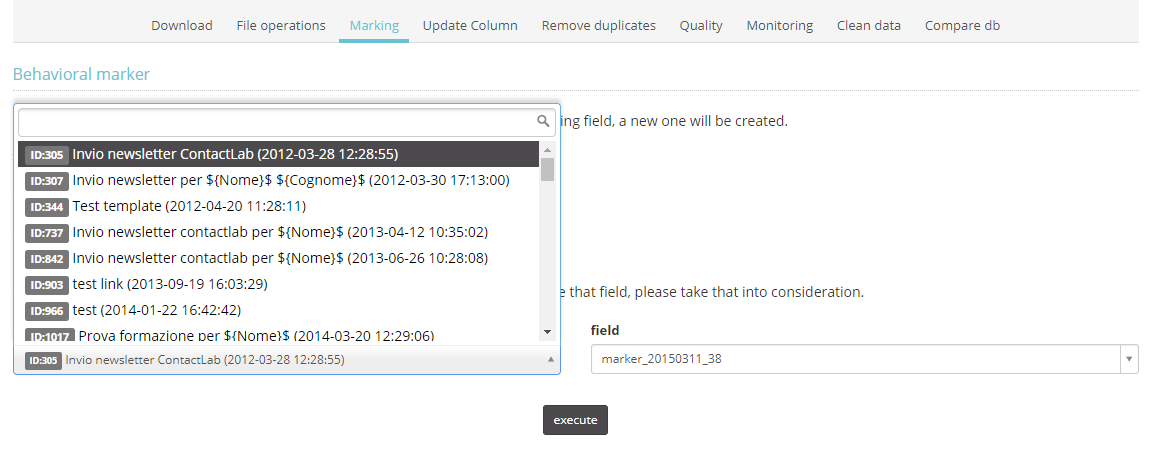
Figure 56: The Behavioral marker page
To configure behavior marking, do the following:
- Under delivery, click the downwards pointing arrow to the right of the field and select the appropriate delivery.
As an alternative, you can enter a search term to identify the required delivery. - Under field, do one of the following:
- Click the downwards pointing arrow to the right of the field and select an existing database field.
As an alternative, you can enter a search term to identify the required field.
Note:
Certain database fields, for example, the primary key field, cannot be selected.
or:
- Enter the name that should be given to a new field.
The new field is automatically added to the database.
- Click the downwards pointing arrow to the right of the field and select an existing database field.
IMPORTANT:
Take care if you choose to use an existing database field, as its values will be overwritten.
- When you are finished, click execute.
If the Mark request is correctly added, a message displays.

Figure 57: The marking confirmation message
When the process is complete, you will receive an email informing you about the correct execution of the behavioral mark, and a message is displayed.
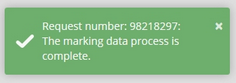
Figure 58: Example of the marking process completion message
The appropriate field can have one of the following values:
- NULL
Delivery has not been sent to the contact (user). - 0
The delivery has been sent but not opened. - 1
The delivery has been opened. - 2
A link has been clicked.
You can use these values to create filters that are based on contact activity. For example, to send targeted campaigns to contacts who have not opened a message.
Update column
The Update column section is used to globally define the value of one field, for all records in the database. You can only update one column at a time.
Before using the Update column section, you must ensure that the relevant field is visible. Do the following:
- In the Configuration panel on the database management page, click Field management.
The field management page displays.
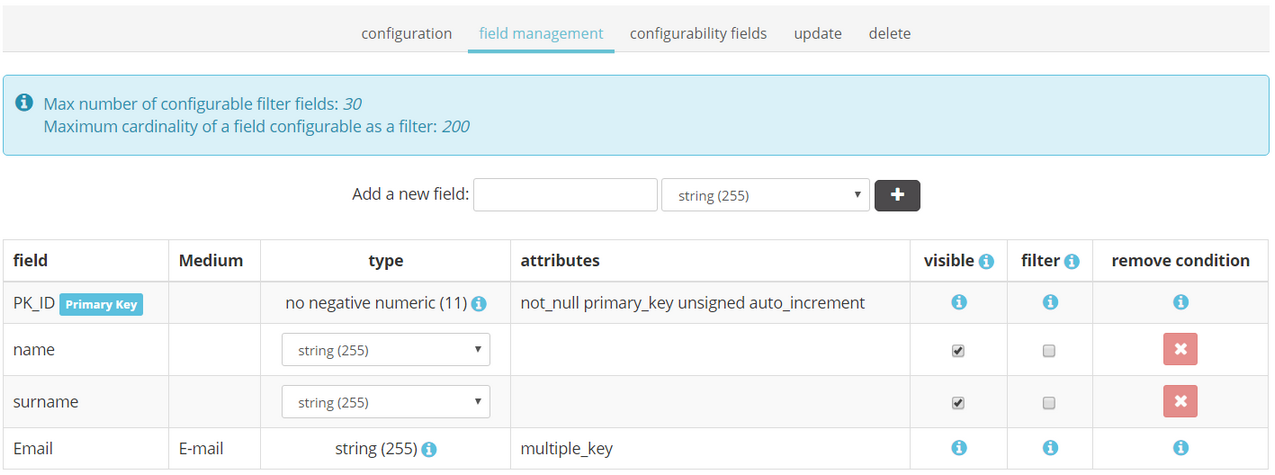
Figure 59: The field management page
- Under visible, click the check (tick) box for the relevant field, if not already selected.
The field becomes visible. - Click configure > user db and the manage icon next to the relevant database, to return to the database management page.
- Click Update column in the tools panel.
The Update Column page displays.
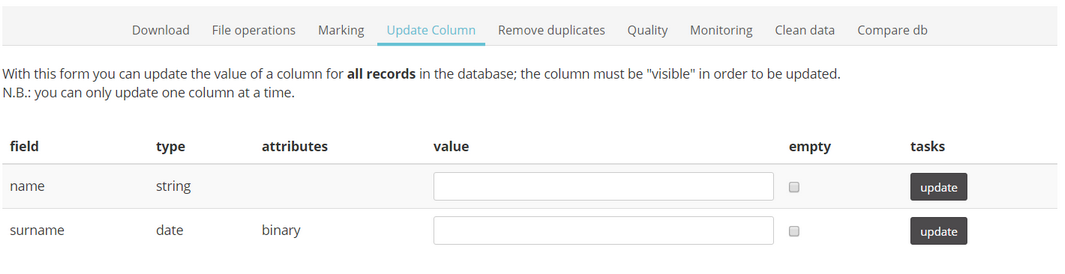
Figure 60: Example of the Update Column page
- Locate the required field and do one of the following:
- Under value, enter the required value, according to the field type.
or:
- Under empty, click the relevant check (tick) box to remove all existing values.
- When you are finished, click update.
The appropriate field change is applied to all records.
IMPORTANT:
Ensure you do not change fields that you may require later, or assign incorrect values.
Remove duplicates
The Remove duplicates section enables you to delete records in the database that have duplicated email addresses.
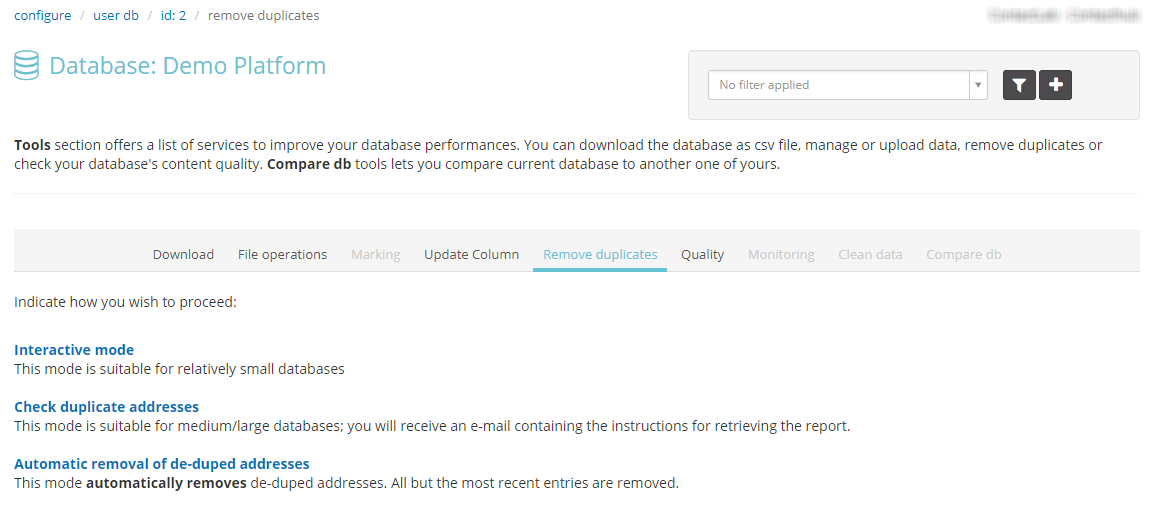
Figure 61: The Remove duplicates page
This functionality is also available for SMS and fax channels.
To initiate a duplicate removal operation, do the following:
- Click Remove duplicates in the tools panel.
The Remove duplicates page displays (figure 61).
There are three options available to you, according to the size of the database and the amount of control you want to have when removing duplicates:
- Interactive mode.
Suitable for small databases with just a few thousand records. Provides maximum control over the addresses to remove. - Check duplicate addresses.
Suitable for average size databases. Enables you to decide which records to delete. - Automatic removal of duplicate addresses.
Suitable for very large databases, but you do not have direct control over the addresses that are removed.
To continue, select the appropriate link above, according to the operation that you want to carry out.
Interactive mode
Do the following:
- On the Remove duplicates page, select Interactive mode.
The database displays. - Remove duplicates manually, by double-clicking the appropriate entry.
Check duplicate addresses
IMPORTANT:
The following steps overwrite the existing database.
Do the following:
- On the Remove duplicates page, select Check duplicate addresses.
The system exports the records to a spreadsheet, and sends you an email with instructions about downloading it. - Review the spreadsheet, delete the appropriate duplicates and save the edited file locally.
- Click File operations in the tools panel.
The File operations page displays. - On the Create new request tab, do the following:
- Under Operation type, select Insert.
- Under File to be used, click Choose file, navigate to the appropriate file and select it, then click Upload.
- Click proceed.
- On the File operation Insert Step 2/3 page, under Operation type, select Replace all contents in the database.
The existing database will be overwritten with the content of the uploaded file.
- Select other options as required.
See File operations and Insert for more details. - Click proceed.
The database is updated with the records in the spreadsheet.
Automatic removal of duplicate addresses
Do the following:
- On the Remove duplicates page, select Automatic removal of de-duped addresses.
The system automatically removes any duplicates that it identifies. The latest entry is retained, while any previous ones are deleted.
Quality control
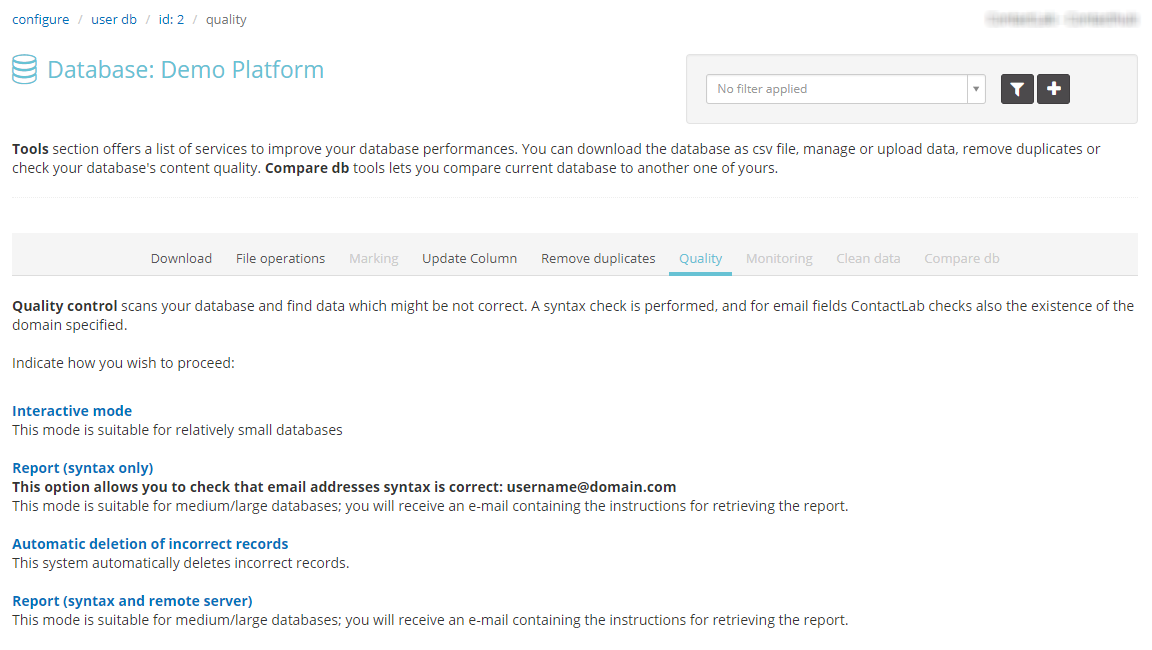
Figure 62: The Quality page
The Quality control section enables you to scan the database for data that may not be correct. The syntax of email addresses, for example, username@name.domain, is checked, while domains may also be inspected, to ensure that they exist and can be reached.
There are four options available to you, according to the size of the database and the amount of control you want to have over quality activities:
- Interactive mode.
Suitable for relatively small databases. Displays incorrect addresses in the interface and allows you to edit or delete them, as required. - Syntax only report.
Suitable for medium to large databases. Works in a similar way to Check duplicate addresses in the Remove duplicates section, allowing you to download and edit a report. - Automatic deletion or incorrect records.
Automatically removes incorrect records from the database. You do not have direct control over the addresses that are removed. - Syntax and remote server report.
Suitable for medium to large databases. Works in a similar way to Check duplicate addresses in the Remove duplicates section, allowing you to download and edit a report.
Note:
Because the Quality control operation results in an increased load on the system, it should be carried out in the evening (17.30 – 19.00) when the servers are not so busy. If you do so, other processes, such as outgoing campaigns and similar will not be hindered, and operation steps can be carried out quicker.
Clean data

Figure 63: The Clean data page
The Clean data section enables you to remove from this db the addresses that are in a suppression list (blacklist) or belong to contacts (users) who have unsubscribed through Contactsend managed links (via any unsubscribe system on any user group). No list or report of deleted records is provided.
Monitoring
The Monitoring section enables you to track database update trends over time. This is currently Beta version functionality.
Compare db
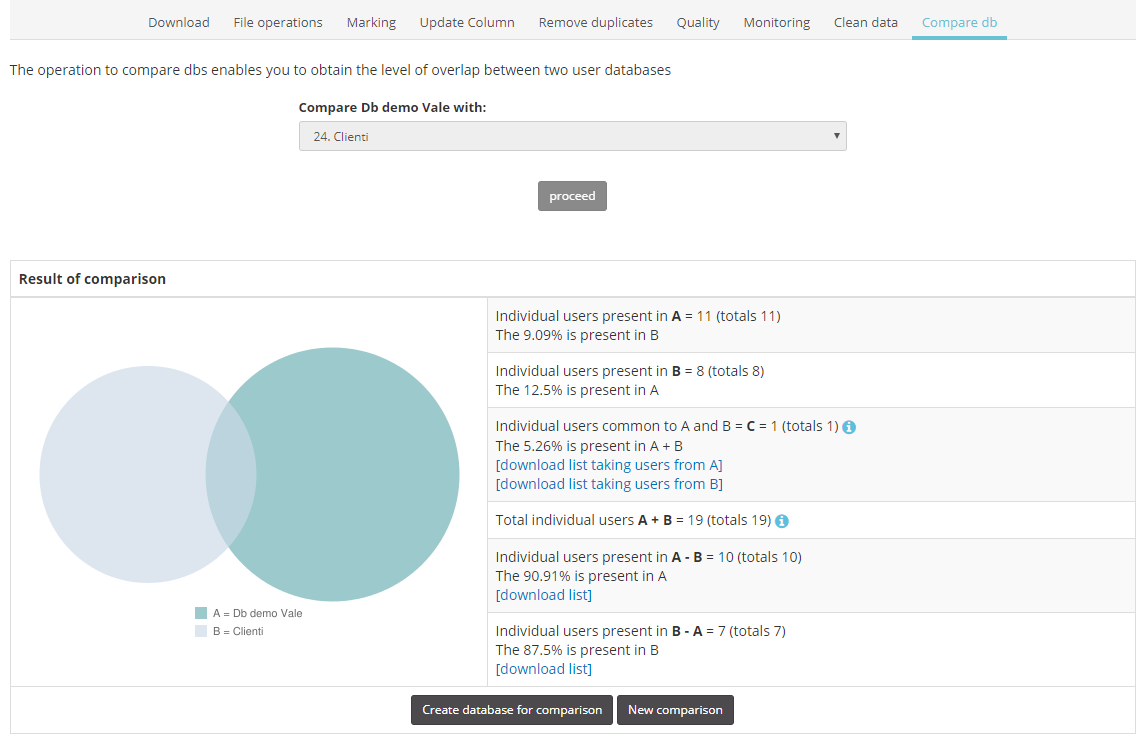
Figure 64: The Compare db page
The Compare db section enables you to compare the data in two databases, and identify overlaps in the email field. You can also download contact (user) records that are unique to each database.