
Scope
In this tutorial you will learn how to configure Contacthub to automatically send tailored emails to customers who have carried out specific actions. Doing so will not only reassure your customers that you are looking after them, but you will also demonstrate your high customer service standards.
And with Contacthub automations working together with the features of Contactsend, it’s simplicity itself to realize the benefits.
As an example, suppose you want to send a welcome email to all the users who subscribe to your newsletter, to confirm the registration and thank them for their interest.
It’s easy to activate transactional emails; you just have to follow the procedure.
Procedure
Suppose you want to send an automatic email to all those who subscribe to Maison Contactlab newsletter, a fictional company with physical stores and an e-commerce website in fashion field.
Do the following:
- Sign in to the platform and click the Automations tab, followed by Create a new automation.
- The Create automation configuration page displays.
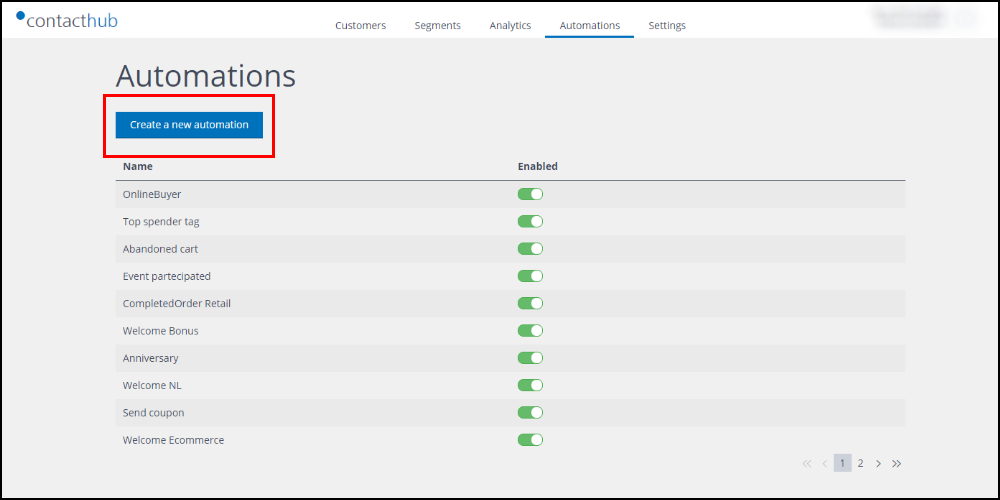
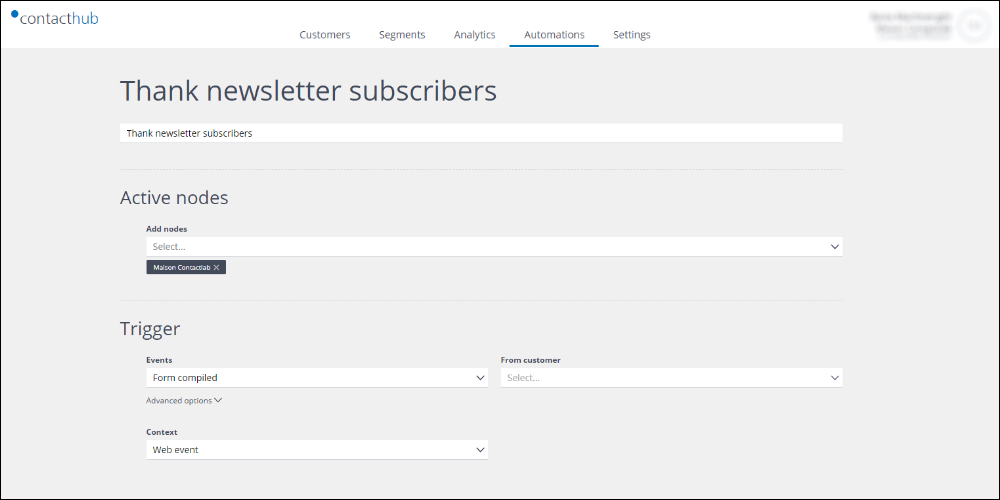
- Give the automation a unique and recognizable name, for example, ‘Thank newsletter subscribers’.
- Under Active nodes, select the appropriate node.
For this example, it should be the node where all the newsletter subscription contacts are stored. See the appropriate section in the Contacthub Guide for more about nodes. - Under Trigger > Events, select the appropriate event.
To continue with the example, Form compiled should be selected.
An event, such as a contact completing a subscription form, needs to be recorded in Contacthub for an automation to be activated.
Note:
The type of event is not the only way to define the conditions that are required to activate an automation. You can also use Advanced options and the Context field to add conditions that should be applied to the data associated with the event. - Click Advanced options and under Conditions, select formName, then enter ‘addUser’ in the available field.
Ensures that only contacts who complete the ‘addUser’ form are identified for the automation.
Under Context, select Web event.
Ensures that only web events are associated with the automation.
As a result, the automation would only be activated when a Form compiled event, using the ‘addUser’ form in a Web event context, takes place.
When you have completed the Trigger fields, you can go on to define the action that should take place. Using the example here, this is to send the appropriate email.
IMPORTANT:
Before configuring a Send Email action, you must have previously created an Immediate message template in Contactsend. You also need to know the Campaign ID and any dynamic variables that it contains.
- Under Action, click Send Email.
- Enter the relevant apiKey and userKey.
Authentication tokens provided by Contactlab when your company’s account is set up.
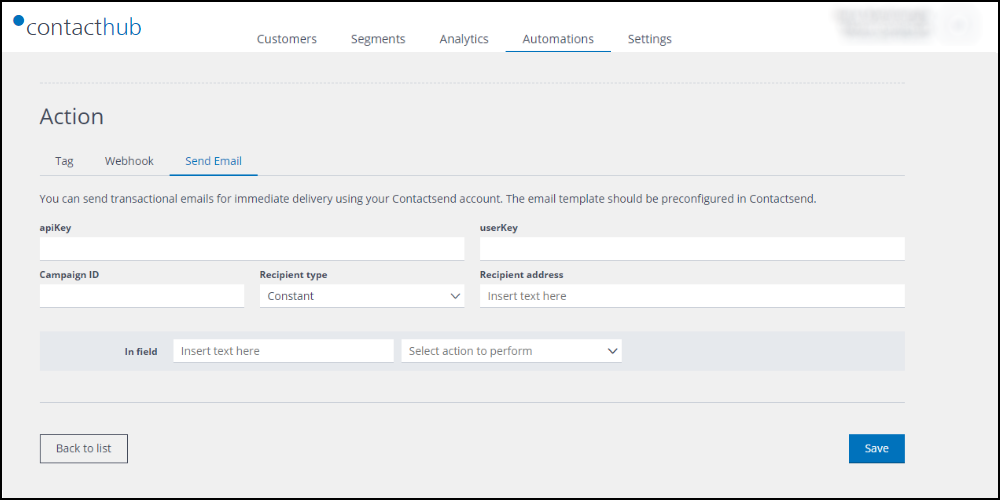
- Enter the Campaign ID and select the Recipient type.
The Recipient type can be a Constant so a fixed email address used for example, for a test delivery or it can be a dynamic Customer property. It means that the email address is taken from the customer’s profile. In this example, select Customer property. - Configure the email template dynamic fields as follows:
Under In field, insert the dynamic field name from the template and the appropriate value.
The value can be a constant, or taken from a customer or event-related property.
- When you are finished, click Save.
You are returned to the Automations management page and the automation is added to the list. It is automatically activated, but you can disable it at any time.
This is just one example of how to configure an email delivery automation. But you can use any event to create ad hoc automations such as purchase confirmation, delivery or password change emails and similar.
See the appropriate section in the Contacthub Guide for more about automations, or contact our Customer Care.