
To access the Automation section, click configure in the main menu and then click the automation panel. The Automation page displays (figure 1).
Click the appropriate link below to scroll to the information you require:
- The Overview.
- Managing DataExchange.
- Managing Reports.
- Viewing XMLDelivery logs.
- Managing Seed lists.
Overview
The Automation section (figure 1) enables you to:
- View and activate currently available DataExchange configurations.
- Define new automatic Reports and view the configuration details of existing ones.
- View XMLDelivery process logs.
- Define seed lists that are to be associated with email groups.
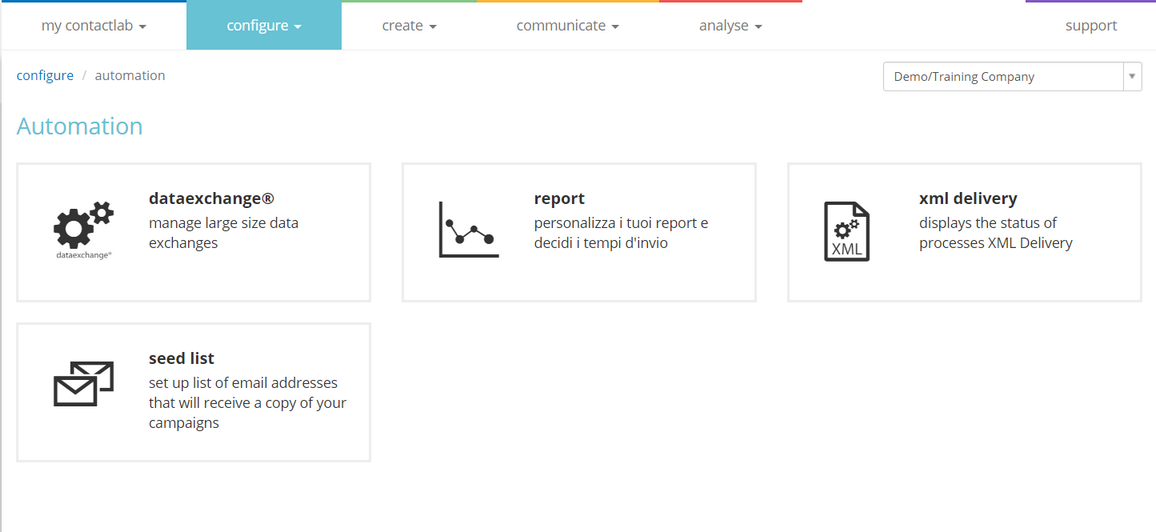
Figure 1: The Automation page
The page is subdivided into a series of panels, which you can click to access the relevant section.
To be able to use an automation, it needs to be activated for your account, and you also require the appropriate permissions. A panel appears gray if it is not available to you.
Managing DataExchange
DataExchange enables you to manage data flow automation effectively , through a range of application modules. See How does DataExchange work? for more details.
DataExchange needs to be explicitly activated and is not included in the basic contract by default.
To access the details of currently configured DataExchange modules, do the following:
- Click the DataExchange panel on the Automation page.
The DataExchange management page displays (figure 2).
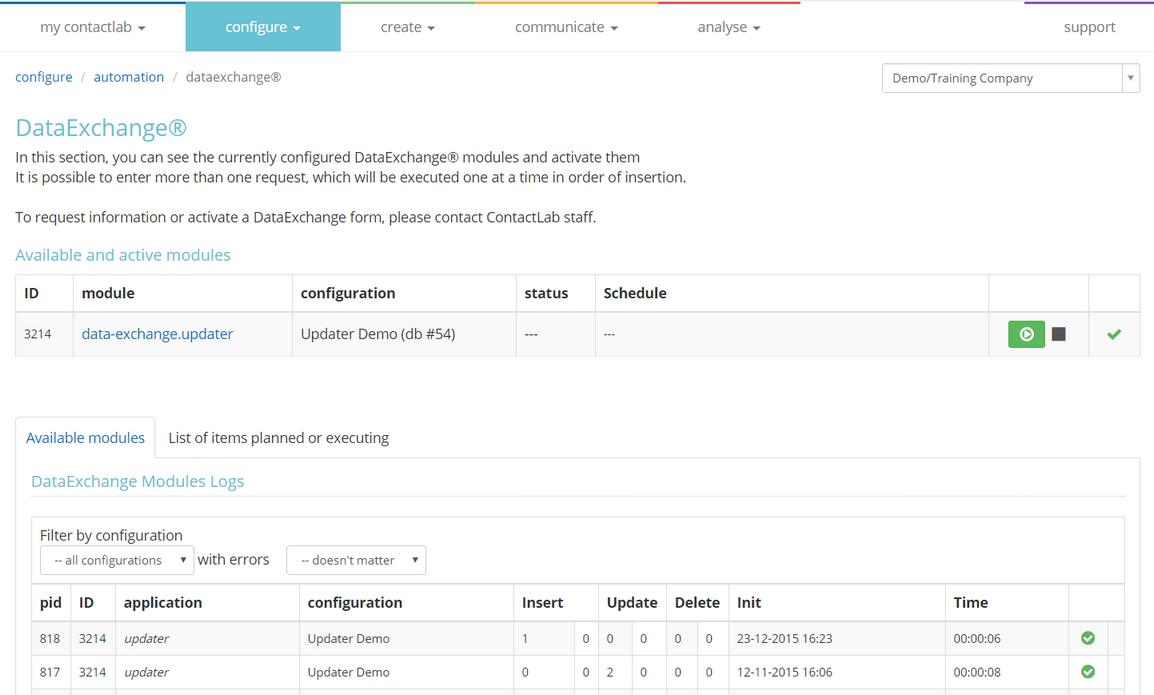
Figure 2: The DataExchange management page
How does DataExchange work?
Data exchange is bi-directional between a Contactlab client and Contactsend:
- From the client to Contactsend.
Using the DataImporter and DataUpdater modules.
Contact (user) data is imported into the specially configured Contactsend database from the client’s database, or a CSV or XML file that has been made available in a nominated SFTP space. - From Contactsend to the client.
Using DataDisplacer and DataExporter modules.
Contact (user) data or statistical information is exported from the Contactsend database to the client’s database, or to a CSV or XML file that is saved in a shared SFTP space.
DataImporter
This module imports the content of the source database or file into in the Contactsend database. You can choose whether data is overwritten or appended.
DataUpdater
This module lets you define which operation must be carried out for each record:
- Delete.
- Insert as a new record.
- Update.
The record retains its primary key and the field values are updated.
The source data must have an operation field that defines the operation to be applied. For example, D = delete, I = insert, U = update.
DataDisplacer
This module exports contact (user) data from the Contactlab database to the client.
DataExporter
This module exports campaign-related feedback and statistical data from the Contactlab database to the client, for use in their own systems.
Deploying DataExchange application modules
DataExchange modules can be deployed in two ways:
- Using cron.
- On request.
Cron
Cron is used to schedule communications between a client’s environment and Contactsend. To configure the cron schedule settings, do the following:
- In the module column of the DataExchange management page, click the name of an available module.
The DataExchange cron scheduling page displays (figure 3).
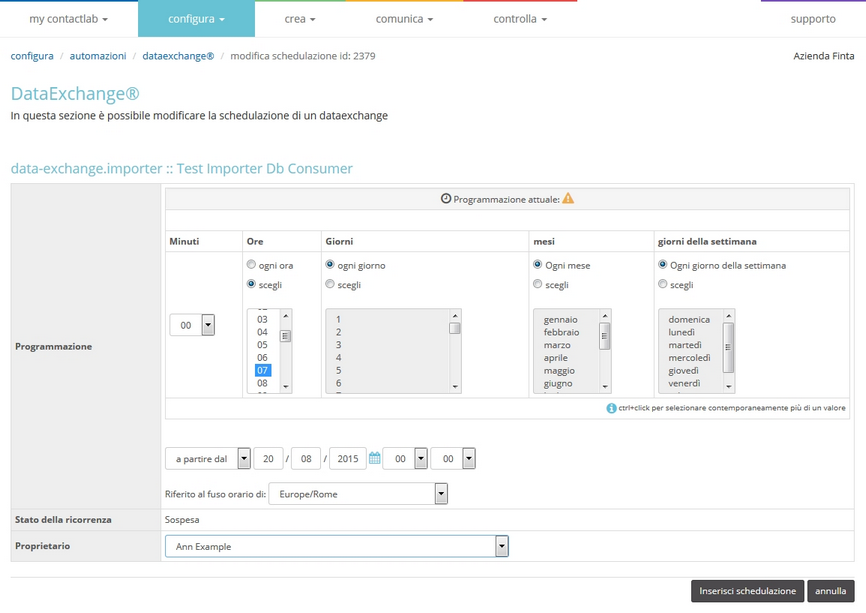
Figure 3: The DataExchange cron scheduling page
- Define the schedule as required, using the available options:
- One or more data exchanges each day.
- Data exchanges on selected days of the week.
- Data exchanges in selected months.
- Select the appropriate start and end dates.
- Select an appropriate time zone.
- When you are finished, click Insert schedule.
The schedule is applied to the module.
On request
This option enables you to manually deploy a module, as required. Do the following:
- On the DataExchange management page (figure 2), click the Run Now icon
 .
.
The module is deployed.
The on request option is always available.
Suspending and restoring an available and active module
To suspend an active module:
- Click the appropriate Pause icon
 on the DataExchange management page (figure 2).
To restore a module later:
- Click the appropriate Active recurrence icon
 .
.
Report email error codes
DataExchange report emails may include the following error codes:
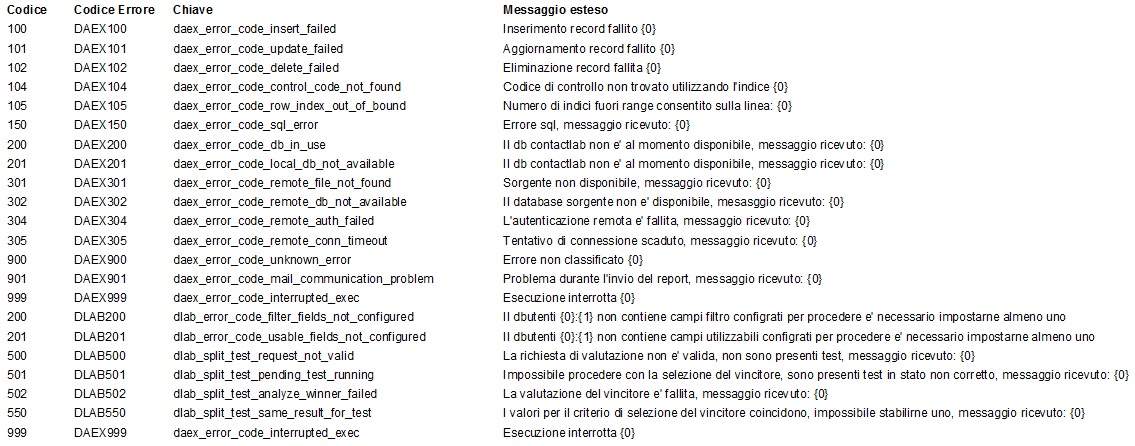
Figure 4: DataExchange report email error codes and their explanation
Downloading failed operation reports
To download a report showing the details of any failed operations, do the following:
- Click the Paper Clip icon (figure 5), positioned to the right of the appropriate entry on the DataExchange management page.
![]()
Figure 5: Example of an entry with a failed operation on the DataExchange management page
For example, if the DataUpdater module has been run, you may get a list of the contacts (users) that the system could not insert, update or delete.
Managing Reports
Reports can be configured and scheduled with just a few simple steps. You can also send them to email addresses that are not included in the Contactsend database, as required.
To view existing reports or configure a new one, do the following:
- Click the Report panel on the Automation page.
The Report management page displays (figure 6).
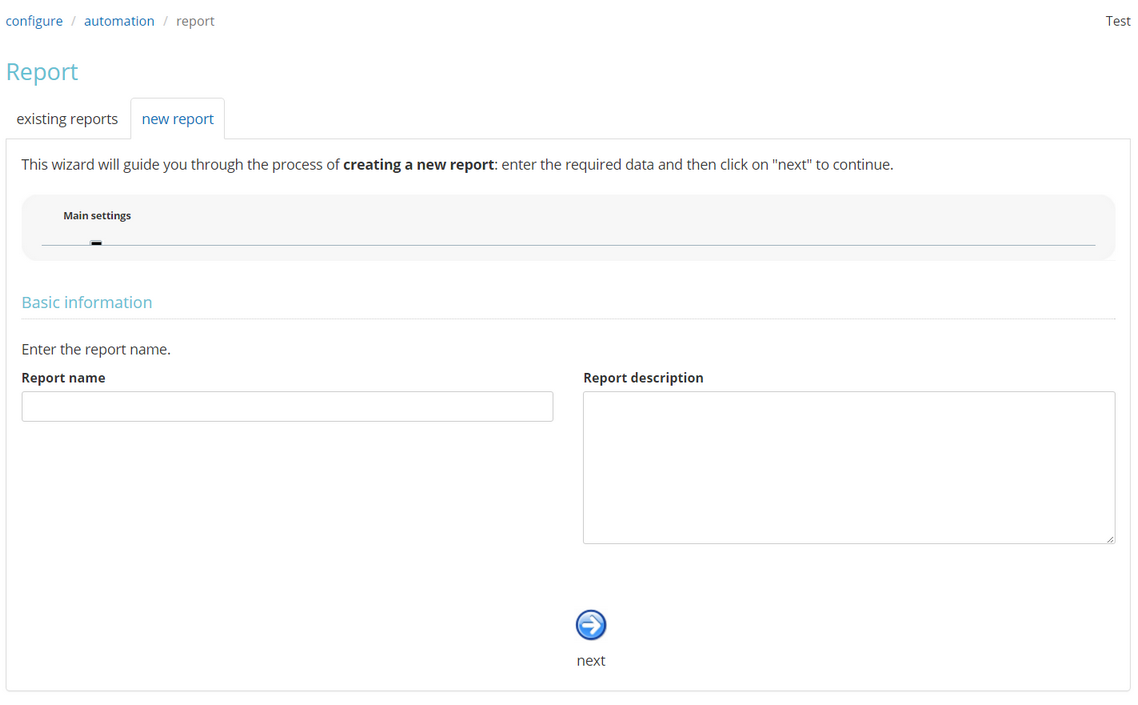
Figure 6: The Report management page
Configuring and scheduling a report
To configure and schedule a report, do the following:
- On the Report management page, select the New report tab.
The Main settings > Basic information page of the New report wizard displays (figure 6). - Enter a unique and recognizable Report name, together with a description, if required.
- Click next.
The Selection page displays (figure 7).
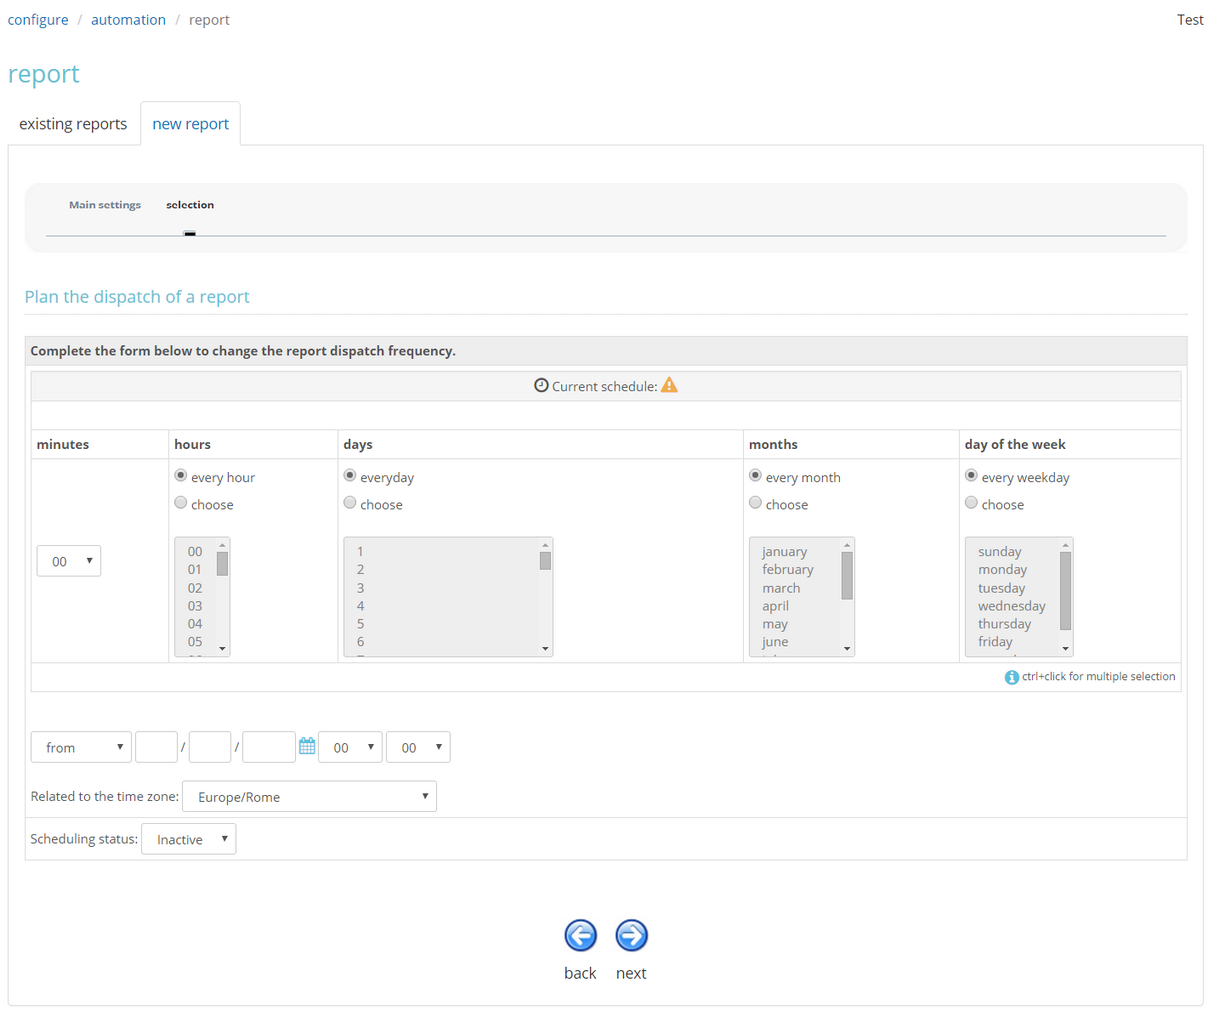
Figure 7: The Selection page
- Use the available controls to configure how often the report should be sent and from when.
- Click next.
The Recipients page displays (figure 8).
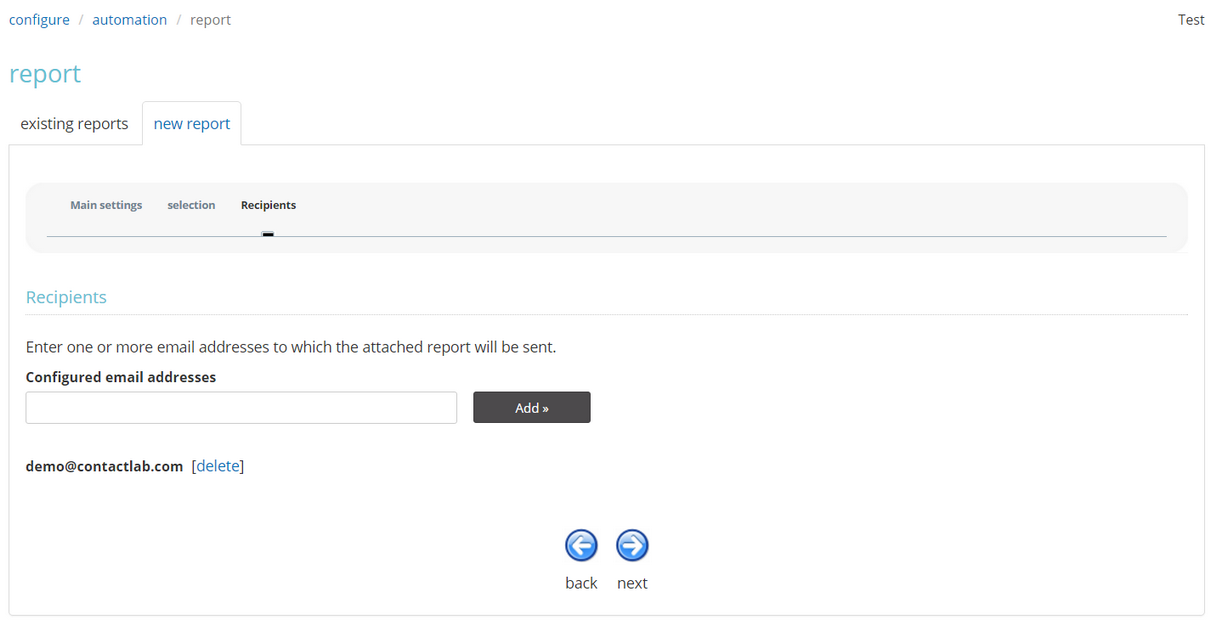
Figure 8: The Recipients page
- Enter the email addresses to which the report should be sent.
- Click next.
The Configuration report > New Report Object page displays (figure 9).
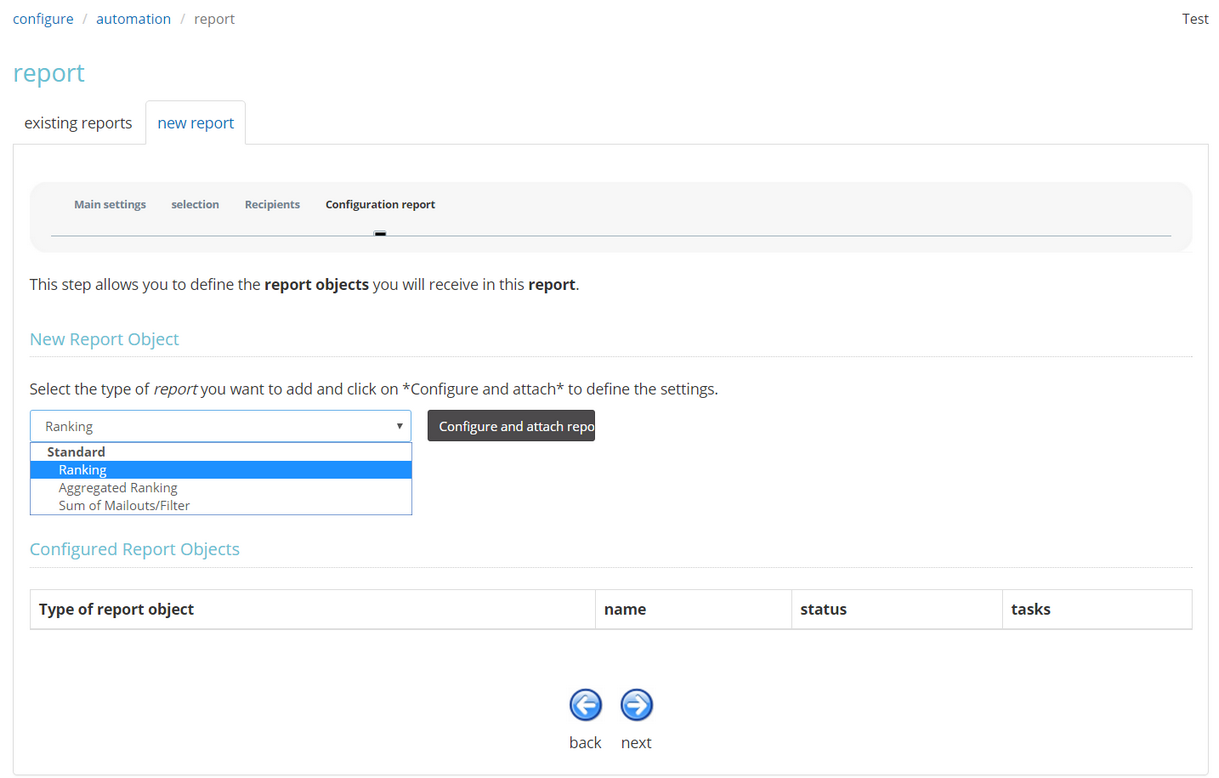
Figure 9: The Configuration report > New Report Object page
- Select the type of report that you want, using the drop-down list:
- Ranking.
Rank the deliveries within the defined period. - Aggregated Ranking.
Aggregate the values for each ranking entry. - Sum of Mailouts/Filter.
Number of contacts (users) in each filter that has been used within the defined period.
- Ranking.
- Click Configure and attach.
- Click next.
The Configuration report > Configure Report Object > Select Groups page displays (figure 10).
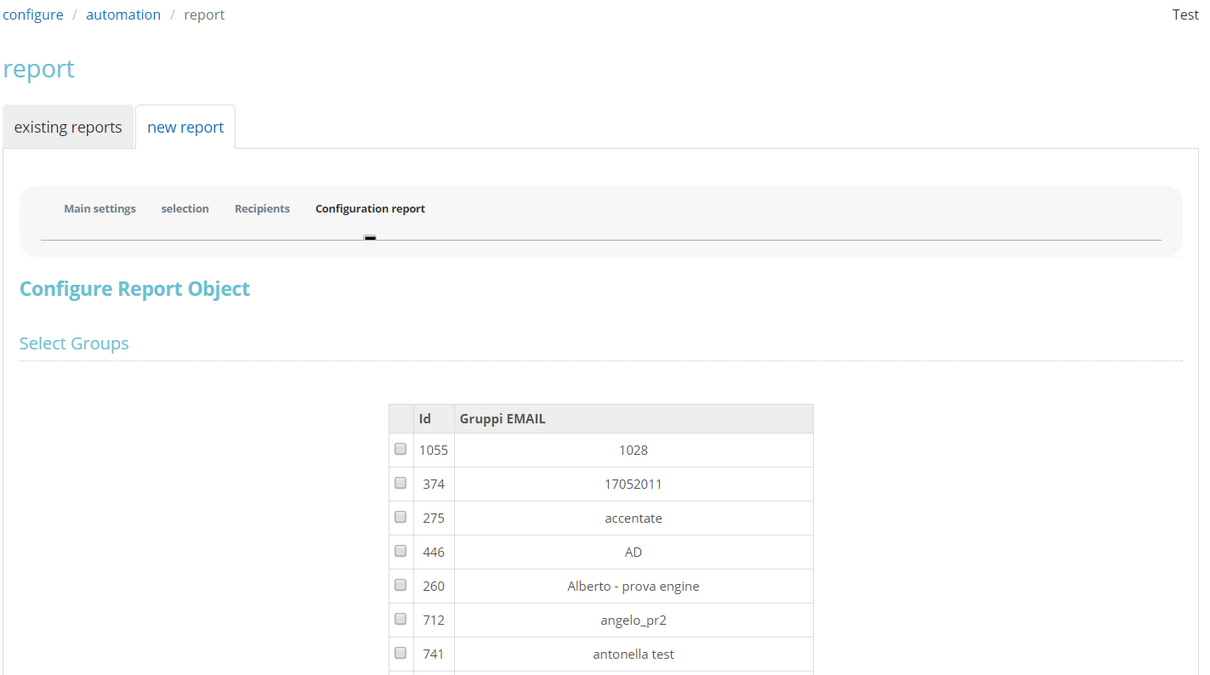
Figure 10: The Configuration report > Configure Report Object > Select Groups page
- Select the groups that you want to analyze in the report, from the displayed lists.
- Click next.
The Configuration report > Configure Report Object > Reference period page displays (figure 11).
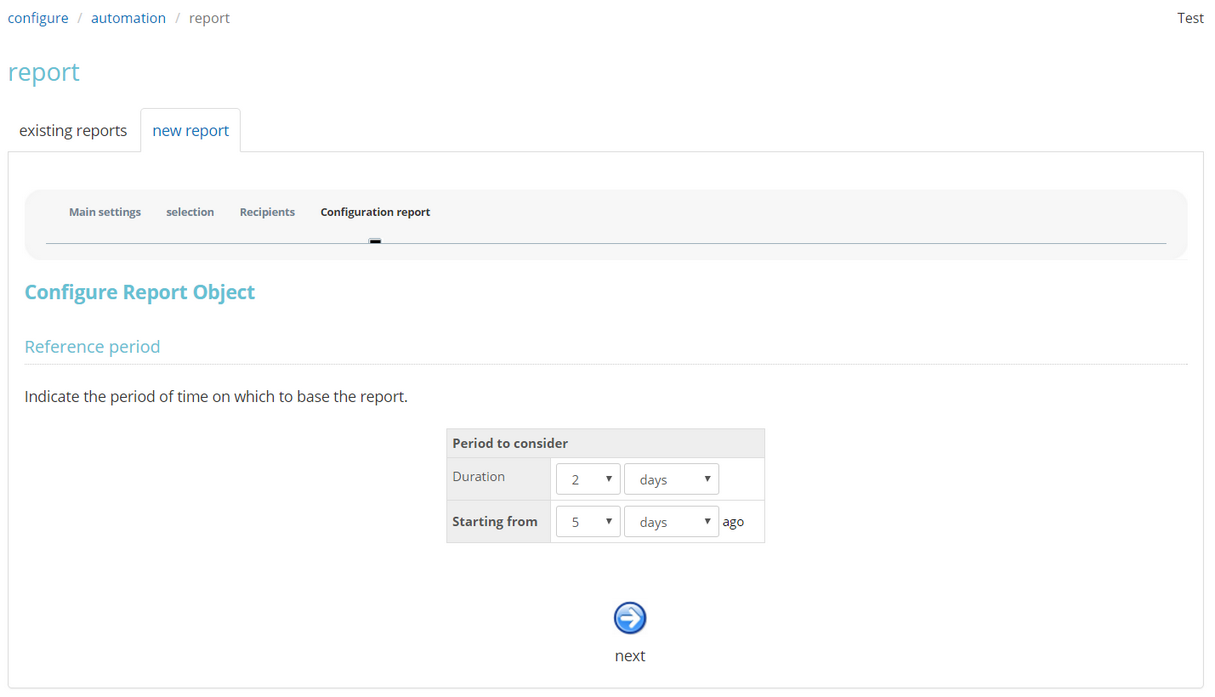
Figure 11: The Configuration report > Configure Report Object > Reference period page
- Use the available controls to define the analysis period.
- Click next.
The Configuration report > Configure Report Object > File name page displays (figure 12).
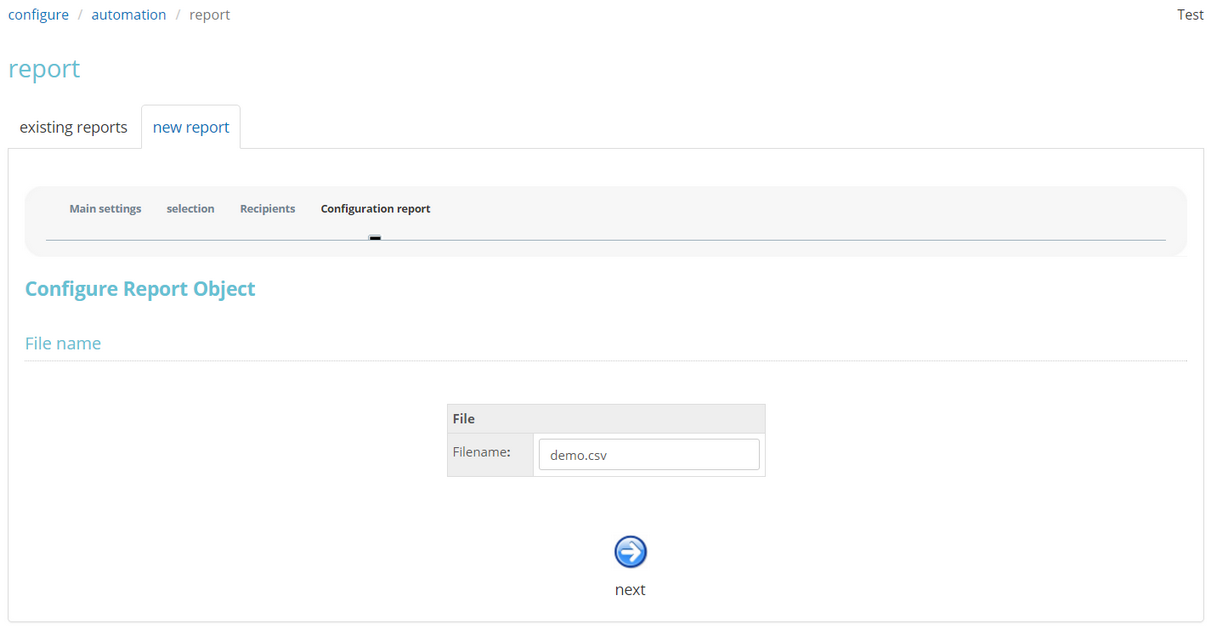
Figure 12: The Configuration report > Configure Report Object > File name page
- Enter a file name.
- Click next.
The Summary page displays (Figure 13).
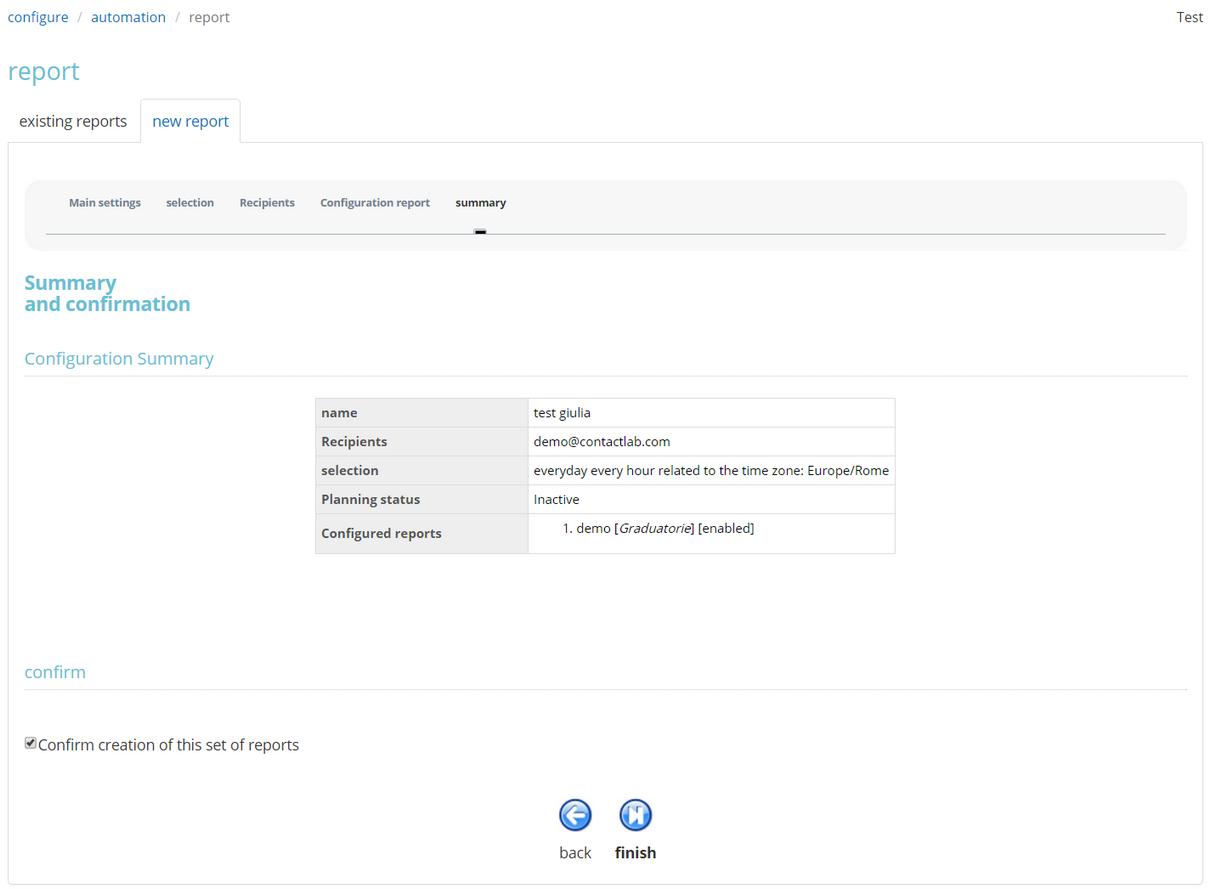
Figure 13: The Summary page
- Check the configuration and if you are satisfied, select Confirm creation of this set of reports and click Finish.
The wizard closes and the report is added to the list on the Existing reports tab of the Report management page.
You can change the report schedule as required, deliver it immediately, or delete the configuration.
Viewing XMLDelivery logs
To view XMLDelivery logs and see, for example, which ones completed successfully, or ended with errors, do the following:
- Click the XMLDelivery panel on the Automation page.
The XMLDelivery page displays, with a list of XMLDelivery processes (figure 14).
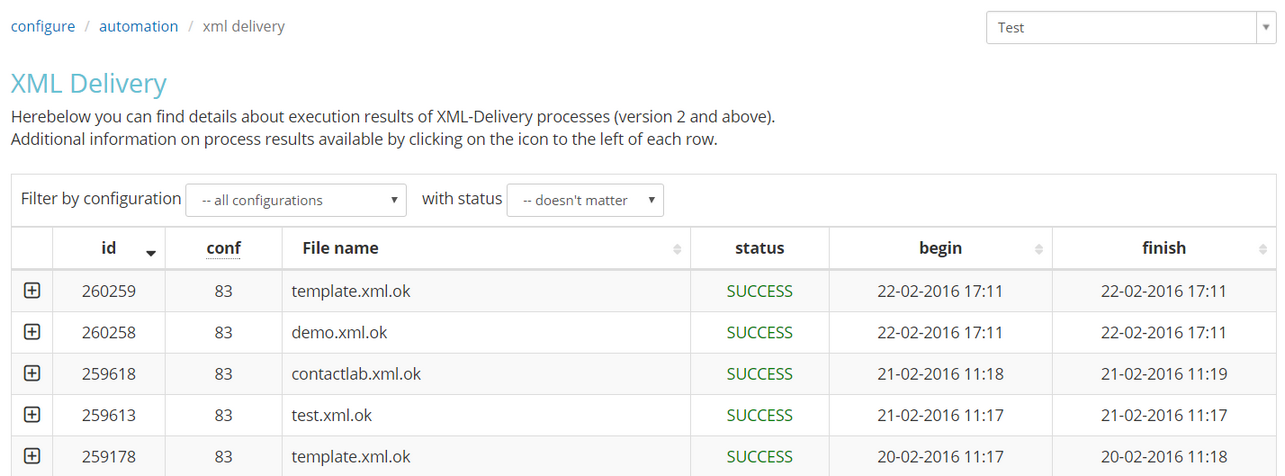
Figure 14: Example of the XMLDelivery page
Managing Seed lists
A seed list is a very useful way of controlling and monitoring deliveries. It is made up of a maximum of 30 email addresses, including ones that are not in the database, which receive copies of all real deliveries sent using Contactsend, or those sent to selected email groups.
Seed lists enable you to check whether, for example, a specific delivery is correctly received from different email servers, the message is regarded as spam, or there are any problems with the delivery.
You can use a different seed list for each email group, one for a combination of groups, or one that is active for all deliveries. You can configure a maximum of 10 seed lists.
To view existing seed lists, or create a new one, do the following:
- Click the Seed list panel on the Automation page.
The Seed list management page displays (figure 15).
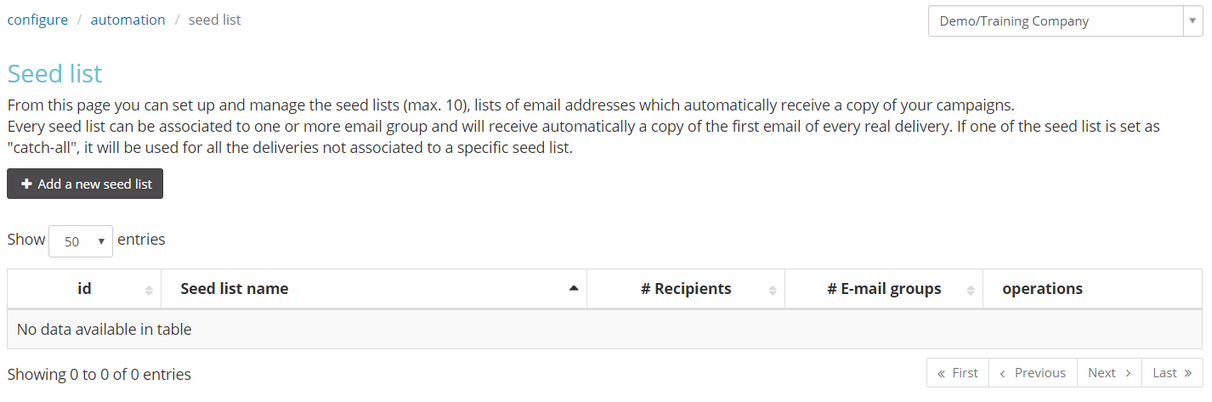
Figure 15: Example of the empty Seed list management page
To create a seed list, do the following:
- On the Seed list management page, click + Add a new seed list.
The New seed list page displays (figure 16).
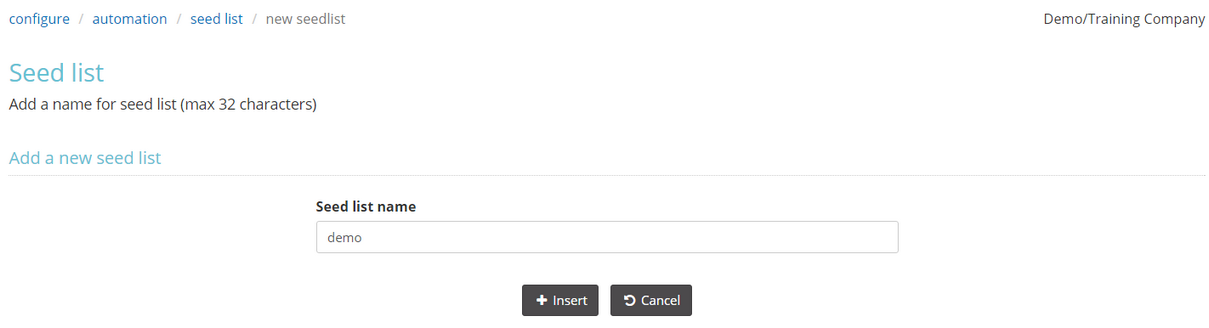
Figure 16: The New seed list page
- Enter a unique and recognizable Seed list name.
- Click + Insert.
The New seed list page closes and the list is added to the Seed list management page (figure 17).
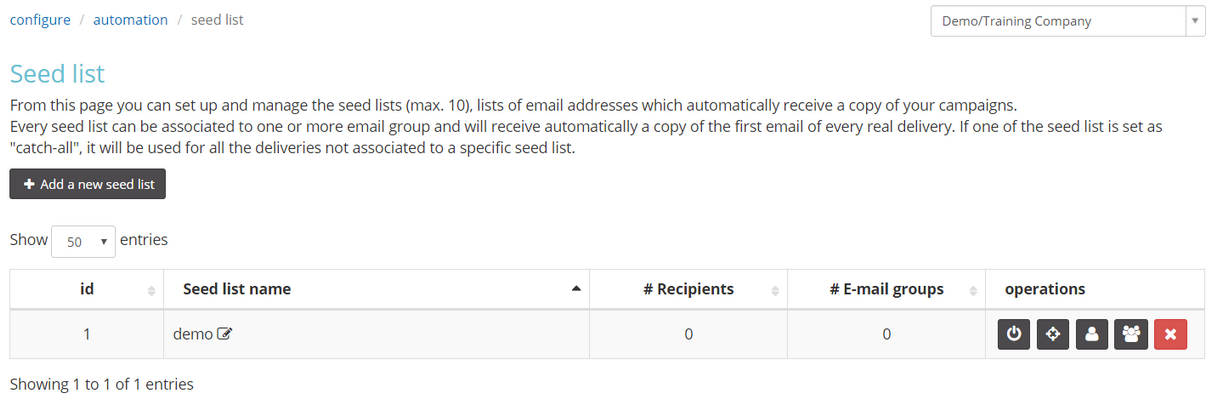
Figure 17: Example of the Seed list management page with a new seed list added
- Do the following as required:
- To add recipient email addresses, click the
 icon.
icon. - To define the deliveries that the seed list should be applied to, do one of the following:
- To associate the seed list with one or more email groups, click the
 icon.
icon.
Associating the seed list with an email group means that you do not have to repeatedly enter certain settings, which are common to different deliveries.
Remember that an email group is a container that can be used for an infinite number of deliveries. A group should not be confused with an individual delivery.
or: - To apply the seed list to all deliveries, regardless of the group, click the
 icon.
icon.
- To associate the seed list with one or more email groups, click the
- To active the seed list, click the
 icon.
icon. - To delete the seed list, click the
 icon.
icon.
- To add recipient email addresses, click the
Note:
The seed list addressees receive a copy of the first email in a Contactsend delivery. If there is personalized content, it will be the same material that is used for the first recipient. Links work correctly, but do not generate events and, as a result, they have no impact on statistics. Links managed by Contactsend, such as web version, unsubscribe and similar, do not work.