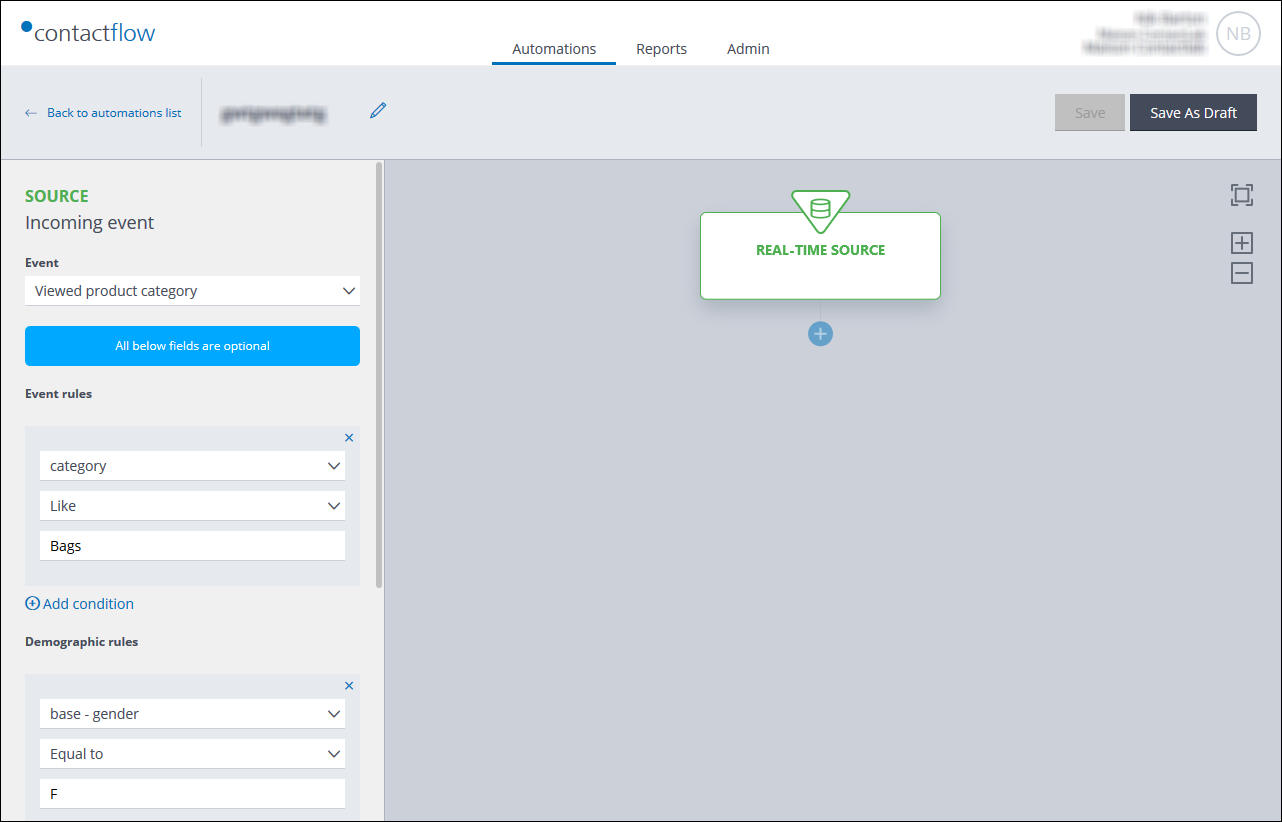
The Contactlab Marketing Cloud provides all the tools you need to manage automatic email communication plans, then engage with just the right contacts, in the most appropriate way, through personalized messages that are tailored to the individual needs and wishes of each customer.
But is this enough to successfully generate interest, or is something different required?
We have written two articles that we believe will help answer this question. We want to share some important advice with you to get the HTML to display correctly, together with suggestions about how to make messages immediately available on every device, including mobile ones, regardless of the client server involved.
But first of all, here are some of the steps that are required to create technically correct emails.

The specifications for successful emails
If you want to create a newsletter or an email campaign directly in HTML, it is useful to know the specifications that are required to ensure content displays correctly on most mail clients and services (Outlook, Gmail, and similar) and devices.
These specifications are based on the many years of experience that Contactlab staff have gained, together with the countless number of deliveries our clients have sent. We are always at hand to answer any questions or queries.
Scope
Here, you can learn high-quality HTML technical specifications that can be used with the Contactlab Marketing Cloud Send module.
General rule
An email’s HTML code must be more ‘simple and clean’ than that of a website page. Webmail services and mail clients have difficulty managing certain elements, such as style sheets, JavaScript and similar, when compared with a browser.
The following specifications also highlight the items that should NOT be included in a message, to help avoid recipient visualization problems.
What is important for you to know
- Content layout
- Recommended width
- Recommended length
- Doctype
- <title> tag in the <head>
- Bugfix in the <head>
- Meta tag
- Style sheet use
- Body
- Structure tags
- Usable newsletter attributes
- Tag attributes
- Fonts
- Preheader
- <br> not <p>
- Images
- Balancing text and images
- Image names
- Characters
- Link text
- Recommended message size
- Elements to avoid
- Contents layout
All message content must be placed within a fixed width table, by specifying the width in the <table> tag width attribute. Enter the width for each cell (for example, <td width = “121”>).
- Recommended width
While the table described in Contents layout must have a fixed width, there is no real maximum size. However, it is better not to exceed 600 – 650px, to avoid tedious horizontal scrolls for the recipient.
- Recommended length
There is no recommended length. However, for newsletters or marketing emails to be effective, you need to ensure that messages are not too long. As much content detail as practically possible should be included in web pages, with the appropriate links contained in the message.
- Doctype
To make sure that the HTML of the message is correctly interpreted, use the following doctype:
<! DOCTYPE html PUBLIC “- // W3C // DTD XHTML 1.0 Transitional // EN” “http://www.w3.org/TR /xhtml1/DTD/xhtml1-transitional.dtd “>
- <title> tag in the <head>
Enter text in the <title> tag. Avoid leaving the default text that an HTML editor enters (for example, ‘Untitled1’ or ‘New page 1’). It is better to write, for example, something similar to the email subject.
- Bugfix in the <head>
To ensure the message displays correctly, avoid the resizing of text due the zoom being used on mobile devices or in Outlook, by inserting the following code in the <head> tag:
<!–[if gte mso 9]>
<xml>
<o:OfficeDocumentSettings>
<o:AllowPNG/>
<o:PixelsPerInch>96</o:PixelsPerInch>
</o:OfficeDocumentSettings>
</xml>
<![endif]–>
<style type=”text/css”>@-ms-viewport{width:device-width}</style>
<style type=”text/css”>
html { -webkit-text-size-adjust:none;}
body, .ReadMsgBody, .ExternalClass, .multi-col .column {width: 100%; width:100% !important; margin: 0px !important; padding: 0px; display: block; -ms-overflow-style: none !important;}
.ExternalClass {line-height: 100%;}
table, tr, td {margin:0; padding: 0; border-collapse: collapse !important; mso-line-height-alt:0px; mso-margin-top-alt:0px; mso-table-lspace:0px; mso-table-rspace:0px; vertical-align: top; border-spacing: 0; }
td { font-size:0px; line-height: 0px; }
a img, img{margin: 0px; padding: 0px; display: block;}
</style>
- Meta tag
To ensure characters display correctly, including those in any online version, and to add information to any social shares on Facebook, include the following meta in the <head> tag:<meta http-equiv = “content-type” content = “text / html; charset = UTF-8”>
<meta property = “og: title” content = “TITLE” />
<meta property = “og: description” content = “DESCRIPTION” />
<meta property = “og: image” content = “URL IMAGE” />
-
-
- Style sheet use
Style sheets (CSS) should be used sparingly, as follows:·
- Do not use CSS to determine the position of an element (for example, the alignment of an image or a table, padding, float and similar).
- In the message HTML, insert the CSS:
- Internally (in the <head> tag).
- Online (insert the CSS in the cells, within a link and a <div> tag – where the class is called).
CSS attributes commonly used in newsletters:
Background-color (BACKGROUND COLOR): Hexadecimal color code, for example, # Ff0000.
Background-image: URL (‘IMAGE PATH’): background image.
Color (TEXT COLOR): Hexadecimal color code, for example, # Ff0000.
Text-align (HORIZONTAL TEXT ALIGNMENT): left, right, justify, center.
Text-decoration (UNDERLINED or NO): underline, none.
Font-family (FONT TYPE): Font name or “family” name [WEB SAFE].
Font-size (FONT SIZE): Expressed in pixels.
Line-height (INTERLINEA): Expressed in pixels.
Width (WIDTH): In pixels or %.
height (HEIGHT): Expressed in pixels or %.
Vertical-align (VERTICAL ALIGNMENT): top, bottom, middle.
IMPORTANT:
The 2 style sheets must have the same characteristics.
- Body
Insert the following style in the <body> tag, to ensure that the message centering is not affected by the default client settings:
<body style = “margin: 0; padding: 0px;”>
- Structure tags
<table> Indicates the beginning of the table
<tr> Indicates the beginning of a line
<td> Indicates the beginning of a cell
</ td> Indicates the end of a cell
</ tr> Indicates the end of a line
</ table> Indicates the end of the table
- Usable newsletter attributes
Dir (DIRECTION OF WRITING): rtl, ltr
Cellpadding (CELL INNER SPACE): Expressed in pixels
Cellspacing (SPACE BETWEEN THE CELLS): Expressed in pixels
Border (DIMENSION EDGE OF TABLE): Expressed in pixels
Align (ORIGINAL ALIGNMENT): left, right, center, justify
Valign (VERTICAL ALIGNMENT): top, middle, bottom, baseline
Bgcolor (BACKGROUND COLOR): Hexadecimal color code, for example, # ff0000 (or RGB, or color name)
Background (BACKGROUND IMAGE): Image link
Width: Expressed in pixels or %
Height (HEIGHT): Expressed in pixels or %
Colspan (NUMBER OF CELLS GROUPED IN A COLUMN): Number that identifies the sum of the grouped columns
Rowspan (NUMBER OF CELLS GROUPED IN ONE LINE): Number that identifies the sum of the grouped rows
- Tag attributes
<body> class, dir, id, lang, style, title, bgcolor, background
<table> align, bgcolor, background, border, cellpadding, cellspacing, width, height, class, dir, id, lang, style, title
<tr> No attributes
<td> align, bgcolor, background, colspan, width, height, class, dir, id, lang, nowrap, rowspan, valign style, title
- Fonts
The fonts that are used in messages must be web safe, so they appear the same on different operating systems. A list of safe fonts can be found here.
The font size should be the absolute value in pixels. To prevent mobile devices from modifying the size, insert the following in the internal CSS:
css-webkit-text-size-adjust: none;Always use a font size greater than 9px and less than 23px. The spam score increases beyond these thresholds. To ensure usability on mobile devices, the recommended font size is greater than 14px. Always define a line spacing that is more than 4px bigger than the font size.
- Preheader
The preheader – also known as the ‘eyebrow’, is the first line of text in an email, which enables the reader to immediately see the main contents at a glance. It is visible even before opening an email on Gmail, Outlook and most mobile devices. You can insert an invisible preheader that only appears in the inbox preview by using the following code:
<div class=”preheader” style=”display:none !important; visibility:hidden; opacity:0; color:transparent; height:0; width:0; color:#ffffff; font-size:1px; line-height:0; overflow:hidden; mso-hide:all;”>TESTO</div>
And the following class in the CSS:
.preheader{display:none !important; visibility:hidden; opacity:0; color:transparent; height:0; width:0; color:#ffffff; font-size:1px; line-height:0; overflow:hidden; mso-hide:all;}
- <br> and not <p>
Use the <br> tag to wrap content. You should avoid using the <p> tag, because defining a paragraph ensures that each mail client or service will alter the appearance, by associating a different top and bottom margin.
- Images
Images, if not already incorporated, must be loaded on a server, which can be the Send or other server. The absolute path should be inserted in the ‘src’ attribute of the tag. The format must be JPG, GIF, animated GIF, or PNG. We strongly advise against inserting mapped images. The file size of each image should be as small as possible, to avoid affecting the download time.
Background images
If there are background images in the HTML, avoid using white text, or text that is the same color as the <body> background. Otherwise, people that have an image block activated on their email client will not be able to see the message until the images are downloaded. Background images cannot be inserted in the style sheet, they must be included in the cell. However, if possible, avoid inserting background images, because they can increase the likelihood of display problems.
For example:
<td background=”http://domain.it/images/background_main.jpg” bgcolor=”#dadada” align=”center” style=”padding: 0px; vertical-align:top; width:600px; height: 300px;” width=”600″ height=”300″>
<!–[if gte mso 9]>
<v:rect xmlns:v=”urn:schemas-microsoft-com:vml” fill=”true” stroke=”false” style=”width:600px;height:300px;”>
<v:fill type=”tile” src=”http://dominio.it/images/sfondo_main.jpg”/>
<v:textbox inset=”0,0,0,0″>
<![endif]–>
#CONTENT
<!–[if gte mso 9]>
</v:textbox>
</v:rect>
<![endif]–>
</td>
-
-
- Balancing text and images
It’s better to avoid using just images in the HTML, because this will greatly increase the probability that the message will be regarded as SPAM . As almost all webmail services automatically block image downloads and viewing, it is also better to avoid the possibility that emails appear to be empty.As a result, we recommend using text instead of images. The recommended composition ratio for emails is 60% text and 40% images. Very large images should be subdivided into two or more pieces and then reassembled using a table.
- Images names
Give each image a meaningful name that describes what it represents. Avoid names like 001.gif, 002.gif, foto1.jpg, foto2.jpg and so on. This reduces the risk of the message being regarded as SPAM. Also avoid using spaces and accented characters when naming images. Use characters such as an underscore (for example, picture_holidays.jpg) instead.
- Characters
Beware of Word-based characters, such as quotes, ellipses, dashes and apostrophes. Replace these with the corresponding symbols, by entering them with the keyboard.
- Link text
Do not use a URL as the link text. For example, avoid links such as:
<a href=” http://www.contactlab.com/”>www.contactlab.com</a>
Some common mailing programs perform an anti-phishing check that could highlight such a link as suspicious. It is better to use simple text, such as:<a href=”http://www.tomato.it”> Tomato Interactive </a>.We also recommend:
- Entering a link that refers to a fixed page on a server, or the code:
$ {online_version_url} $
at the beginning of the relevant text, to allow the content to be viewed online and enable all recipients to see the message as intended
- Inserting a link to your Privacy Policy and information about the processing of personal data at the end of the message
- Inserting an Unsubscribe link at the end of the message, to give recipients the opportunity to unsubscribe from the newsletter or marketing messages
- Recommended message size
The maximum recommended size for the HTML is 60 KB. It is good practice to avoid exceeding 100 KB, to make sure the message is not cropped.
- Elements to avoid
- Mapped images.
Do not insert image maps. Instead, subdivide the image and reassemble the pieces in a table.
- JavaScript
Do not insert JavaScript in the message HTML.
- Flash
Do not insert Flash files (.swf) into the HTML. If you need to introduce moving elements, use animated GIFs.
Read more


 Act now to keep your campaigns up and running. If you have any questions or need support, don’t hesitate to contact our